Eyeball Cheesecake Cups
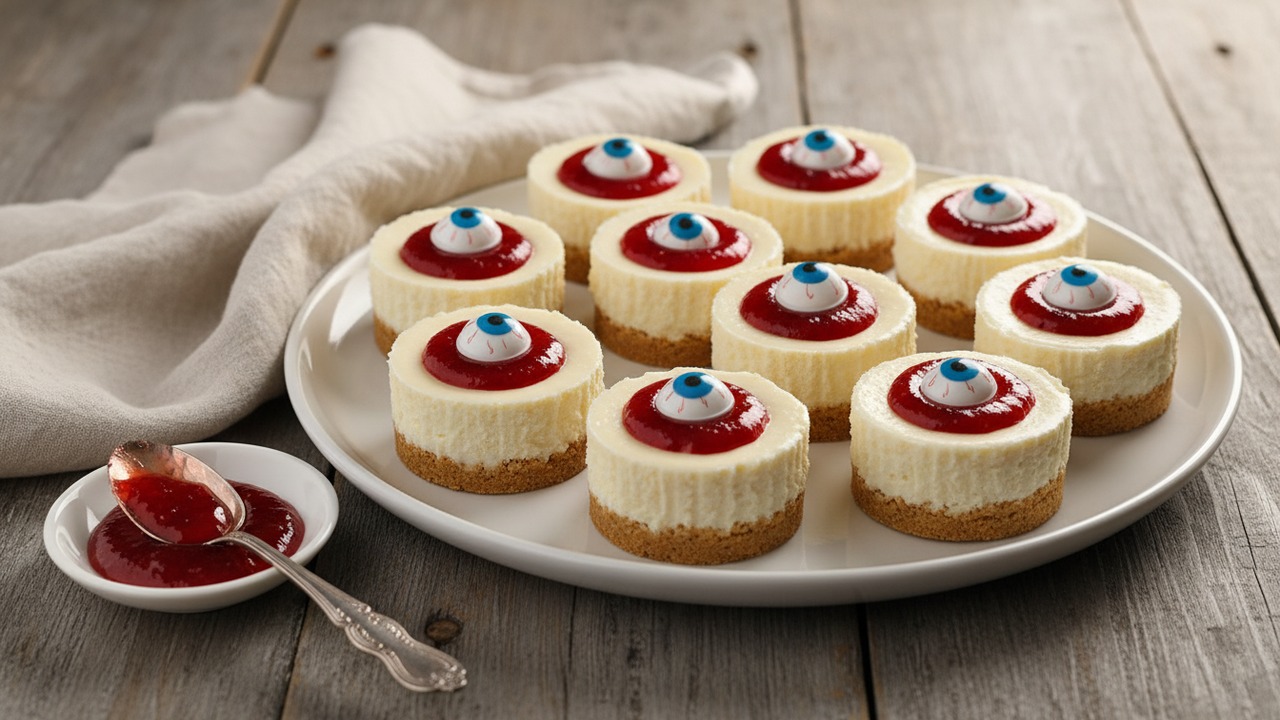
Kid-friendly, spooky no-bake cheesecake cups that look like ghoulish eyeballs — perfect for Halloween parties or classroom treats. Creamy mini cheesecakes sit in a crisp graham crust and are finished with red 'blood' jam and candy eyeballs for maximum fun and minimal fuss.
Jake Woods's note
"These no-bake cheesecake cups are quick to assemble, hold up well at a party, and delight kids with their playful eyeball decorations. Make them a day ahead so they're perfectly chilled and ready to serve."
About This Recipe
These Eyeball Cheesecake Cups are the kind of dessert that does double duty—innocent, creamy mini cheesecakes for little hands, and a delightfully spooky centerpiece at a Halloween spread. A crisp graham base gives a buttery snap under a cloudlike no-bake filling, and the glossy red "blood" of warmed strawberry jam transforms perfectly ordinary cups into ghoulish eyeballs with almost no fuss. Because they’re assembled in clear cups, the contrast between pale filling and dark crust reads beautifully from across a party table, and candy eyeballs add theatricality without any special baking skill.
What makes this version reliable at home is the balance of texture and tempo: full‑fat cream cheese for richness, whipped heavy cream folded in for lift, and an overnight chill or at least two hours to let the filling set so the jam won’t sink. Warming the jam just enough makes a smooth, paintable ring that won’t break the tops, and pressing the crust into small cups keeps each portion neat for classroom treats. These cups are forgiving—you can make the components a day ahead—and they scale easily if you need a dozen or a hundred.
Plan your timing
Ingredients for Eyeball Cheesecake Cups
- 16 oz cream cheese, softened
- 1 1/2 cups graham cracker crumbs
- 1/3 cup strawberry jam or red gel icing
- 12 pieces candy eyeballs
- 6 tbsp unsalted butter, melted
- 3/4 cup powdered sugar
- 1 tsp vanilla extract
- 1 cup heavy whipping cream (cold)
How to Make Eyeball Cheesecake Cups
Step 1: Make the graham cracker crust
Active 10 min
Combine 1.5 cups graham cracker crumbs and 6 tbsp melted unsalted butter in a medium bowl until the mixture resembles wet sand. Spoon about 2 tablespoons of the crumb mixture into each of 12 small clear cups (or 12 standard silicone cupcake liners) and press lightly to form a firm base — this recipe makes 12 cheesecake cups. Set the prepared cups on a tray and refrigerate while you make the filling.For this step
- 1 1/2 cupsgraham cracker crumbs
- 6 tbspunsalted butter, melted
Step 2: Prepare the cheesecake filling
Active 12 min
Using a handheld mixer or stand mixer, beat 16 oz softened cream cheese on medium speed until smooth, about 1–2 minutes. Add 3/4 cup powdered sugar and 1 tsp vanilla extract and beat until combined, then in a separate chilled bowl whip 1 cup cold heavy whipping cream to soft peaks and gently fold it into the cream cheese mixture until smooth and airy.For this step
- 16 ozcream cheese, softened
- 3/4 cuppowdered sugar
- 1 tspvanilla extract
- 1 cupheavy whipping cream (cold)
Step 3: Assemble and chill the cups
Active 8 min · Passive 120 min
Divide the cheesecake filling evenly among the 12 prepared crusts (about 2–3 tablespoons per cup), smoothing the tops with the back of a spoon. Cover the tray loosely with plastic wrap and refrigerate for at least 2 hours (120 minutes) so the filling firms and flavors meld.Step 4: Decorate as spooky eyeballs
Active 5 min
Warm 1/3 cup strawberry jam in a small microwave-safe bowl for 10–15 seconds and stir until pourable (or thin red gel with a little water). Spoon a small ring of warm jam on top of each chilled cheesecake to look like bloodshot veins, then place 1 candy eyeball in the center of each cup. Chill briefly if the jam softens the filling; serve chilled.For this step
- 1/3 cupstrawberry jam or red gel icing
- 12 piecescandy eyeballs


- Combine 1.5 cups graham cracker crumbs and 6 tbsp melted unsalted butter in a medium bowl until the mixture resembles wet sand. Spoon about 2 tablespoons of the crumb mixture into each of 12 small clear cups (or 12 standard silicone cupcake liners) and press lightly to form a firm base — this recipe makes 12 cheesecake cups. Set the prepared cups on a tray and refrigerate while you make the filling.
- Using a handheld mixer or stand mixer, beat 16 oz softened cream cheese on medium speed until smooth, about 1–2 minutes. Add 3/4 cup powdered sugar and 1 tsp vanilla extract and beat until combined, then in a separate chilled bowl whip 1 cup cold heavy whipping cream to soft peaks and gently fold it into the cream cheese mixture until smooth and airy.
- Divide the cheesecake filling evenly among the 12 prepared crusts (about 2–3 tablespoons per cup), smoothing the tops with the back of a spoon. Cover the tray loosely with plastic wrap and refrigerate for at least 2 hours (120 minutes) so the filling firms and flavors meld.
- Warm 1/3 cup strawberry jam in a small microwave-safe bowl for 10–15 seconds and stir until pourable (or thin red gel with a little water). Spoon a small ring of warm jam on top of each chilled cheesecake to look like bloodshot veins, then place 1 candy eyeball in the center of each cup. Chill briefly if the jam softens the filling; serve chilled.
Eyeball Cheesecake Cups Tips
Soften cream cheese properly
Let the block sit at room temperature for 30–45 minutes; it should be pliable but still cool so it creams smoothly without lumps. If you’re short on time, cut it into cubes to soften faster and beat evenly.
Chill the whipping bowl
Place the mixing bowl and whip attachment in the fridge or freezer for 10–15 minutes before whipping cream to help it reach soft peaks faster and hold structure better. Cold tools make a big difference with high‑fat creams.
Pack the crust firmly
Press the graham mixture down with the bottom of a small glass or a flat measuring spoon to create a compact base that won’t crumble when you scoop. A firm crust also prevents sogginess from the filling.
Warm jam for control
Heat the jam just 10–15 seconds so it loosens and becomes pourable—too hot will melt the topping, too cool will be clumpy. Stir to a saucy consistency and transfer to a squeeze bottle or spoon for precise ring placement.
Fold, don’t beat
When combining whipped cream with the sweetened cream cheese, use a spatula and gentle folding motions to keep the mixture airy and light rather than deflating it. Overmixing yields a dense, heavy filling.
Pipe for tidy cups
Transfer filling to a piping bag (or a zip bag with a corner snipped) to portion neatly into cups and avoid smearing the rims. This is especially useful when making many cups for a party.
Eyeball Cheesecake Cups Variations and Substitutions
Gluten‑free crust
Swap graham crumbs for crushed gluten‑free graham crackers or ground gluten‑free oats and use the same butter ratio to form a stable base for allergy‑friendly treats.
Berry or cherry ‘blood’
Replace strawberry jam with seedless raspberry or cherry preserves for a deeper color and tartness; warm and strain if seeds bother you before decorating.
Chocolate‑lover version
Use chocolate sandwich cookies (crushed Oreos) for the crust and a thin ring of cherry pie filling as the red highlight for a rich, goth‑chic twist.
Dairy‑free/vegan swap
Use a firm vegan cream cheese and chilled coconut cream whipped to peaks; bind the crust with melted coconut oil instead of butter and decorate with vegan candy eyes.
How to Store and Make Eyeball Cheesecake Cups Ahead
Store assembled cheesecake cups tightly covered in the refrigerator for up to 3 days; the jam will keep but may bleed slightly into the top layer over time. For longer storage, freeze the un‑topped cups (skip the jam and eyes) for up to 1 month in an airtight container and thaw overnight in the fridge before finishing. Do not leave these at room temperature for more than two hours because of the dairy.
What to Serve With Eyeball Cheesecake Cups
Serve these chilled on a black or matte tray to make the red jam pop, and space them so each guest can grab a single cup. Pair with warm spiced apple cider or a not‑too‑sweet coffee to cut through the richness, or present them alongside plain baked apples or simple sugar cookies for a kid‑friendly spread.
Eyeball Cheesecake Cups FAQs
Can I make these ahead of time?
Yes—prepare the crusts and filling a day in advance, assemble and chill, and add the warmed jam and candy eyes just before serving to keep the presentation crisp.
My filling is grainy—what happened?
That’s usually from cold cream cheese mixed too quickly; ensure the block is softened and beat until smooth before adding sugar, and sift powdered sugar if you suspect clumps.
How do I stop the jam from running?
Warm the jam slightly and stir to a pourable but thick consistency; a thin ribbon works best, and chilling the cups first helps the jam set quickly without sinking.
Can I use low‑fat cream cheese or half‑and‑half?
Low‑fat versions may yield a thinner, less stable filling and change the mouthfeel—if using them, add a bit more whipped cream and chill longer, but full‑fat is recommended for best texture and taste.
Will the candy eyes melt or bleed color?
Most commercial candy eyes are stable at refrigerator temperatures and won’t bleed, but avoid prolonged contact with very moist jam; place them gently on top after the jam has set for a minute or two.
About the author
Jake WoodsHello, I'm Jake. I started this recipe site with the idea that I hated recipe websites that overwhelm you with long stories and ads just to see plain content that's not helpful. My goal is to provide you with quality recipes, simple ideas and a fun cooking experience. There's lots of fun things to cook, and I think as you browse the site you'll find that TopShelf.Recipes is the place for quality recipes on the web.
See all recipes by Jake Woods →Ratings & Reviews
Did you make this recipe?
Be the first to share your experience.
Nutrition Facts
Per serving: about 1 cup
Nutrition values are estimated from USDA ingredient data and may vary based on preparation, brands, and portion sizes. Values are provided for informational purposes only.
Keep Reading
Guides & articles for this recipe
Guides
Grilled & Campfire Seasonal Sweets: 12 Crowd‑Favorite Desserts and How to Make Them Year‑Round
A season-by-season guide to 12 grill- and campfire-friendly desserts with flame-safe techniques, make-ahead strategies, vegetarian and gluten-free swaps, plus serving and storage tips so your outdoor sweets shine any time of year.

Guides
Summer Weeknight Grilling Playbook: 4-Week Rotating Meal Plan with Quick Seasonal Recipes, Make‑Ahead Sides & Grill‑First Desserts
A practical, four-week summer grilling playbook built for busy weeknights: 12 fast mains, 8 make‑ahead sides, 4 grill-forward desserts, weekly shopping lists, prep timelines, and smart tips for backyard, tailgate, or campsite cooking. Get the rhythm of easy, seasonal grilling that keeps dinner fresh and fast.

Recipes
DIY Edible Monster Eyes Candy
Make safe, fun edible monster eyes for cupcakes, cookies, and candy trays. Step-by-step recipes show baking-soda balls, chocolate and fondant eyes, wafer-print options, plus assembly, storage, and kid-friendly safety tips.
More from Desserts
View all Desserts recipes →
Gluten-Free Apple Crisp

Smoky Grilled Meringue Skewers

Charred Caramel Apple Pretzel Bites

Mint Chocolate Chip Cookies

Snake River Farms Beef Tallow Pie Crust for Savory and Sweet Pies

Creamsicle Frosé with Orange Vodka and Cream

Fresh Raspberry Sugar Cookies

Grilled Chocolate-Stuffed Pumpkin Bites

Fresh Strawberry Cheesecake Bites
Ask me anything about this recipe — substitutions, scaling, techniques, timing.
Powered by AI · 6 questions per 5 minutes, 30 per day