Grilled Mini Pita Pizzas for Kids
Fast, make-your-own mini pizzas using grilled mini pitas for a crispy base kids can top themselves. Includes kid-safe grill tips and a make-ahead topping station so busy families can serve a fun, speedy meal everyone will enjoy.
Jake Woods's note
"These mini pita pizzas are perfect for weeknight dinners, backyard cookouts, or birthday snack stations — they grill up fast, kids love assembling them, and the topping station makes prep a breeze."
About This Recipe
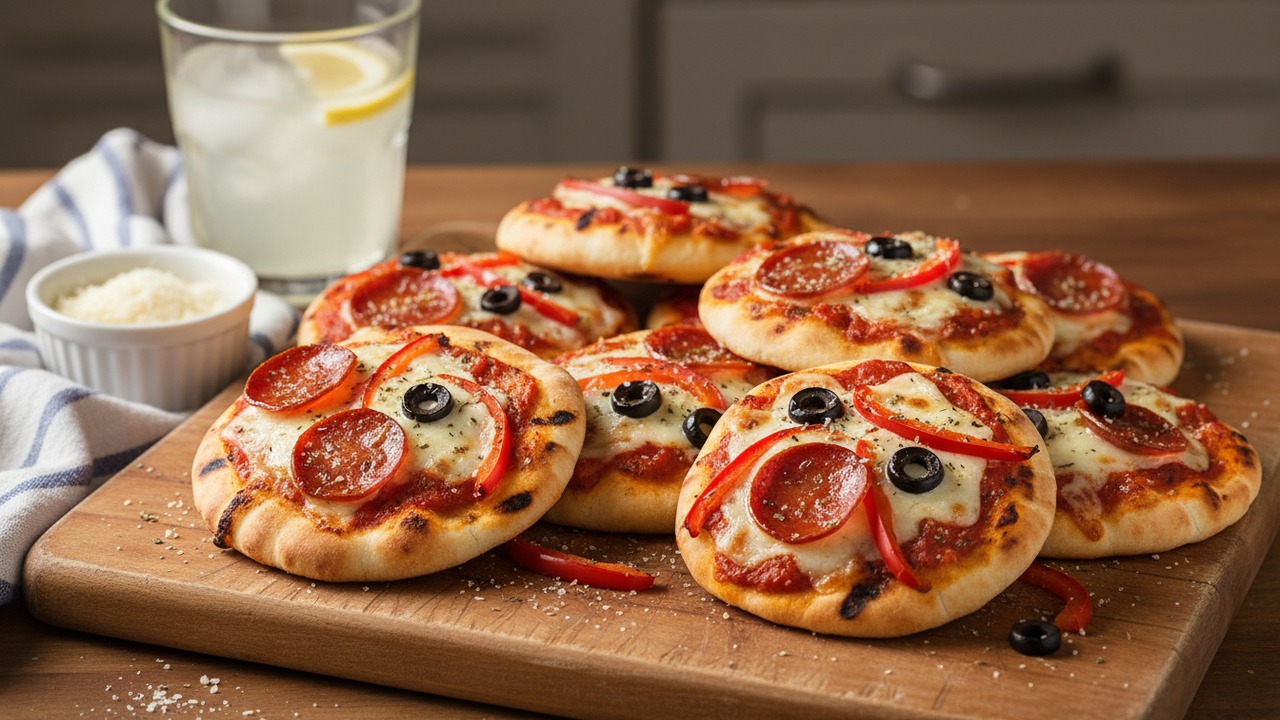
Mini pita pizzas are one of those meals that make weeknight dinners feel special without extra work. Grilling the mini pitas crisps the outsides and gives a whisper of char while the pocketed interior stays tender enough to fold — a sturdier base than dough tossed directly onto hot grates. Because each child can top their own, the meal becomes part assembly line and part creative play; the contrast of hot melted mozzarella and cool, crunchy bell pepper or briny olives keeps every bite interesting.
This version works because of two small choices: lightly oiling and pre-grilling the pitas to prevent soggy bottoms, and setting up a make-ahead topping station so assembly is fast and tidy. Encourage 2–3 toppings per pizza so everything melts evenly, and use the grill lid for a quick, consistent melt. It’s ideal for busy families, backyard playdates, or for easing picky eaters into new flavors, since each pizza can be made exactly how it’s wanted without wasting ingredients.
Ingredients for Grilled Mini Pita Pizzas for Kids
- 1 cup Pizza sauce
- 2 cups Shredded mozzarella
- 24 slices Mini pepperoni
- 1 small Red bell pepper (thinly sliced)
- 1/2 cup Sliced black olives
- 2 tablespoons Grated Parmesan
- 1 teaspoon Dried oregano
- 12 pieces Mini pita breads
- 2 tablespoons Olive oil
How to Make Grilled Mini Pita Pizzas for Kids
Step 1: Build a make-ahead topping station
Active 10 min
Set up a topping station by spooning the pizza sauce into a small bowl, placing the shredded mozzarella in a bowl, and arranging mini pepperoni, thinly sliced red bell pepper, sliced black olives, grated Parmesan, and dried oregano into separate small bowls. Cover and refrigerate any leftovers; label bowls if desired to make assembly fast for kids and caregivers.For this step
- 1 cupPizza sauce
- 2 cupsShredded mozzarella
- 24 slicesMini pepperoni
- 1 smallRed bell pepper (thinly sliced)
- 1/2 cupSliced black olives
- 2 tablespoonsGrated Parmesan
- 1 teaspoonDried oregano
Step 2: Preheat the grill and brush mini pitas
Active 2 min · Passive 6 min
Preheat a gas or charcoal grill to medium heat (about 350–400°F / 175–200°C). While the grill warms (keep an eye on it), use a pastry brush or clean hands to lightly brush both sides of each of the mini pita breads with olive oil to promote crisping on the grill.For this step
- 12 piecesMini pita breads
- 2 tablespoonsOlive oil
Step 3: Grill the mini pitas until crisp
Active 8 min
Place the oiled mini pita breads directly on the grill grates and grill 1–2 minutes per side until lightly charred and crisp but not burnt; work in batches if needed. Remove the grilled mini pitas to a baking sheet or platter to cool just enough for kids to handle safely.Step 4: Kids assemble their mini pizzas
Active 8 min
At the topping station, let kids spread pizza sauce on each grilled mini pita, sprinkle shredded mozzarella, then add mini pepperoni, red bell pepper, sliced black olives, a light dusting of dried oregano, and a pinch of grated Parmesan as desired. Encourage portion control by suggesting 2–3 toppings per pizza so everything melts evenly.Step 5: Melt the cheese on the grill
Active 4 min
Return the assembled mini pita pizzas to the grill (directly on grates or on a sheet pan) and cook with the lid closed 2–4 minutes until the cheese melts and toppings are warmed. Watch closely and remove with a spatula or long tongs once cheese is melted.Step 6: Serve, store leftovers & follow kid-safe grill tips
Active 2 min
Serve warm — a good portion is 3 mini pita pizzas per person. Store leftover pitas and toppings separately in airtight containers; reheat assembled pizzas on the grill or in a 350°F (175°C) oven 5–7 minutes to melt. Kid-safe tips: keep kids at least 3 feet from the grill, use long-handled tongs for adults, let children assemble at the topping station away from hot surfaces, and always supervise when pizzas go back on the grill.


- Set up a topping station by spooning the pizza sauce into a small bowl, placing the shredded mozzarella in a bowl, and arranging mini pepperoni, thinly sliced red bell pepper, sliced black olives, grated Parmesan, and dried oregano into separate small bowls. Cover and refrigerate any leftovers; label bowls if desired to make assembly fast for kids and caregivers.
- Preheat a gas or charcoal grill to medium heat (about 350–400°F / 175–200°C). While the grill warms (keep an eye on it), use a pastry brush or clean hands to lightly brush both sides of each of the mini pita breads with olive oil to promote crisping on the grill.
- Place the oiled mini pita breads directly on the grill grates and grill 1–2 minutes per side until lightly charred and crisp but not burnt; work in batches if needed. Remove the grilled mini pitas to a baking sheet or platter to cool just enough for kids to handle safely.
- At the topping station, let kids spread pizza sauce on each grilled mini pita, sprinkle shredded mozzarella, then add mini pepperoni, red bell pepper, sliced black olives, a light dusting of dried oregano, and a pinch of grated Parmesan as desired. Encourage portion control by suggesting 2–3 toppings per pizza so everything melts evenly.
- Return the assembled mini pita pizzas to the grill (directly on grates or on a sheet pan) and cook with the lid closed 2–4 minutes until the cheese melts and toppings are warmed. Watch closely and remove with a spatula or long tongs once cheese is melted.
- Serve warm — a good portion is 3 mini pita pizzas per person. Store leftover pitas and toppings separately in airtight containers; reheat assembled pizzas on the grill or in a 350°F (175°C) oven 5–7 minutes to melt. Kid-safe tips: keep kids at least 3 feet from the grill, use long-handled tongs for adults, let children assemble at the topping station away from hot surfaces, and always supervise when pizzas go back on the grill.
Grilled Mini Pita Pizzas for Kids Tips
Preheat for even char
Bring the grill to medium (350–400°F) so the pitas crisp quickly without overcooking; a cold grate will make oil soak in rather than sear.
Oil sparingly but well
Brush both sides of each mini pita with a thin coat of olive oil so they brown evenly and resist sogginess from the sauce.
Limit toppings per pie
Suggest 2–3 toppings to kids so the cheese melts uniformly and the pita doesn’t get weighed down or soggy.
Use the lid for melting
Once assembled, close the grill lid for 2–4 minutes to trap heat and melt cheese quickly without blowing toppings off with flare-ups.
Keep a cool assembly zone
Set the topping station away from the grill and use small bowls so kids can assemble safely and you can shuttle pizzas to the heat.
Grilled Mini Pita Pizzas for Kids Variations and Substitutions
Gluten-free mini pitas
Swap in store-bought gluten-free mini pitas and treat them the same; pre-grill carefully since some GF breads crisp faster than wheat.
Veg-forward Mediterranean
Top with hummus instead of tomato sauce, then add crumbled feta, sliced cucumber after grilling, and a sprinkle of chopped kalamata olives.
BBQ chicken twist
Use a thin layer of BBQ sauce, shredded rotisserie chicken, red onion slices, and smoked gouda for a smoky family favorite.
Sweet dessert pizzas
Swap pizza sauce for a thin smear of sweetened cream cheese, sprinkle with cinnamon sugar and mini chocolate chips, then warm briefly to melt.
How to Store and Make Grilled Mini Pita Pizzas for Kids Ahead
Store leftover grilled pitas and remaining toppings in separate airtight containers in the refrigerator for up to 3 days. Assembled pizzas are best eaten the same day, but you can refrigerate them for up to 24 hours and reheat on the grill or in a 350°F oven for 5–7 minutes until warmed and cheese is melted. Grilled pitas (without toppings) freeze well up to 1 month; thaw before reheating.
What to Serve With Grilled Mini Pita Pizzas for Kids
Serve family-style on a large platter so kids can pick and choose; offer small plates and plenty of napkins for sticky fingers. Pair with crunchy sides like carrot and celery sticks, a quick cucumber-tomato salad dressed in lemon vinaigrette, or fruit skewers. For drinks, plain milk or a lightly sweetened iced tea and sparkling water keep things simple and kid-friendly.
Grilled Mini Pita Pizzas for Kids FAQs
Can I make these without a grill?
Yes—toast the oiled pitas under a hot broiler 1–2 minutes per side or use a hot cast-iron skillet for the initial crisping, then melt assembled pizzas in the oven at 350°F until cheese is bubbly.
How do I prevent soggy pitas?
Pre-grill the pitas after oiling both sides to create a moisture barrier, and avoid over-saucing—about a tablespoon of sauce per mini pita is usually enough.
Can I assemble the pizzas ahead of time?
You can pre-assemble and refrigerate for a few hours, but the crust will soften; for best texture, assemble just before the final grill or reheat.
How many should kids eat?
Portions vary by age, but a good guideline is 2–3 mini pizzas for younger children and 3–4 for older kids or active adults; serve with veg or fruit to balance the meal.
What if the cheese isn’t melting evenly?
Close the grill lid to create an oven-like environment and move the pizzas to a slightly cooler zone so the tops melt without burning the bottoms.
Are there any safety tips for kids around the grill?
Keep kids at least 3 feet from the grill, have them assemble at a separate table, and only let adults handle placing and removing pizzas from the heat with long-handled tools.
About the author
Jake WoodsHello, I'm Jake. I started this recipe site with the idea that I hated recipe websites that overwhelm you with long stories and ads just to see plain content that's not helpful. My goal is to provide you with quality recipes, simple ideas and a fun cooking experience. There's lots of fun things to cook, and I think as you browse the site you'll find that TopShelf.Recipes is the place for quality recipes on the web.
See all recipes by Jake Woods →Ratings & Reviews
Did you make this recipe?
Be the first to share your experience.
Nutrition Facts
Per serving: 3 mini pita pizzas
Nutrition values are estimated from USDA ingredient data and may vary based on preparation, brands, and portion sizes. Values are provided for informational purposes only.
Keep Reading
Guides & articles for this recipe

Healthy Eating
Gluten-Free Weeknight Grilling Plan
A 7-day gluten-free weeknight grilling plan with quick, family-friendly recipes, prep-ahead timelines, and a printable shopping list that spotlights late-summer produce and pantry staples. Includes clear cross-contamination safety tips and simple swaps to keep dinners fast and crowd-pleasing.

Cocktails & Drinks
Shakerless Cocktails for Backyard Grilling
Easy, tool-free cocktail recipes designed for backyard grilling and outdoor hangs. Find single-serve and batch formulas, quick portable infusions, improvised gear hacks, and simple cocktail pairings for grilled meats and vegetables.

Healthy Eating
Lean Labor Day Grilling Menu
A Labor Day grilling guide that swaps heavy BBQ classics for lighter, flavorful options—think lean proteins, charred vegetables, and low‑sugar sauces. Includes make-ahead meal prep, portioning tips, and a short shopping checklist for healthy, crowd-pleasing cookouts.
More from Grilling
View all Grilling recipes →
Tandoori Yogurt Marinated Grilled Chicken (Tandoori Style on the Grill)

Labor Day Grilled Lobster Rolls with Charred Scallion Brown Butter & Lemon‑Herb Aioli

Bulgogi Smash Burger

Campfire‑Smoked Potato Salad with Mustard‑Bacon Vinaigrette — A Labor Day Grilling Side for Steak

Hanger Steak with Shallot Sauce
Grilled Pineapple Upside-Down Cake

Spicy Grilled Shrimp Skewers with Garlic Lime Marinade

Honey Garlic Grilled Thin-Sliced Chicken Breasts

Coffee and Porcini Dry-Rub Steaks with RUB PRIME STEAK Finish
Ask me anything about this recipe — substitutions, scaling, techniques, timing.
Powered by AI · 6 questions per 5 minutes, 30 per day