No-Bake Halloween Candy Skull Rice Cereal Treats
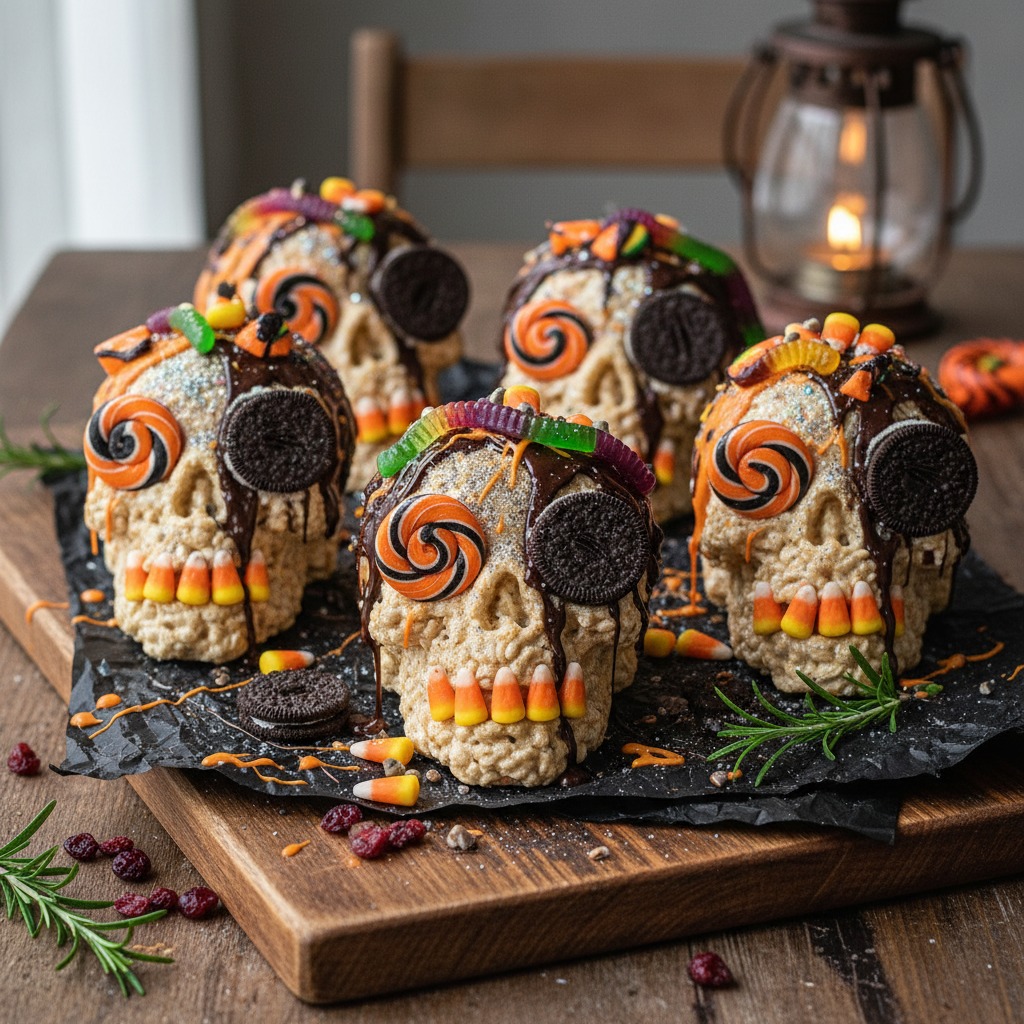
Quick, no-bake Rice Krispie–style skull treats decorated for Halloween — perfect for parties, classroom snacks, or an easy kid-friendly craft. These soft, sweet skulls are made from marshmallow and rice cereal, then finished with candy melts, candy eyes and icing for instant spooky charm.
Jake Woods's note
"These treats are delightfully simple and great for decorating with kids — customize colors and faces for a festive platter. They come together fast and hold up well for parties or school events."
About This Recipe
These No-Bake Halloween Candy Skull Rice Cereal Treats are the kind of party snack that looks like work but feels like play. The base is the familiar tender-chewy Rice Krispies-and-marshmallow combination, but shaped and packed to hold skull details so every bite gives a little crunch from the cereal and a pillowy marshmallow chew. A thin shell of melted candy adds a glossy, slightly crisp exterior that makes colors pop and makes the treats easy to handle at crowded parties or classroom events.
What makes this version sing is the balance: just enough marshmallow to bind without turning the skulls gummy, and a careful coating technique using white candy melts tinted with gel color so hues remain vibrant. Silicone skull molds (or a sharp cutter) let you produce consistent shapes, and the one-tube black icing approach gives instant character without advanced piping skills. These treats are perfect for parents, teachers, or hosts who want quick, kid-friendly decorating, and they travel well for bake sales, lunchbox surprises, or Halloween-themed platters.
Ingredients for No-Bake Halloween Candy Skull Rice Cereal Treats
- 4 tablespoons unsalted butter
- 10 ounces mini marshmallows
- 1 teaspoon pure vanilla extract
- 6 cups rice cereal (e.g., Rice Krispies)
- 8 ounces white candy melts (for coating & decorating)
- 1 teaspoon gel food coloring (assorted colors)
- 1 cup candy eyeballs or mini candy pieces
- 1 tube black decorating icing (tube) for outlines and details
How to Make No-Bake Halloween Candy Skull Rice Cereal Treats
Step 1: Melt butter and marshmallows
In a large saucepan over low heat, melt the butter until foamy. Add the mini marshmallows and stir constantly until fully melted and smooth; remove from heat and stir in the vanilla extract.For this step
- 4 tablespoonsunsalted butter
- 10 ouncesmini marshmallows
- 1 teaspoonpure vanilla extract
Step 2: Fold in rice cereal
Add the rice cereal to the melted marshmallow mixture and gently fold with a spatula until the cereal is evenly coated. Work quickly so the mixture stays pliable but avoid overmixing to keep the treats light.For this step
- 6 cupsrice cereal (e.g., Rice Krispies)
Step 3: Mold into skull shapes
Lightly spray silicone skull molds or a skull cookie cutter with nonstick spray. Press the cereal mixture firmly into the molds (or press into a lined pan and cut skull shapes after cooling). Let set at room temperature for 20–30 minutes until firm.Step 4: Prepare and apply candy coating
Melt white candy melts in microwave-safe bowls in 20–30 second bursts, stirring until smooth; divide and tint portions with gel food coloring as desired. Dip or brush skull faces with colored candy melts to create a base, then attach candy eyeballs while the coating is still tacky.For this step
- 8 ounceswhite candy melts (for coating & decorating)
- 1 teaspoongel food coloring (assorted colors)
- 1 cupcandy eyeballs or mini candy pieces
- 1 tubeblack decorating icing (tube) for outlines and details
Step 5: Add details and finish
Use black decorating icing to pipe mouth lines, nose hollows and other facial details. Let decorated skulls set completely (about 10–15 minutes) before serving or stacking on a platter.


- In a large saucepan over low heat, melt the butter until foamy. Add the mini marshmallows and stir constantly until fully melted and smooth; remove from heat and stir in the vanilla extract.
- Add the rice cereal to the melted marshmallow mixture and gently fold with a spatula until the cereal is evenly coated. Work quickly so the mixture stays pliable but avoid overmixing to keep the treats light.
- Lightly spray silicone skull molds or a skull cookie cutter with nonstick spray. Press the cereal mixture firmly into the molds (or press into a lined pan and cut skull shapes after cooling). Let set at room temperature for 20–30 minutes until firm.
- Melt white candy melts in microwave-safe bowls in 20–30 second bursts, stirring until smooth; divide and tint portions with gel food coloring as desired. Dip or brush skull faces with colored candy melts to create a base, then attach candy eyeballs while the coating is still tacky.
- Use black decorating icing to pipe mouth lines, nose hollows and other facial details. Let decorated skulls set completely (about 10–15 minutes) before serving or stacking on a platter.
No-Bake Halloween Candy Skull Rice Cereal Treats Tips
Melt on low heat
Keep butter and marshmallows over low heat and stir constantly to prevent scorching; remove from heat as soon as smooth so the mixture stays pliable for molding.
Lightly grease molds
Spray silicone skull molds or cookie cutters sparingly to ensure easy release, but avoid over-spraying which can make the cereal mixture greasy and harder to stick to the mold details.
Pack firmly, not aggressively
Press the cereal mixture firmly into molds so the skulls hold their shape, but don’t overwork it—overmixing flattens the cereal and makes the texture dense.
Temper candy melts properly
Microwave in short bursts, stirring between each; if the coating is too thick, thin with 1/2 teaspoon vegetable oil or coconut oil at a time until smooth and glossy.
Attach eyes while tacky
Press candy eyeballs into the coating while it’s still tacky for a secure bond, or use a dot of warm melted candy as glue for later placement.
No-Bake Halloween Candy Skull Rice Cereal Treats Variations and Substitutions
Chocolate skulls
Swap half the white candy melts for milk or dark chocolate melts, or fold 1–2 tablespoons cocoa powder into the marshmallow mixture for a chocolate-flavored base.
Vegan version
Use vegan marshmallows and a plant-based butter substitute, and check that your rice cereal and candy melts are marked vegan to make these dairy-free.
Gluten-free swap
Choose a certified gluten-free puffed rice cereal and confirm that your candy melts and decorations are GF, which keeps the treat safe for guests with sensitivities.
Spiced or citrus twist
Stir 1/2–1 teaspoon pumpkin pie spice or 1 teaspoon orange zest into the melted marshmallows for a seasonal aromatic boost that plays nicely with the sweetness.
How to Store and Make No-Bake Halloween Candy Skull Rice Cereal Treats Ahead
Store finished skulls in an airtight container at room temperature for up to 3 days; keeping them out of the refrigerator prevents the candy coating from sweating and turning sticky. If you need to make them a day ahead, finish the candy coating and icing the same day and layer with parchment to avoid sticking. For longer storage, freeze uncoated skulls on a sheet pan, wrap tightly, then thaw and decorate when ready.
What to Serve With No-Bake Halloween Candy Skull Rice Cereal Treats
Arrange on a platter with parchment cut to look like tombstones and sprinkle with crushed cookies or candy corn for contrast; add pretzel sticks or chocolate-dipped wafer fingers for variety. Pair with warm beverages like spiced apple cider or hot chocolate—the warm drinks balance the sweetness and make for a cozy Halloween spread.
No-Bake Halloween Candy Skull Rice Cereal Treats FAQs
Can I use regular marshmallows instead of minis?
Yes—use the same total weight but chop large marshmallows into smaller pieces to help them melt evenly; they may take a touch longer to become smooth.
Why do my candy melts clump or seize?
Candy melts seize when overheated or exposed to moisture; melt in short bursts, stir thoroughly, and avoid adding water. If too thick, thin with small amounts of neutral oil or coconut oil until spreadable.
How do I unmold skulls without breaking them?
Let molded treats cool completely at room temperature, then gently flex silicone molds to release. If still soft, chill for 10–15 minutes to firm the centers before unmolding.
Will the candy eyes stay on during transport?
Press them into the coating while it’s still tacky or adhere them with a dab of melted candy or icing; pack skulls snugly so they don’t rub together in transit.
Can I make these ahead for a party?
Yes—fully decorated skulls keep for 2–3 days in an airtight container at room temperature; for best appearance, assemble eyes and delicate piping the day of the event if possible.
About the author
Jake WoodsHello, I'm Jake. I started this recipe site with the idea that I hated recipe websites that overwhelm you with long stories and ads just to see plain content that's not helpful. My goal is to provide you with quality recipes, simple ideas and a fun cooking experience. There's lots of fun things to cook, and I think as you browse the site you'll find that TopShelf.Recipes is the place for quality recipes on the web.
See all recipes by Jake Woods →Ratings & Reviews
Did you make this recipe?
Be the first to share your experience.
Nutrition Facts
Per serving: about 2¼ cups
Nutrition values are estimated from USDA ingredient data and may vary based on preparation, brands, and portion sizes. Values are provided for informational purposes only.
Keep Reading
Guides & articles for this recipe

Recipes
DIY Edible Monster Eyes Candy
Make safe, fun edible monster eyes for cupcakes, cookies, and candy trays. Step-by-step recipes show baking-soda balls, chocolate and fondant eyes, wafer-print options, plus assembly, storage, and kid-friendly safety tips.

Recipes
No-Bake Funny Halloween Treats: 15 Quick Recipes
15 no-bake, funny Halloween treats that busy hosts can assemble in minutes — kid-friendly sweets, savory bites, and easy cocktails that don’t need an oven. Built for last-minute parties, with pantry-staple shortcuts and quick decoration ideas.

Recipes
Best Halloween Recipes For Parties
A practical guide to Halloween recipes that literally have “Halloween” in the name—party-ready snacks, kid-friendly treats, mains, drinks, and make-ahead desserts. Pick recipes, plan timing, and scale a spooky menu with straightforward shopping and prep advice.
More from Snacks
View all Snacks recipes →
Easy Peanut Butter Bars

Holiday Cranberry Maple Chex Mix

Labor Day Grilled Lobster Rolls with Charred Scallion Brown Butter & Lemon‑Herb Aioli

Snake River Farms Beef Tallow Crispy Air Fryer Chicken Wings

Strawberry Yogurt Bark

Buffalo Chicken Dip

Snake River Farms Beef Tallow Popcorn with Parmesan and Herbs

Truffle Parmesan Butter Board with Crispy Breadcrumbs

S'mores Popcorn
Ask me anything about this recipe — substitutions, scaling, techniques, timing.
Powered by AI · 6 questions per 5 minutes, 30 per day