Beer-Can Turkey
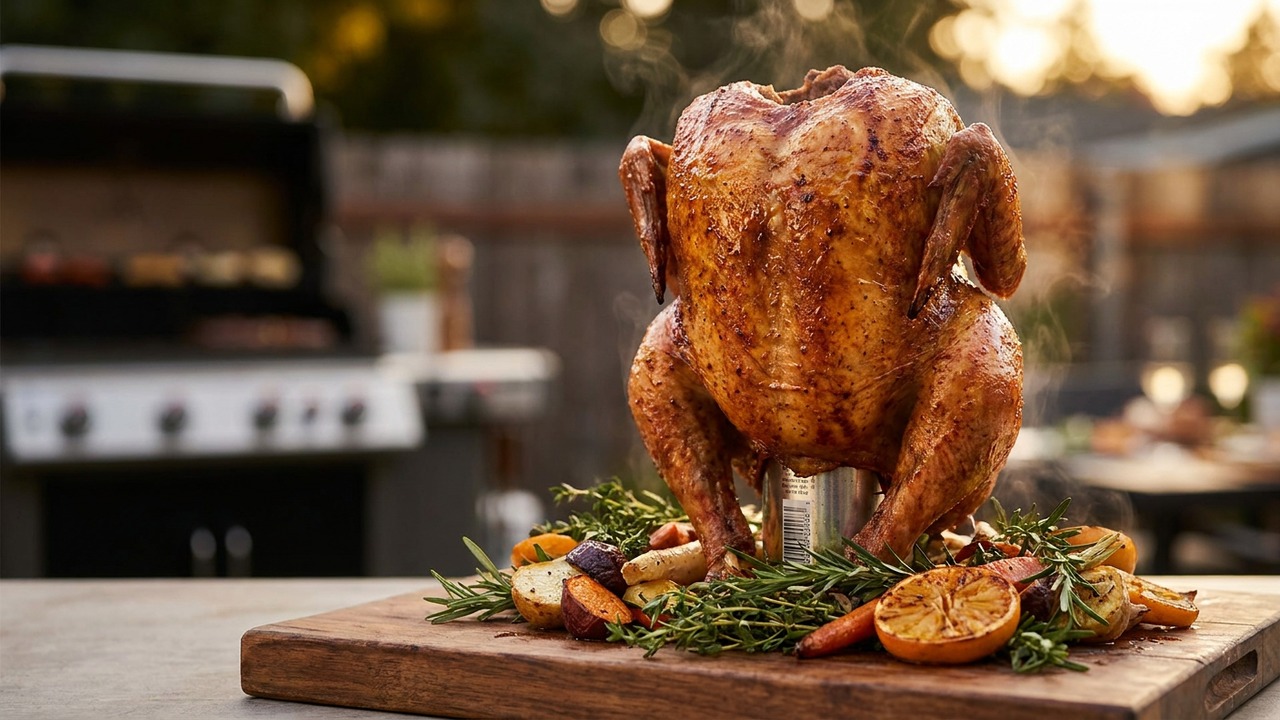
A whole turkey roasted upright on a beer can for extra moisture, steam-infused flavor, and a crisp, evenly browned skin. Ideal for backyard grills and holiday gatherings when you want roast turkey flavor with a hands-off, show-stopping presentation.
Jake Woods's note
"This beer-can method gives a reliably juicy turkey with a lightly seasoned, crackling skin — great when you want something different from the oven. It shines for outdoor celebrations and is surprisingly easy once the grill is set up."
About This Recipe
This beer-can turkey is a show-stopping hybrid of roast and grill techniques: the bird stands upright over a half-full can so the aromatics and liquid steam the inside while the outside roasts, which helps keep the dark meat juicy and encourages a deeply browned, crackling skin. The key to success here is marrying a dry-brine and herb butter under the skin with the gentle, indirect heat of a grill so you get concentrated savory flavor without soggy breast meat. Using a pale lager or pilsner gives a clean, malty backbone that won't overpower the turkey; the halved lemon, smashed garlic and onion tucked into the can contribute quick aromatics that the steam carries into the cavity.
This method is ideal for a backyard host who wants a largely hands-off centerpiece with a bit of theatrical flair—perfect for holidays or casual al fresco dinners. It works especially well with a 10–14 lb bird: small enough to heat through in 2–3 hours, large enough to carve and feed a crowd. Finish with a 20–30 minute rest to redistribute juices, remove the can carefully (it will be hot), and slice for a platter that’s both moist and beautifully browned.
Ingredients for Beer-Can Turkey
- 12 lb Whole turkey (12 lb / 5.4 kg), thawed
- 3 tbsp Kosher salt
- 2 tsp Freshly ground black pepper
- 6 tbsp Unsalted butter (softened)
- 6 sprigs Fresh rosemary and thyme sprigs
- 12 fl oz Beer (one 12 fl oz can / or 355 ml) — use a pale lager or pilsner
- 1 can-portion Aromatics for can (1 small onion, 3 garlic cloves, 1 lemon half)
- 2 tbsp Olive oil for grill and finishing (optional)
How to Make Beer-Can Turkey
Step 1: Dry-brine and season the turkey
Pat the turkey completely dry with paper towels. Rub the softened butter under and over the skin, sprinkle the kosher salt and black pepper evenly over the exterior and inside the cavity, and tuck a few herb sprigs under the skin and into the cavity. For best results, refrigerate uncovered on a rimmed sheet for at least 1 hour or overnight to dry the skin and let the seasoning penetrate.For this step
- 12 lbWhole turkey (12 lb / 5.4 kg), thawed
- 3 tbspKosher salt
- 2 tspFreshly ground black pepper
- 6 tbspUnsalted butter (softened)
- 6 sprigsFresh rosemary and thyme sprigs
Step 2: Prepare the beer can and aromatics
Open the beer and pour out (or drink) about 3 fl oz so the can is about two-thirds full; pry the pop-top off fully for safety. Nestle the halved lemon, onion wedge, and smashed garlic cloves into the can so they sit partially submerged; if you prefer, pour a couple tablespoons of beer into a small saucepan with the aromatics and simmer briefly to release flavors before returning to the can. Place the can on a sturdy, heatproof beer-can or upright poultry stand if you have one; otherwise use a half-empty can on a stable tray to catch drips.For this step
- 12 fl ozBeer (one 12 fl oz can / or 355 ml) — use a pale lager or pilsner
- 1 can-portionAromatics for can (1 small onion, 3 garlic cloves, 1 lemon half)
Step 3: Set up the grill for indirect heat
Light a charcoal grill and bank the coals to one side or arrange briquettes around a drip pan so the turkey will sit over indirect heat; target a steady temperature of 325°F (160–170°C). If using a gas grill, leave the center burners off and heat the outer burners to hold 325°F. Place a drip pan beneath where the turkey will stand to catch drippings and reduce flare-ups.Step 4: Mount the turkey and roast upright
Slip the beer can into the turkey cavity and carefully lower the bird upright so it stands on the can and its legs form a tripod. Place it on the grill over the drip pan, close the lid, and roast until an instant-read thermometer reads 165°F (74°C) in the thickest part of the thigh (about 2½–3 hours for a 12 lb turkey). Rotate the bird once if your grill has hot spots; baste lightly with olive oil or pan juices if desired in the last 30 minutes to deepen color.For this step
- 2 tbspOlive oil for grill and finishing (optional)
Step 5: Rest, remove can, and carve
Carefully transfer the turkey to a rimmed baking sheet and tent loosely with foil; let it rest 20–30 minutes to redistribute juices. To remove the can, steady the bird and use tongs to pull the can straight out (be cautious, contents are hot). Carve as usual, serving breast and dark meat; spoon pan juices over slices if you like.


- Pat the turkey completely dry with paper towels. Rub the softened butter under and over the skin, sprinkle the kosher salt and black pepper evenly over the exterior and inside the cavity, and tuck a few herb sprigs under the skin and into the cavity. For best results, refrigerate uncovered on a rimmed sheet for at least 1 hour or overnight to dry the skin and let the seasoning penetrate.
- Open the beer and pour out (or drink) about 3 fl oz so the can is about two-thirds full; pry the pop-top off fully for safety. Nestle the halved lemon, onion wedge, and smashed garlic cloves into the can so they sit partially submerged; if you prefer, pour a couple tablespoons of beer into a small saucepan with the aromatics and simmer briefly to release flavors before returning to the can. Place the can on a sturdy, heatproof beer-can or upright poultry stand if you have one; otherwise use a half-empty can on a stable tray to catch drips.
- Light a charcoal grill and bank the coals to one side or arrange briquettes around a drip pan so the turkey will sit over indirect heat; target a steady temperature of 325°F (160–170°C). If using a gas grill, leave the center burners off and heat the outer burners to hold 325°F. Place a drip pan beneath where the turkey will stand to catch drippings and reduce flare-ups.
- Slip the beer can into the turkey cavity and carefully lower the bird upright so it stands on the can and its legs form a tripod. Place it on the grill over the drip pan, close the lid, and roast until an instant-read thermometer reads 165°F (74°C) in the thickest part of the thigh (about 2½–3 hours for a 12 lb turkey). Rotate the bird once if your grill has hot spots; baste lightly with olive oil or pan juices if desired in the last 30 minutes to deepen color.
- Carefully transfer the turkey to a rimmed baking sheet and tent loosely with foil; let it rest 20–30 minutes to redistribute juices. To remove the can, steady the bird and use tongs to pull the can straight out (be cautious, contents are hot). Carve as usual, serving breast and dark meat; spoon pan juices over slices if you like.
Beer-Can Turkey Tips
Dry-brine overnight
Apply salt and refrigerate uncovered for at least overnight when possible; this firms the skin and seasons the meat more deeply than a quick rub.
Loosen skin carefully
Use a fingertip or spoon to separate skin from breast before massaging in softened butter and herb sprigs so the fat directly bastes the meat without tearing the skin.
Stabilize the setup
Use a proper beer-can stand or a wide, rimmed sheet and tuck a foil collar around the can base so the bird won’t tip when you transfer it to the grill or oven.
Probe thermometer placement
Insert the instant-read or leave-in probe into the thickest part of the thigh without touching bone to get an accurate 165°F (74°C) reading.
Manage indirect heat
Keep grill steady at about 325°F and use a drip pan; if the skin browns too fast, move the turkey slightly away from the hottest area or lower the heat.
Beer-Can Turkey Variations and Substitutions
Nonalcoholic steam
Substitute beer with low-sodium chicken broth, apple juice, or nonalcoholic beer for the same steam infusion and aromatic lift without alcohol.
Apple Cider Twist
Swap the pilsner for hard cider and add a cinnamon stick and a few whole cloves to the can for a subtly sweet, autumnal profile that pairs well with porky turkey skin.
Smoky BBQ Finish
Add a small chunk of soaked apple or hickory wood to the coals for the last 45 minutes, and brush the breast with a thin layer of maple-BBQ glaze to build a smoky-sweet crust.
Citrus-Herb Butter
Fold orange zest and chopped rosemary into the butter under the skin for brighter breast meat and a Mediterranean lift that’s great with roast potatoes.
Low-sodium option
Reduce the kosher salt by half and lengthen the dry-brine time while increasing aromatic herbs and lemon in the cavity to maintain savory complexity without extra salt.
How to Store and Make Beer-Can Turkey Ahead
Remove the beer can before storing and carve the turkey into portions, refrigerating in airtight containers within two hours. Leftovers keep well for up to 4 days in the fridge or up to 3 months frozen; wrap tightly to avoid freezer burn. Reheat gently in a 325°F oven covered with foil until warmed through (about 15–20 minutes for slices), or refresh slices in a skillet with a splash of broth to prevent drying.
What to Serve With Beer-Can Turkey
Serve this turkey with bright, acidic condiments such as a fresh cranberry relish or a lemon-herb gravy to cut the richness, plus roasted root vegetables and buttery mashed potatoes. For drinks, stick with a pilsner or amber ale to echo the cooking liquid, or choose a medium-bodied Chardonnay or Pinot Noir if you prefer wine. Carve for guests at the table for maximum impact and spoon pan juices over slices when plating.
Beer-Can Turkey FAQs
Is beer-can turkey safe to cook?
Yes, when done correctly: use a clean can emptied of most liquid, place the bird on a stable stand, and avoid using press-top cans or unpainted/decorated cans. Always remove the hot can carefully with tongs and allow juices to settle before carving.
Will the steam make the breast soggy?
Not if you dry-brine, put butter under the skin, and roast over indirect heat; those steps encourage crisping. If you see the breast lagging in color, raise the grill rack or move the bird briefly into slightly higher heat to finish browning.
Can I use a whole bottle or different can size?
The can merely serves as a narrow steam source and support; a standard 12 oz can fits most cavities best. If you use a different container, ensure it’s oven-safe, fits the cavity, and the setup is stable.
How do I tell when it's done?
Use an instant-read thermometer in the thickest part of the thigh (avoiding bone); the safe target is 165°F (74°C). After resting 20–30 minutes the carryover will settle and juices will redistribute.
Can I brine instead of dry-brining?
Yes — a wet brine will also yield juicy meat, but be mindful that a wet-brined skin can be harder to crisp; pat thoroughly dry and allow time in the fridge to dry the skin before roasting.
About the author
Jake WoodsHello, I'm Jake. I started this recipe site with the idea that I hated recipe websites that overwhelm you with long stories and ads just to see plain content that's not helpful. My goal is to provide you with quality recipes, simple ideas and a fun cooking experience. There's lots of fun things to cook, and I think as you browse the site you'll find that TopShelf.Recipes is the place for quality recipes on the web.
See all recipes by Jake Woods →Ratings & Reviews
Did you make this recipe?
Be the first to share your experience.
Nutrition Facts
Per serving: 1 serving
Nutrition values are estimated from USDA ingredient data and may vary based on preparation, brands, and portion sizes. Values are provided for informational purposes only.
Keep Reading
Guides & articles for this recipe

Healthy Eating
Gluten-Free Weeknight Grilling Plan
A 7-day gluten-free weeknight grilling plan with quick, family-friendly recipes, prep-ahead timelines, and a printable shopping list that spotlights late-summer produce and pantry staples. Includes clear cross-contamination safety tips and simple swaps to keep dinners fast and crowd-pleasing.

Cocktails & Drinks
Shakerless Cocktails for Backyard Grilling
Easy, tool-free cocktail recipes designed for backyard grilling and outdoor hangs. Find single-serve and batch formulas, quick portable infusions, improvised gear hacks, and simple cocktail pairings for grilled meats and vegetables.

Healthy Eating
Lean Labor Day Grilling Menu
A Labor Day grilling guide that swaps heavy BBQ classics for lighter, flavorful options—think lean proteins, charred vegetables, and low‑sugar sauces. Includes make-ahead meal prep, portioning tips, and a short shopping checklist for healthy, crowd-pleasing cookouts.
More from Grilling
View all Grilling recipes →
Labor Day Grilled Lobster Rolls with Charred Scallion Brown Butter & Lemon‑Herb Aioli

Tandoori Yogurt Marinated Grilled Chicken (Tandoori Style on the Grill)

Bulgogi Smash Burger

Campfire‑Smoked Potato Salad with Mustard‑Bacon Vinaigrette — A Labor Day Grilling Side for Steak

Hanger Steak with Shallot Sauce
Grilled Pineapple Upside-Down Cake

Spicy Grilled Shrimp Skewers with Garlic Lime Marinade

Honey Garlic Grilled Thin-Sliced Chicken Breasts

Coffee and Porcini Dry-Rub Steaks with RUB PRIME STEAK Finish
Ask me anything about this recipe — substitutions, scaling, techniques, timing.
Powered by AI · 6 questions per 5 minutes, 30 per day