Grilled Pears with Blue Cheese
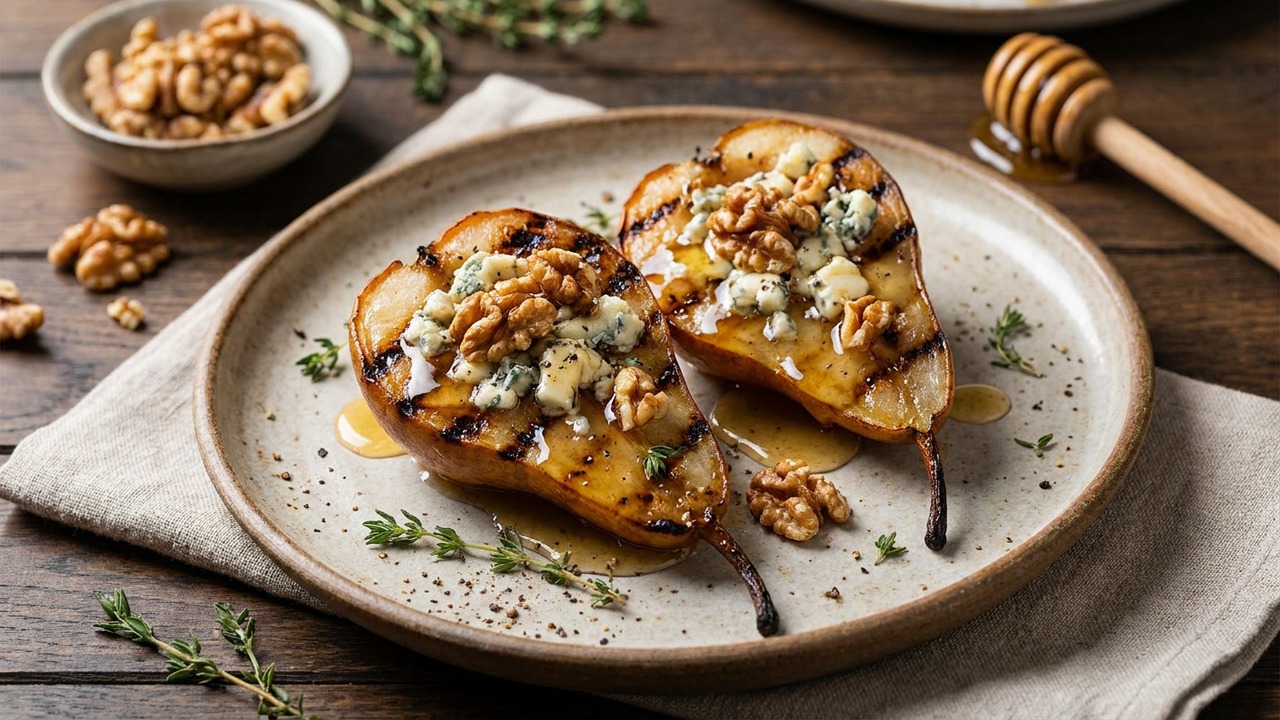
Charred, caramelized pear halves topped with tangy blue cheese, a drizzle of honey, and crunchy walnuts — a simple grilling recipe that brightens fall dinners and cheese boards. Quick to make and elegant to serve, it pairs beautifully with roasted meats or as a seasonal component of a cheese platter.
Jake Woods's note
"This recipe highlights the pear's natural sweetness with quick grill marks for smoky depth — perfect for weekday grilling or as a showy addition to a dinner party. Home cooks will love how few ingredients create a sophisticated, shareable dish."
About This Recipe
Grilled pears with blue cheese are that rare simple dish that reads elegant but arrives at the table with very little fuss. Halving and charing pears concentrates their sweetness while the high heat creates those bitter-sweet caramelized edges that play beautifully against the salty tang of blue cheese. Toasted walnuts add a toasty crunch and the honey drizzle lifts everything toward a floral finish — together the textures and flavors create a small, perfect composition that works as a starter, a side to roast meats, or a standout element on a seasonal cheese board.
What makes this version work is the balance: firm-ripe pears (Bosc or Anjou) that hold their shape, a quick oil-and-lemon brush to encourage even charring and prevent collapse, and just enough blue cheese to provide punch without coating the fruit. Timing is key — too long on the grill and the pears lose their texture; too little and they won’t caramelize. This recipe is for home cooks who want a high-impact dish with minimal ingredients, and who enjoy the contrast of sweet fruit and assertive cheese rather than a purely sweet dessert.
Ingredients for Grilled Pears with Blue Cheese
- 4 medium pears ripe but firm medium pears (Bosc or Anjou), halved and cored
- 2 tbsp extra-virgin olive oil
- 1 tbsp fresh lemon juice
- 1/2 tsp kosher salt
- 1/4 tsp freshly ground black pepper
- 4 oz crumbled blue cheese
- 2 tbsp honey
- 1 third cup toasted chopped walnuts
How to Make Grilled Pears with Blue Cheese
Step 1: Prep pears and dressing
Halve the pears lengthwise and use a small spoon or melon baller to remove the core and seeds. In a small bowl, whisk together the olive oil, lemon juice, kosher salt, and black pepper; brush the cut sides of the pears lightly with the mixture to prevent browning and help them caramelize on the grill.For this step
- 4 medium pearsripe but firm medium pears (Bosc or Anjou), halved and cored
- 2 tbspextra-virgin olive oil
- 1 tbspfresh lemon juice
- 1/2 tspkosher salt
- 1/4 tspfreshly ground black pepper
Step 2: Preheat and oil the grill
Preheat the grill to medium-high (about 400°F / 200°C). Oil the grates with a folded paper towel dipped in oil held with tongs to prevent sticking, or use a well-oiled grill brush.Step 3: Grill the pears
Place pears cut-side down on the hot grill and cook 4–6 minutes until deeply charred and lightly caramelized. Flip and grill cut-side up 1–2 minutes just to warm through and finish cooking without over-softening.Step 4: Dress and top
Transfer the warm pears to a platter or individual plates. Sprinkle each pear half with crumbled blue cheese, drizzle with honey, and scatter toasted chopped walnuts over the top for crunch.For this step
- 4 ozcrumbled blue cheese
- 2 tbsphoney
- 1 third cuptoasted chopped walnuts
Step 5: Serve
Serve the pears warm or at room temperature alongside roasted mains or as part of a cheese board. They pair especially well with salty cured meats, fresh greens, or a slice of crusty bread.


- Halve the pears lengthwise and use a small spoon or melon baller to remove the core and seeds. In a small bowl, whisk together the olive oil, lemon juice, kosher salt, and black pepper; brush the cut sides of the pears lightly with the mixture to prevent browning and help them caramelize on the grill.
- Preheat the grill to medium-high (about 400°F / 200°C). Oil the grates with a folded paper towel dipped in oil held with tongs to prevent sticking, or use a well-oiled grill brush.
- Place pears cut-side down on the hot grill and cook 4–6 minutes until deeply charred and lightly caramelized. Flip and grill cut-side up 1–2 minutes just to warm through and finish cooking without over-softening.
- Transfer the warm pears to a platter or individual plates. Sprinkle each pear half with crumbled blue cheese, drizzle with honey, and scatter toasted chopped walnuts over the top for crunch.
- Serve the pears warm or at room temperature alongside roasted mains or as part of a cheese board. They pair especially well with salty cured meats, fresh greens, or a slice of crusty bread.
Grilled Pears with Blue Cheese Tips
Choose firm-ripe pears
Look for pears that yield slightly to pressure but aren’t soft; they should hold their shape on the grill without being chalky.
Oil the grates well
Prevent sticking by oiling the grill grates or brushing the pear cut sides with the oil-lemon mix; a clean hot grate helps achieve good caramelization.
Watch for caramelization
Cook cut-side down first until deep char marks form, then flip briefly to finish through without letting the flesh collapse.
Toast walnuts first
Briefly toast chopped walnuts in a dry skillet until fragrant to heighten their crunch and deepen their flavor for contrast with the cheese.
Balance salty and sweet
If your blue cheese is very salty, use a lighter hand and taste the cheese before adding honey so the sweet-salty contrast reads bright, not cloying.
Grilled Pears with Blue Cheese Variations and Substitutions
Gorgonzola Dolce swap
Use a milder, creamier gorgonzola dolce if you want the blue flavor without assertive saltiness; it will melt more luxuriously over the warm pear.
Prosciutto-wrapped pears
Wrap each pear half with a thin slice of prosciutto before grilling for an added savory-salty layer that crisps at the edges.
Balsamic reduction finish
Replace or add the honey with a spoonful of thick balsamic reduction to introduce a tangy, slightly acidic counterpoint to the cheese.
Nut swap — pecans or hazelnuts
Use toasted pecans or hazelnuts in place of walnuts for a sweeter, rounder nut flavor that complements pear well.
Goat cheese alternative
For those who don’t prefer blue cheese, a tangy log of aged goat cheese provides a creamy, slightly tart contrast without the blue funk.
How to Store and Make Grilled Pears with Blue Cheese Ahead
If you must store leftovers, keep the grilled pears and toppings separate: pears in an airtight container for up to 2 days in the refrigerator, and crumbled cheese and nuts in separate containers to preserve texture. Reheat pears gently on a warm skillet or back on the grill for a minute or two, then reassemble with fresh honey to avoid soggy nuts and over-melted cheese.
What to Serve With Grilled Pears with Blue Cheese
Serve warm or at room temperature on a cheese board alongside cured meats, crusty bread, and a handful of peppery arugula tossed in a light vinaigrette. For drinks, pair with a crisp white like Sauvignon Blanc or a light red such as Pinot Noir; for a more indulgent pairing, a tawny Port or spätlese Riesling amplifies the sweet-savory interplay.
Grilled Pears with Blue Cheese FAQs
How ripe should the pears be?
They should be ripe but still firm — not rock hard and not soft. Firm-ripe pears will caramelize and warm through without turning mushy on the grill.
Can I cook these in a grill pan or broiler?
Yes; use a hot grill pan to get good char marks or place cut-side up under a hot broiler until caramelized, watching closely to prevent burning.
How do I stop pears from falling through the grate?
Halve them and place cut-side down so the flat surface makes full contact, or use a grill basket or foil sheet with holes to support smaller pieces.
Can I make this ahead of time?
You can grill the pears ahead and rewarm briefly before serving, but wait to add the blue cheese, honey, and nuts until just before plating to maintain texture and contrast.
What’s the best way to toast the walnuts?
Toast chopped walnuts in a dry skillet over medium heat, stirring frequently, until fragrant and slightly darker (2–4 minutes); cool before sprinkling to keep them crisp.
About the author
Jake WoodsHello, I'm Jake. I started this recipe site with the idea that I hated recipe websites that overwhelm you with long stories and ads just to see plain content that's not helpful. My goal is to provide you with quality recipes, simple ideas and a fun cooking experience. There's lots of fun things to cook, and I think as you browse the site you'll find that TopShelf.Recipes is the place for quality recipes on the web.
See all recipes by Jake Woods →Ratings & Reviews
Did you make this recipe?
Be the first to share your experience.
Nutrition Facts
Per serving: 1½ tbsp
Nutrition values are estimated from USDA ingredient data and may vary based on preparation, brands, and portion sizes. Values are provided for informational purposes only.
Keep Reading
Guides & articles for this recipe

Recipe Roundup
Early-Fall Grill Roundup: Apples & Squash
Transition summer cookouts into early fall with a roundup of grill recipes starring apples, winter squash, mushrooms, pears, and warm smoky flavors. Find mains, sides, veg-forward ideas, easy marinades, and practical tips for grilling when the air turns crisp.

Healthy Eating
Gluten-Free Weeknight Grilling Plan
A 7-day gluten-free weeknight grilling plan with quick, family-friendly recipes, prep-ahead timelines, and a printable shopping list that spotlights late-summer produce and pantry staples. Includes clear cross-contamination safety tips and simple swaps to keep dinners fast and crowd-pleasing.

Cocktails & Drinks
Shakerless Cocktails for Backyard Grilling
Easy, tool-free cocktail recipes designed for backyard grilling and outdoor hangs. Find single-serve and batch formulas, quick portable infusions, improvised gear hacks, and simple cocktail pairings for grilled meats and vegetables.
More from Grilling
View all Grilling recipes →
Quinoa and Black Bean Salad

Perfect Juicy Grilled Chicken Breasts (No Drying, 15 Minute Method)

Maple Mustard Glazed Grilled Chicken Thighs (Sweet Savory Weeknight BBQ)

Small Grill Alternatives to Beer-Can Whole Chicken: Spatchcock and Two-Zone Roast on the Grill

Labor Day Grilled Lobster Rolls with Charred Scallion Brown Butter & Lemon‑Herb Aioli

Spicy Grilled Shrimp Skewers with Garlic Lime Marinade

Bulgogi Smash Burger

Campfire‑Smoked Potato Salad with Mustard‑Bacon Vinaigrette — A Labor Day Grilling Side for Steak

Hanger Steak with Shallot Sauce
Ask me anything about this recipe — substitutions, scaling, techniques, timing.
Powered by AI · 6 questions per 5 minutes, 30 per day