Ghost Meringue Kisses with Chocolate Face
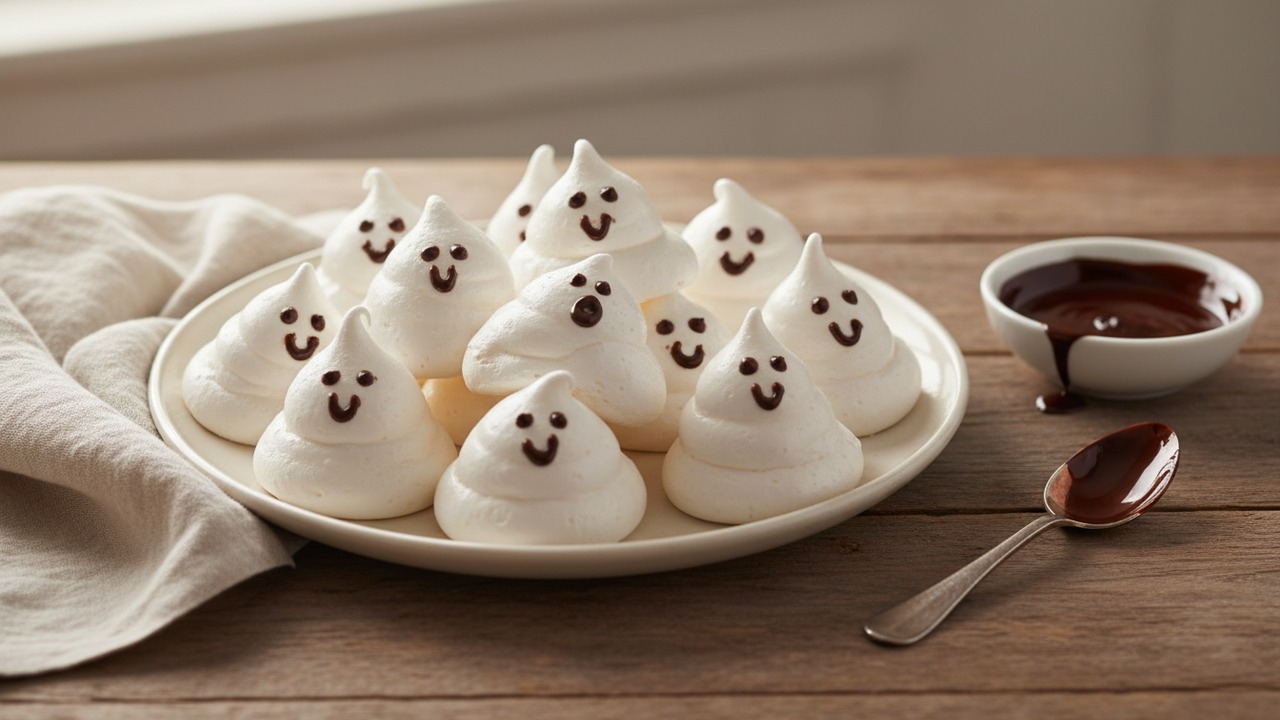
Light, make-ahead meringue ghosts are airy, seasonal cookies that satisfy dessert cravings without heavy baking. These whimsical kisses are dried low-and-slow, then given playful chocolate faces — perfect for Halloween or any spooky-themed treat table.
Jake Woods's note
"These ghost meringues are feather-light and store beautifully, making them an ideal make-ahead treat for parties. Home bakers will love how little active work is required and how dramatic the results look with simple chocolate faces."
About This Recipe
These Ghost Meringue Kisses are the kind of Halloween treat that looks whimsical but relies on technique rather than theatrical ingredients. Baked at a low temperature and dried slowly, each kiss develops a paper-thin, crisp shell that gives way to a light, slightly marshmallow-y interior if you stop the drying early, or a fully crisp bite if you prefer. Piped about an inch tall, the ghosts keep their airy shapes and are finished with small dark chocolate faces that add just enough bitterness to cut the sugar and make each bite interesting.
What makes this version work is attention to the details: room-temperature whites whipped with a touch of cream of tartar for stability, sugar added in measured increments to melt fully, and a long, gentle drying period so the meringues don’t brown or crack. The recipe is forgiving for hosts and bakers who want make-ahead ease — they store well and are a kid-friendly decorating project. If you enjoy contrast in a cookie — fragile exterior, featherlight interior, and a pop of dark chocolate — these little ghosts will feel like a grown-up yet playful addition to any spooky spread.
Ingredients for Ghost Meringue Kisses with Chocolate Face
- 4 large (whites only) Large egg whites (room temperature)
- 1 cup Granulated sugar
- 1/4 tsp Cream of tartar
- 1 tsp Vanilla extract
- 1 pinch Fine sea salt
- 4 oz Dark chocolate (for faces)
How to Make Ghost Meringue Kisses with Chocolate Face
Step 1: Prep and separate eggs
Active 8 min
Preheat the oven to 200°F (95°C). Line two baking sheets with parchment and fit piping bags with a 1/2–3/4-inch round tip (or snip the corner). In a large, completely clean bowl, separate 4 large egg whites and let them sit at room temperature for 20 minutes while you ready your equipment.For this step
- 4 large (whites only)Large egg whites (room temperature)
Step 2: Whip whites to glossy peaks
Active 14 min
Whip the room-temperature egg whites on medium speed until foamy, then add 1/4 tsp cream of tartar and a pinch of fine sea salt. Increase to medium-high and add 1 cup granulated sugar in 3 additions, about 15–20 seconds between additions, whipping to very stiff, glossy peaks; finish by folding in 1 tsp vanilla extract. Taste a tiny bit of the meringue to ensure no gritty sugar remains.For this step
- 1 cupGranulated sugar
- 1/4 tspCream of tartar
- 1 tspVanilla extract
- 1 pinchFine sea salt
Step 3: Pipe and dry low-and-slow
Active 10 min · Passive 90 min
Transfer the meringue to the prepared bag and pipe about 36 ghost-shaped kisses (roughly 1-inch tall each) onto the lined sheets, leaving a little space between each. Bake at 200°F (95°C) for 60 minutes, then turn the oven off and leave the meringues inside to cool and dry for another 30 minutes (total passive drying time 90 minutes). This yields 36 individual meringue kisses.Step 4: Melt chocolate and draw faces
Active 10 min · Passive 10 min
While the meringues finish drying (or after they’ve cooled), melt 4 oz dark chocolate in a microwave in 20-second bursts, stirring between bursts until smooth. Spoon melted chocolate into a small piping bag or a resealable bag with a tiny corner cut and pipe little eyes and mouths to make ghost faces; allow chocolate to set for about 10 minutes before handling. Store cooled meringues in an airtight container at room temperature for up to 5 days — they’re make-ahead friendly.For this step
- 4 ozDark chocolate (for faces)


- Preheat the oven to 200°F (95°C). Line two baking sheets with parchment and fit piping bags with a 1/2–3/4-inch round tip (or snip the corner). In a large, completely clean bowl, separate 4 large egg whites and let them sit at room temperature for 20 minutes while you ready your equipment.
- Whip the room-temperature egg whites on medium speed until foamy, then add 1/4 tsp cream of tartar and a pinch of fine sea salt. Increase to medium-high and add 1 cup granulated sugar in 3 additions, about 15–20 seconds between additions, whipping to very stiff, glossy peaks; finish by folding in 1 tsp vanilla extract. Taste a tiny bit of the meringue to ensure no gritty sugar remains.
- Transfer the meringue to the prepared bag and pipe about 36 ghost-shaped kisses (roughly 1-inch tall each) onto the lined sheets, leaving a little space between each. Bake at 200°F (95°C) for 60 minutes, then turn the oven off and leave the meringues inside to cool and dry for another 30 minutes (total passive drying time 90 minutes). This yields 36 individual meringue kisses.
- While the meringues finish drying (or after they’ve cooled), melt 4 oz dark chocolate in a microwave in 20-second bursts, stirring between bursts until smooth. Spoon melted chocolate into a small piping bag or a resealable bag with a tiny corner cut and pipe little eyes and mouths to make ghost faces; allow chocolate to set for about 10 minutes before handling. Store cooled meringues in an airtight container at room temperature for up to 5 days — they’re make-ahead friendly.
Ghost Meringue Kisses with Chocolate Face Tips
Use spotless equipment
Any grease or yolk will destabilize the foam; wipe bowls and beaters with a little vinegar if in doubt.
Room-temperature whites
Bring whites to room temperature before whipping to achieve greater volume and more stable peaks.
Add sugar gradually
Add sugar in small, spaced additions and wait until it dissolves—rub a bit between fingers to check for grittiness.
Pipe consistent shapes
Use a round tip and steady pressure to keep ghosts uniform; practice a couple on parchment first if needed.
Dry completely before storing
Allow the meringues to cool and finish drying in the turned-off oven to avoid sticky middles and keep them crisp.
Ghost Meringue Kisses with Chocolate Face Variations and Substitutions
Cocoa-dusted ghosts
Fold 1–2 tablespoons sifted unsweetened cocoa into the meringue for chocolate meringues, piping and drying as directed for a richer flavor.
Peppermint faces
Swap the dark chocolate for white chocolate tinted with a drop of peppermint oil and pipe tiny red or green eyes for a minty twist.
Vegan aquafaba option
Use 6 tablespoons aquafaba in place of egg whites, whip to stiff peaks with 1/4 tsp cream of tartar, and proceed the same way for a vegan-friendly version.
Citrus vanilla
Add 1/2 teaspoon finely grated lemon or orange zest with the vanilla for a bright, citrus note that pairs well with dark chocolate faces.
How to Store and Make Ghost Meringue Kisses with Chocolate Face Ahead
Store cooled meringues in an airtight container at room temperature away from humidity for up to 5 days; keep layers separated with parchment to avoid sticking. If they soften from moisture, re-crisp them in a 200°F (95°C) oven for 5–10 minutes, then cool completely before returning them to the container.
What to Serve With Ghost Meringue Kisses with Chocolate Face
Arrange the ghosts on a platter with a bowl of extra melted chocolate for dipping and some toasted nuts or candied orange slices to offer contrasting textures and flavors. They pair particularly well with hot beverages—espresso, spiced hot chocolate, or mulled cider—to balance the sweetness and accentuate the chocolate faces.
Ghost Meringue Kisses with Chocolate Face FAQs
Why are my meringues sticky after baking?
Sticky meringues usually mean they didn’t dry long enough or were exposed to humidity; return them to the oven with it turned off to continue drying, and store in an airtight container once fully cool.
How do I prevent grainy meringue?
Add the sugar slowly and allow it to dissolve between additions; rub a tiny bit between your fingers—if you feel grittiness, continue whipping until smooth and glossy.
Can I make these ahead for a party?
Yes — they store well for several days at room temperature in an airtight container; pipe and bake the meringues a day or two ahead, then add the chocolate faces the morning of your event if you prefer fresher decoration.
My meringues cracked or browned — what happened?
Cracking or browning indicates the oven was too hot or the meringues rose too quickly; use a low, steady temperature and dry long and slow to avoid color change and structural stress.
Can I freeze the meringues?
Freezing can introduce moisture that makes them sticky when thawed, so it’s not ideal; if you must, freeze in a single layer in an airtight container with desiccant tape and thaw in the sealed container at room temperature to limit condensation.
About the author
Jake WoodsHello, I'm Jake. I started this recipe site with the idea that I hated recipe websites that overwhelm you with long stories and ads just to see plain content that's not helpful. My goal is to provide you with quality recipes, simple ideas and a fun cooking experience. There's lots of fun things to cook, and I think as you browse the site you'll find that TopShelf.Recipes is the place for quality recipes on the web.
See all recipes by Jake Woods →Ratings & Reviews
Did you make this recipe?
Be the first to share your experience.
Nutrition Facts
Per serving: about 10g
Nutrition values are estimated from USDA ingredient data and may vary based on preparation, brands, and portion sizes. Values are provided for informational purposes only.
Keep Reading
Guides & articles for this recipe
Tips & Techniques
Baking Soda and Tenderized Beef
Learn how baking soda can tenderize, boost browning, and improve moisture for ground beef and other meats. This practical guide covers the science, step-by-step techniques, common mistakes, and recipes to try.

Recipes
DIY Edible Monster Eyes Candy
Make safe, fun edible monster eyes for cupcakes, cookies, and candy trays. Step-by-step recipes show baking-soda balls, chocolate and fondant eyes, wafer-print options, plus assembly, storage, and kid-friendly safety tips.

Recipes
No-Bake Funny Halloween Treats: 15 Quick Recipes
15 no-bake, funny Halloween treats that busy hosts can assemble in minutes — kid-friendly sweets, savory bites, and easy cocktails that don’t need an oven. Built for last-minute parties, with pantry-staple shortcuts and quick decoration ideas.
More from Baking
View all Baking recipes →
Lobster Mac and Cheese

Classic Snickerdoodles

Ham Gruyere Croissant Sandwich

Low-Carb Zucchini Lasagna (Keto Friendly)

All-Butter Shortbread

Mike's Hot Honey Pepperoni Pizza with Goat Cheese and Arugula

Hidden Veg Chicken Nuggets

Snake River Farms Beef Tallow Pie Crust for Savory and Sweet Pies

Crispy Oven Roast Potatoes
Ask me anything about this recipe — substitutions, scaling, techniques, timing.
Powered by AI · 6 questions per 5 minutes, 30 per day