Raspberry Galette
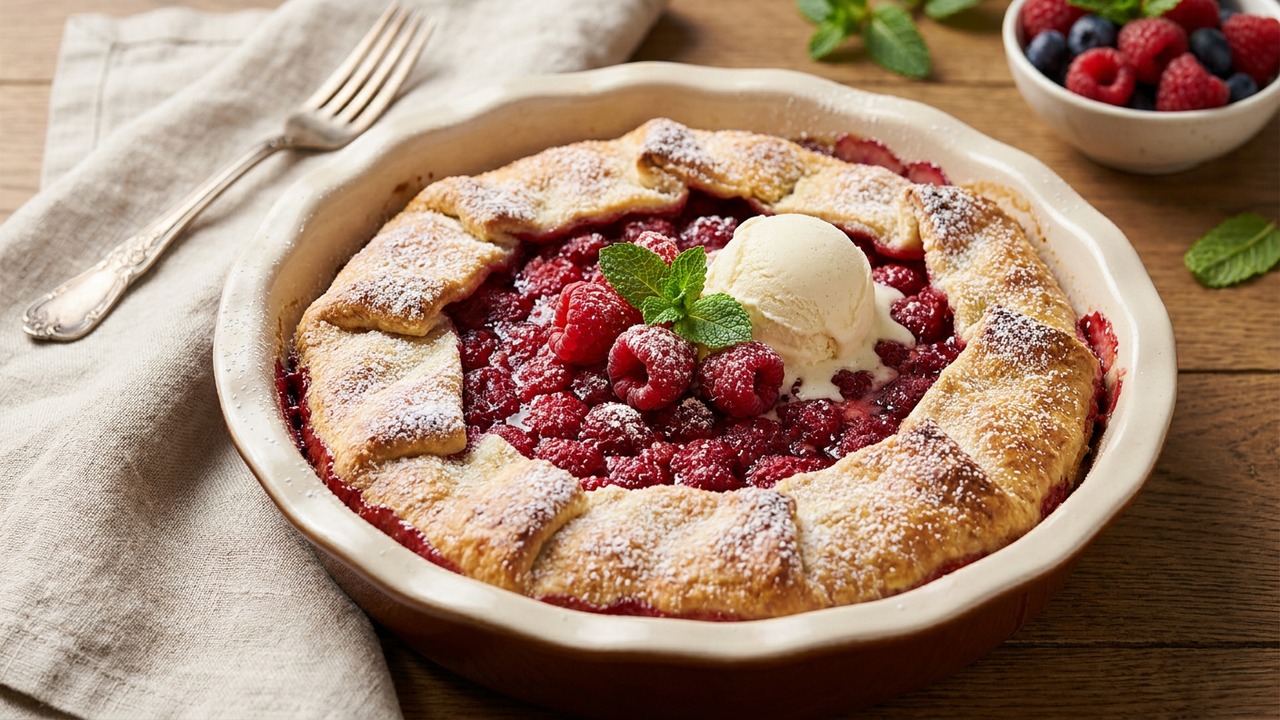
A simple rustic raspberry galette with a flaky, buttery crust and a juicy, bright raspberry filling. Easy to assemble and perfect for showcasing seasonal berries, it’s an approachable tart for home bakers who want something elegant without fuss.
Jake Woods's note
"This galette is all about fresh raspberries and a quick, forgiving free-form crust—no tart pan required. It’s perfect for summer dinners, potlucks, or any time you want a bright, homey dessert that looks special with minimal effort."
About This Recipe
There’s a small, satisfying rebellion in a galette: it looks artisanal without demanding pastry-school precision. This raspberry galette balances a flaky, buttery crust with a bright, juicy filling — lemon zest lifts the fruit while a spoonful of cornstarch quietly tames the juices so the slices hold their shape. The rustic fold of the edges, a glossy egg wash and a scatter of coarse sugar give it a finished look that still feels homey.
This version works because it focuses on temperature and restraint: cold, pea-sized butter for distinct layers, just enough ice water to bring the dough together, and a short chill so the crust bakes up tender and crisp. It’s an approachable recipe for bakers who want elegant results with minimal fuss — perfect for late-summer berries, a casual weekend brunch or a dessert you can assemble in under an hour and finish in the oven while you set the table.
Ingredients for Raspberry Galette
- 1 1/4 cups All-purpose flour
- 1/2 cup Granulated sugar (total)
- 1/2 cup Cold unsalted butter, cubed
- 1/2 teaspoon Fine salt
- 1/4 cup Ice water
- 4 cups Fresh raspberries
- 2 tablespoons Cornstarch
- 1 medium Lemon (zest + 1 tablespoon juice)
- 1 piece Large egg (for egg wash)
- 1 tablespoon Coarse sugar (for sprinkling)
How to Make Raspberry Galette
Step 1: Make the pastry dough
In a large bowl or food processor, combine the flour, 2 tablespoons of the granulated sugar, and the salt. Cut the cold, cubed butter into the flour until the mixture resembles coarse crumbs with some pea-sized pieces remaining. Add the ice water a tablespoon at a time and mix just until the dough holds together when pinched; do not overwork.For this step
- 1 1/4 cupsAll-purpose flour
- 1/2 cupCold unsalted butter, cubed
- 1/2 teaspoonFine salt
- 1/4 cupIce water
Step 2: Chill the dough
Shape the dough into a rough disc, wrap tightly in plastic, and chill in the refrigerator for at least 30 minutes. Chilling relaxes the gluten and keeps the butter cold so the crust will bake flaky.Step 3: Prepare the raspberry filling
In a bowl, gently toss the raspberries with the cornstarch, the remaining granulated sugar, lemon zest, and lemon juice until evenly coated. Let the filling sit for 5–10 minutes so the cornstarch can begin to thicken the berry juices; this prevents a soggy crust.For this step
- 4 cupsFresh raspberries
- 2 tablespoonsCornstarch
- 1 mediumLemon (zest + 1 tablespoon juice)
Step 4: Roll out and assemble the galette
On a lightly floured surface, roll the chilled dough into a roughly 12-inch circle about 1/8–1/4 inch thick. Transfer the dough to a parchment-lined baking sheet, pile the raspberry filling into the center leaving a 2-inch border, and fold the border up over the filling in pleats. Beat the egg and brush the dough edge with the egg wash, then sprinkle the crust lightly with the coarse sugar.For this step
- 1 pieceLarge egg (for egg wash)
- 1 tablespoonCoarse sugar (for sprinkling)
Step 5: Bake until golden
Preheat the oven to 400°F (200°C). Bake the galette for 30–35 minutes until the crust is deep golden and the filling is bubbling; cover loosely with foil if the edges brown too quickly. Remove from the oven and allow the galette to rest on the baking sheet for 10–15 minutes to set.Step 6: Cool and serve
Transfer the galette to a wire rack and cool slightly before slicing to help the filling hold its shape. Serve warm or at room temperature, optionally with a scoop of vanilla ice cream or a dusting of powdered sugar.


- In a large bowl or food processor, combine the flour, 2 tablespoons of the granulated sugar, and the salt. Cut the cold, cubed butter into the flour until the mixture resembles coarse crumbs with some pea-sized pieces remaining. Add the ice water a tablespoon at a time and mix just until the dough holds together when pinched; do not overwork.
- Shape the dough into a rough disc, wrap tightly in plastic, and chill in the refrigerator for at least 30 minutes. Chilling relaxes the gluten and keeps the butter cold so the crust will bake flaky.
- In a bowl, gently toss the raspberries with the cornstarch, the remaining granulated sugar, lemon zest, and lemon juice until evenly coated. Let the filling sit for 5–10 minutes so the cornstarch can begin to thicken the berry juices; this prevents a soggy crust.
- On a lightly floured surface, roll the chilled dough into a roughly 12-inch circle about 1/8–1/4 inch thick. Transfer the dough to a parchment-lined baking sheet, pile the raspberry filling into the center leaving a 2-inch border, and fold the border up over the filling in pleats. Beat the egg and brush the dough edge with the egg wash, then sprinkle the crust lightly with the coarse sugar.
- Preheat the oven to 400°F (200°C). Bake the galette for 30–35 minutes until the crust is deep golden and the filling is bubbling; cover loosely with foil if the edges brown too quickly. Remove from the oven and allow the galette to rest on the baking sheet for 10–15 minutes to set.
- Transfer the galette to a wire rack and cool slightly before slicing to help the filling hold its shape. Serve warm or at room temperature, optionally with a scoop of vanilla ice cream or a dusting of powdered sugar.
Raspberry Galette Tips
Keep butter pea-sized
Work cold butter into the flour until pea-sized pieces remain; those pockets melt during baking and create flaky layers.
Add ice water sparingly
Add water a tablespoon at a time and stop as soon as the dough holds when pinched to avoid overdeveloping gluten and a tough crust.
Chill before rolling
Chilling the dough at least 30 minutes firms the butter and relaxes the gluten, which prevents shrinkage and keeps the crust tender.
Use cornstarch to bind
Toss raspberries with cornstarch and let them sit 5–10 minutes so the starch absorbs juices and prevents a soggy center.
Preheat baking surface
Bake the galette on a preheated baking sheet or pizza stone placed low in the oven to give the bottom crust a head start to crispness.
Let it rest before slicing
Allow the galette to cool 10–15 minutes on the baking sheet so the filling sets and slices hold together cleanly.
Raspberry Galette Variations and Substitutions
Mixed Berry Galette
Substitute a mix of raspberries, blueberries and blackberries; add an extra 1 tablespoon cornstarch if the berries look especially juicy.
Almond Frangipane Twist
Spread a thin layer of almond frangipane (equal parts almond flour, butter, sugar and beaten egg) on the dough before adding berries for a nutty, moist base.
Gluten-Free Crust
Use a 1:1 gluten-free flour blend and add 1/4 teaspoon xanthan gum if your mix lacks binding agents, and chill the dough thoroughly before rolling.
Vegan-Friendly Version
Swap cold, solid vegan butter for the butter and replace the egg wash with a light brush of plant milk mixed with a teaspoon of maple syrup for browning.
How to Store and Make Raspberry Galette Ahead
Store leftover slices loosely covered at room temperature for up to 24 hours, then refrigerate for up to 3 days. To revive the crust, reheat in a 350°F (175°C) oven for 8–12 minutes; avoid microwaving which makes the crust soggy. You can freeze unbaked dough for up to one month, or freeze a fully baked galette wrapped tightly for up to 1 month and reheat from frozen, adding 10–15 minutes to the oven time.
What to Serve With Raspberry Galette
Serve warm slices with a scoop of vanilla ice cream, a dollop of crème fraîche or a spoonful of thick Greek yogurt to balance the tartness. Garnish with a few fresh raspberries and a mint sprig for color, and pair with a chilled dry rosé, a glass of prosecco, or a bright cup of Earl Grey tea.
Raspberry Galette FAQs
Can I use frozen raspberries?
Yes — thaw and drain them, then toss with the cornstarch and a touch of sugar; you may need an extra tablespoon of cornstarch to account for the extra moisture and bake a few minutes longer.
Why isn't my crust flaky?
Most likely the butter warmed or the dough was overworked; keep butter cold, work it in until pea-sized, and handle the dough as little as possible before chilling.
How can I prevent a soggy bottom?
Make sure to toss the berries with cornstarch, bake on a preheated sheet on a lower rack, and avoid piling the filling too high so excess juice has room to bubble away.
Can I assemble the galette ahead of time?
Yes — the dough can be made up to two days ahead or frozen for a month, and the assembled galette can be chilled up to 24 hours before baking; if frozen assembled, bake from frozen and add 10–15 minutes to the time.
How do I know when it's done?
The crust should be deep golden and the filling should be bubbling in the center; if the edges are browning too quickly, tent them with foil for the last 10–15 minutes.
About the author
Jake WoodsHello, I'm Jake. I started this recipe site with the idea that I hated recipe websites that overwhelm you with long stories and ads just to see plain content that's not helpful. My goal is to provide you with quality recipes, simple ideas and a fun cooking experience. There's lots of fun things to cook, and I think as you browse the site you'll find that TopShelf.Recipes is the place for quality recipes on the web.
See all recipes by Jake Woods →Ratings & Reviews
Did you make this recipe?
Be the first to share your experience.
Nutrition Facts
Per serving: 1 slice (115g)
Nutrition values are estimated from USDA ingredient data and may vary based on preparation, brands, and portion sizes. Values are provided for informational purposes only.
Keep Reading
Guides & articles for this recipe
Tips & Techniques
Baking Soda and Tenderized Beef
Learn how baking soda can tenderize, boost browning, and improve moisture for ground beef and other meats. This practical guide covers the science, step-by-step techniques, common mistakes, and recipes to try.

Healthy Eating
Gluten-Free Weeknight Grilling Plan
A 7-day gluten-free weeknight grilling plan with quick, family-friendly recipes, prep-ahead timelines, and a printable shopping list that spotlights late-summer produce and pantry staples. Includes clear cross-contamination safety tips and simple swaps to keep dinners fast and crowd-pleasing.

Healthy Eating
Low-Fat Grill Swaps for Big Flavor
A practical guide to trimming fat from grilled meals without losing juiciness or char. Learn yogurt- and citrus-based marinades, lean protein picks, searing and indirect-heat tricks, plus 5 quick low-fat marinades and a simple weeknight plan.
More from Baking
View all Baking recipes →
Gluten-Free Soft Pretzels

Sticky Gochujang Spare Ribs (Oven-Baked Korean-Inspired)

Apple Cider Muffins

Baked Buffalo Chicken Wings with Blue Cheese Dip (Crispy Oven Method)

Gluten-Free Honey Garlic Chicken Thighs with Tamari and Toasted Sesame

Sheet Pan Baked Honey Garlic Chicken Breasts with Roasted Vegetables

Juicy Oven-Baked Chicken Breasts (No-Dryness Method)

Cloud Bread Sandwiches

Honey Mustard Chicken Nuggets
Ask me anything about this recipe — substitutions, scaling, techniques, timing.
Powered by AI · 6 questions per 5 minutes, 30 per day