Detroit-Style Pizza
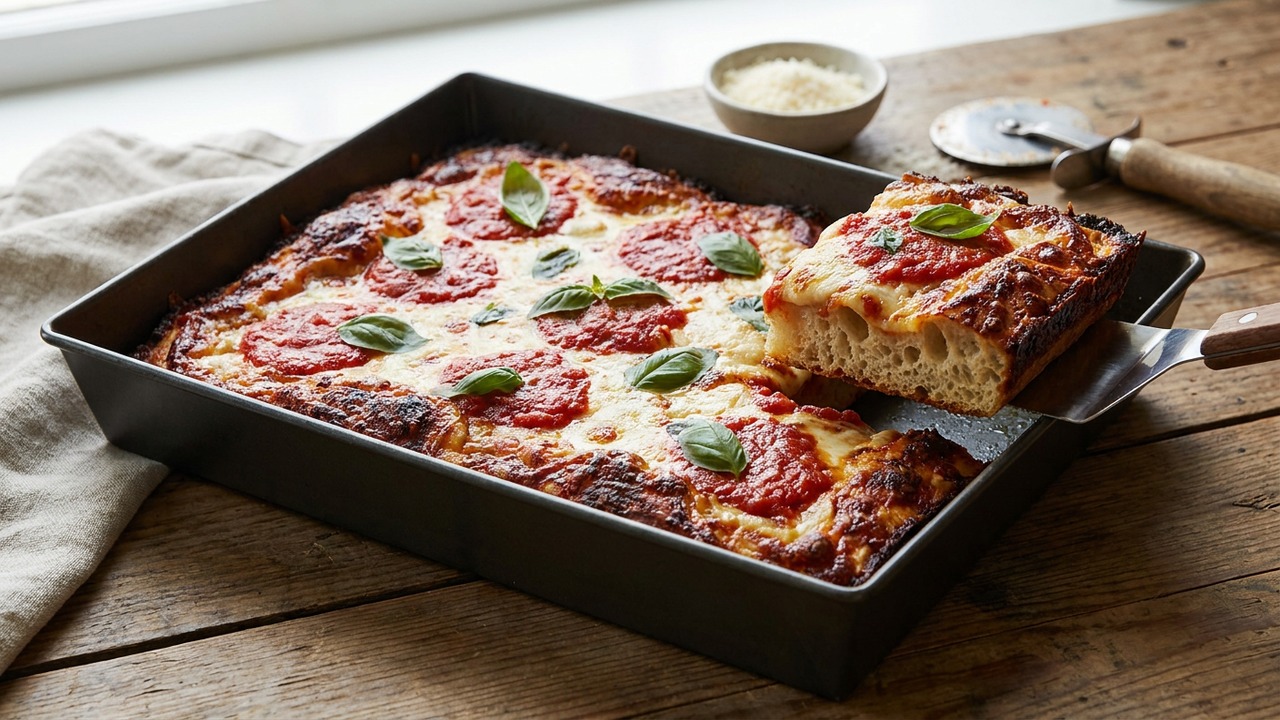
A classic Detroit square pizza with a crisp, caramelized cheesy rim and a light, open-crumb interior. This recipe focuses on the pan technique and higher-hydration dough that create the signature crunchy edges and airy center.
Ingredient Spotlight
Shredded Wisconsin brick cheese (or 50/50 brick + Monterey Jack)
Brick cheese is a semi‑soft cow’s‑milk cheese developed in Wisconsin; when young it’s creamy and mildly tangy and it can become more pungent with age. It’s traditional in Midwestern recipes (notably Detroit‑style pizza) because it melts exceptionally well and caramelizes at the edges. You’ll find it at specialty cheese counters, larger grocery stores (especially in the Midwest), or from online Wisconsin cheesemakers. Good substitutes are young muenster, provolone, or a blend of Monterey Jack and low‑moisture mozzarella to mimic its melt and mild flavor.
Jake Woods's note
"This pie shines for a relaxed weekend dinner or a small gathering — the pan’s crunchy, nearly fried edges are addictive. Home cooks will love how a few technique tweaks (hydration and pan oiling) reliably produce that bar-style crust."
About This Recipe
This Detroit-style pizza is all about contrasts: a tender, open-crumb interior that yields under your bite and a wildly addictive, caramelized cheese crust that shatters into salty shards. The high-hydration dough and gentle stretch-and-folds cultivate large irregular holes and a springy structure, while the method of packing cheese edge-to-edge in an oiled rectangular pan creates the signature lacy, browned rim Detroit is known for. Using Wisconsin brick (or a brick/Monterey Jack mix) gives you the fat and protein content necessary for deep bubbling and the right melt behavior; the racing-stripe sauce keeps the top saucy without weighing the dough down.
This version focuses on practical home-kitchen technique: a modest bulk ferment with an optional long cold slowdown for flavor, simple pan preparation to coax crispness even in a home oven, and a short, hot bake that must be watched closely so those sugars in cheese hit perfect caramel without burning. It’s for the pizza-loving home cook who wants restaurant-style texture without industrial equipment — a party pleaser for casual dinner crowds and a reliable weekend project if you like tinkering with dough and pan technique.
Ingredients for Detroit-Style Pizza
- 4 cups Bread flour
- 1 3/8 cups Water (68% hydration)
- 1 tsp Instant dry yeast
- 1 tsp Granulated sugar
- 2 tsp Fine salt (kosher/sea)
- 4 tbsp Olive oil (for dough + pan)
- 12 oz Shredded Wisconsin brick cheese (or 50/50 brick + Monterey Jack)
- 1 cup Pizza sauce (crushed tomatoes, lightly seasoned)
- 3 oz Sliced pepperoni or preferred topping
How to Make Detroit-Style Pizza
Step 1: Mix the high-hydration dough
Combine the bread flour, water (at room temperature), instant yeast, sugar, salt, and 2 tablespoons of the olive oil in a large bowl. Stir until there are no dry pockets and the dough is shaggy; hydration is about 68% (340 g water to 500 g flour), which produces an open crumb and a supple dough. Cover and let rest 20–30 minutes for an autolyse-focus phase to develop gluten without heavy kneading.For this step
- 4 cupsBread flour
- 1 3/8 cupsWater (68% hydration)
- 1 tspInstant dry yeast
- 1 tspGranulated sugar
- 2 tspFine salt (kosher/sea)
Step 2: Bulk ferment and develop structure
Perform 3 sets of gentle stretch-and-folds every 20–30 minutes during the first 90 minutes of room-temperature bulk ferment, pulling a portion of the dough up and folding it over itself. After the folds, let the dough rise until puffy and roughly 50–75% increased in volume; for best flavor, you can refrigerate 8–72 hours for a cold ferment (reduce yeast to 1/2–3/4 tsp if you prefer a very long ferment).Step 3: Prepare the pan and final proof
Liberally oil a 10x14-inch Detroit-style steel pan (or a well-seasoned 9x13 cast-iron/aluminum pan) with the remaining olive oil so the bottom and sides have a thin, even coating. Gently transfer the dough into the oiled pan seam-side down, using oiled hands to ease it into the corners; do not aggressively degas. Cover and allow to proof in the pan until the dough reaches the edges and shows visible bubbly pockets (30–60 minutes depending on temperature).Step 4: Top: cheese edge-to-edge and sauce stripes
Stretch the dough gently if needed so it reaches the pan corners, then distribute the shredded brick cheese so it goes right up to all four edges — this is the key to the caramelized cheesy rim. Spread pepperoni or other toppings evenly (traditional pepperoni can go under the cheese for cupping), then spoon the sauce in two to three parallel 'racing stripes' across the top instead of fully covering the cheese.For this step
- 12 ozShredded Wisconsin brick cheese (or 50/50 brick + Monterey Jack)
- 1 cupPizza sauce (crushed tomatoes, lightly seasoned)
- 3 ozSliced pepperoni or preferred topping
Step 5: Bake for a blistered, caramelized edge
Preheat your oven to 500–525°F (260–275°C). Bake the pizza on the center rack for 12–18 minutes until the cheese is deeply golden and the edges are blistered and caramelized — watch closely after 10 minutes because the sugars in the cheese and oil brown quickly. For extra-crispy edges, you can preheat an empty steel/stone and place the filled pan on it for the last 5–8 minutes, but be careful with hot oil splash.Step 6: Rest, unmold, and slice
Remove the pan from the oven and let the pizza rest for 3–5 minutes, then run a thin spatula around the edges and invert or lift the pizza out onto a cooling rack or cutting board. Let rest another 2 minutes to set, slice into squares, and serve hot so you enjoy the contrast of crunchy cheesy edges and the airy interior.


- Combine the bread flour, water (at room temperature), instant yeast, sugar, salt, and 2 tablespoons of the olive oil in a large bowl. Stir until there are no dry pockets and the dough is shaggy; hydration is about 68% (340 g water to 500 g flour), which produces an open crumb and a supple dough. Cover and let rest 20–30 minutes for an autolyse-focus phase to develop gluten without heavy kneading.
- Perform 3 sets of gentle stretch-and-folds every 20–30 minutes during the first 90 minutes of room-temperature bulk ferment, pulling a portion of the dough up and folding it over itself. After the folds, let the dough rise until puffy and roughly 50–75% increased in volume; for best flavor, you can refrigerate 8–72 hours for a cold ferment (reduce yeast to 1/2–3/4 tsp if you prefer a very long ferment).
- Liberally oil a 10x14-inch Detroit-style steel pan (or a well-seasoned 9x13 cast-iron/aluminum pan) with the remaining olive oil so the bottom and sides have a thin, even coating. Gently transfer the dough into the oiled pan seam-side down, using oiled hands to ease it into the corners; do not aggressively degas. Cover and allow to proof in the pan until the dough reaches the edges and shows visible bubbly pockets (30–60 minutes depending on temperature).
- Stretch the dough gently if needed so it reaches the pan corners, then distribute the shredded brick cheese so it goes right up to all four edges — this is the key to the caramelized cheesy rim. Spread pepperoni or other toppings evenly (traditional pepperoni can go under the cheese for cupping), then spoon the sauce in two to three parallel 'racing stripes' across the top instead of fully covering the cheese.
- Preheat your oven to 500–525°F (260–275°C). Bake the pizza on the center rack for 12–18 minutes until the cheese is deeply golden and the edges are blistered and caramelized — watch closely after 10 minutes because the sugars in the cheese and oil brown quickly. For extra-crispy edges, you can preheat an empty steel/stone and place the filled pan on it for the last 5–8 minutes, but be careful with hot oil splash.
- Remove the pan from the oven and let the pizza rest for 3–5 minutes, then run a thin spatula around the edges and invert or lift the pizza out onto a cooling rack or cutting board. Let rest another 2 minutes to set, slice into squares, and serve hot so you enjoy the contrast of crunchy cheesy edges and the airy interior.
Detroit-Style Pizza Tips
Hydrate Confidently
68% hydration feels loose but manageable; use wet or oiled hands when handling so the dough doesn’t stick to your fingers during transfers.
Stretch-and-Fold Rhythm
Three gentle sets during the first 90 minutes build strength without overworking—pull until you feel resistance but avoid tearing the dough.
Oil Pan Generously
A thin, even film of olive oil on sides and bottom promotes caramelization and keeps the cheese from sticking; wiping excess oil before baking prevents smoke.
Cheese to the Edge
Push shredded brick right up to the pan edges so the cheese melts up the sides and chars; this forms the crown of crispy, lacy crust.
Watch the Finish
After 10 minutes at 500–525°F keep a close eye—the cheese sugars brown fast and go from perfect to burnt in 1–2 minutes.
Finish on a Hot Surface
If you want an extra-crisp bottom, place the pan on a preheated steel or stone for the final 5–8 minutes but slide carefully to avoid hot oil splatter.
Detroit-Style Pizza Variations and Substitutions
All-Vegetable
Use roasted thin-sliced eggplant, bell peppers, and caramelized onions tucked under the cheese to keep toppings from drying out under high heat.
Spicy Soppressata
Swap pepperoni for thin soppressata and add a sprinkle of red pepper flakes to the sauce for a bolder, oilier flavor that cups beautifully under the cheese.
Lower-Fat Cheese Mix
If brick cheese is unavailable, blend low-moisture mozzarella with 20–25% grated aged cheddar to mimic fat and browning characteristics; avoid 100% part-skim mozzarella or the rim won’t caramelize as well.
Gluten-Free Approach
Use a well-tested high-hydration GF pizza blend with xanthan or psyllium and fully blind-bake the pan crust for 4–6 minutes before adding cheese to encourage a crisp edge.
How to Store and Make Detroit-Style Pizza Ahead
Cool leftover squares on a rack to avoid sogginess, then refrigerate in an airtight container for up to 3 days. Reheat slices in a hot skillet (covered briefly) or under a broiler for 2–4 minutes to re-crisp the cheesy edge; avoid microwaving unless you accept a softer crust. For make-ahead, cold-ferment the dough up to 72 hours, then shape into the pan and proof the final 30–60 minutes before baking.
What to Serve With Detroit-Style Pizza
Serve hot squares on a large cutting board with pickled peppers, a simple fennel-cranberry slaw, or a bright green salad (arugula with lemon vinaigrette cuts the richness). For drinks, pair with an ice-cold lager or a medium-bodied red like a Beaujolais or Sangiovese; nonalcoholic options like sparkling iced tea work well to refresh the palate between bites.
Detroit-Style Pizza FAQs
Can I use regular all-purpose flour?
Yes, but bread flour gives better chew and structure for the high-hydration dough; if using AP, expect a slightly softer crust and fewer large air pockets.
What if I don’t have brick cheese?
Substitute a high-fat Monterey Jack or a blend of low-moisture mozzarella with some aged cheddar; the goal is fat content and browning ability, so avoid low-fat cheeses.
My cheese is browning too fast—what now?
Lower the oven by 25°F and extend baking by a few minutes, or move the pan one rack down; you can also cover the pan loosely with foil late in the bake to prevent burning while the interior finishes.
How do I prevent sticking when unmolding?
Make sure you generously oil the pan and let the pizza rest 3–5 minutes after baking; run a thin spatula around the edges before lifting to release any adhesive spots.
Can I put toppings under the cheese?
Yes—traditional Detroit pepperoni is often placed under the cheese so it cups and renders fat into the crust, but heartier toppings should be pre-cooked or thinly sliced to avoid sogginess.
About the author
Jake WoodsHello, I'm Jake. I started this recipe site with the idea that I hated recipe websites that overwhelm you with long stories and ads just to see plain content that's not helpful. My goal is to provide you with quality recipes, simple ideas and a fun cooking experience. There's lots of fun things to cook, and I think as you browse the site you'll find that TopShelf.Recipes is the place for quality recipes on the web.
See all recipes by Jake Woods →Ratings & Reviews
Did you make this recipe?
Be the first to share your experience.
Nutrition Facts
Per serving: 1 serving
Nutrition values are estimated from USDA ingredient data and may vary based on preparation, brands, and portion sizes. Values are provided for informational purposes only.
Keep Reading
Guides & articles for this recipe
Tips & Techniques
Baking Soda and Tenderized Beef
Learn how baking soda can tenderize, boost browning, and improve moisture for ground beef and other meats. This practical guide covers the science, step-by-step techniques, common mistakes, and recipes to try.

Healthy Eating
Gluten-Free Weeknight Grilling Plan
A 7-day gluten-free weeknight grilling plan with quick, family-friendly recipes, prep-ahead timelines, and a printable shopping list that spotlights late-summer produce and pantry staples. Includes clear cross-contamination safety tips and simple swaps to keep dinners fast and crowd-pleasing.

Healthy Eating
Low-Fat Grill Swaps for Big Flavor
A practical guide to trimming fat from grilled meals without losing juiciness or char. Learn yogurt- and citrus-based marinades, lean protein picks, searing and indirect-heat tricks, plus 5 quick low-fat marinades and a simple weeknight plan.
More from Baking
View all Baking recipes →
Cloud Bread Sandwiches

Honey Mustard Chicken Nuggets

Cheddar Jalapeño Corn Muffins

Basque Burnt Cheesecake

30-Minute Sticky Baked Honey Garlic Chicken Thighs with Crisp Edges

Lemon Butter Salmon

Spritz Cookies

Brown Butter Vanilla Syrup

Honey Glazed Easter Ham
Ask me anything about this recipe — substitutions, scaling, techniques, timing.
Powered by AI · 6 questions per 5 minutes, 30 per day