Fluffy Gluten-Free Dinner Rolls (Yeasted Tear-and-Share)
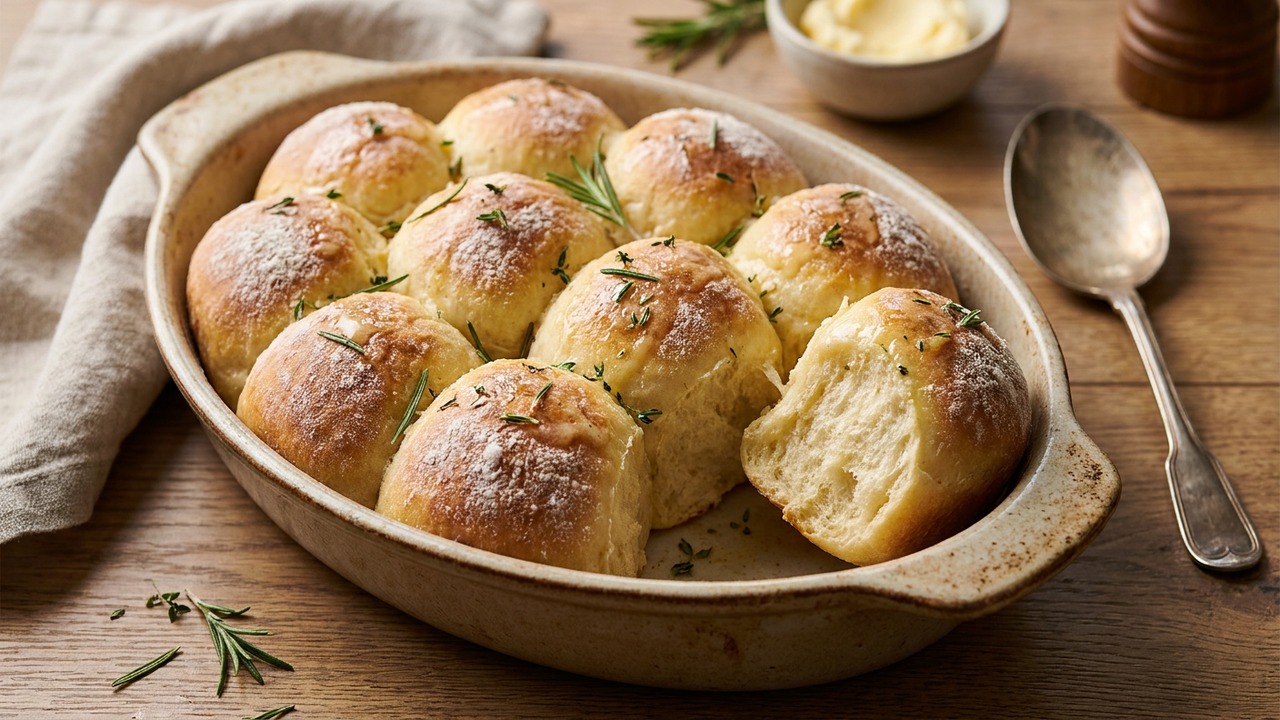
Soft, yeasted gluten-free dinner rolls that rise reliably and pull apart easily for holiday tables or weeknight dinners. These tear-and-share rolls are enriched with egg and butter for a tender crumb and finish with a glossy butter brush for extra flavor.
About This Recipe
These fluffy gluten-free dinner rolls are built to do one thing very well: pull apart. Enriched with a whole egg and butter, the crumb is tender and moist rather than dry and gritty, and the quick butter brush after baking gives an appealing gloss and a real flavor lift. Using a 1:1 gluten-free all-purpose blend (with xanthan already included or added separately) combined with a warm, foamy milk–yeast starter produces a dough that rises reliably — remember that gluten-free dough will feel stickier than wheat dough, so shaping depends on oiled hands and pan rather than dusting with flour.
The recipe is scaled for six generous rolls arranged tightly in a round pan to create that classic tear-and-share presentation, but it’s forgiving: weigh portions for even baking, watch the second rise so they puff without collapsing, and bake until the tops are deep golden and spring back. This approach is especially helpful for anyone who’s struggled with dense or crumbly gluten-free buns — the balance of hydration, egg protein and butter fat gives structure and lift while keeping the crumb soft. Make them for holiday spreads, weeknight roast dinners, or sandwiches that benefit from a pillowy, buttery roll.
Ingredients for Fluffy Gluten-Free Dinner Rolls (Yeasted Tear-and-Share)
- 1 cup Whole milk, warmed to 105–115°F (40–46°C)
- 2 1/4 tsp Instant yeast (or active dry)
- 2 tbsp Granulated sugar
- 2 1/2 cups Gluten-free all-purpose flour blend (1:1, preferably with xanthan included)
- 1 tsp Xanthan gum (omit if your blend already contains it)
- 1 tsp Fine sea salt
- 4 tbsp Unsalted butter, melted (for dough)
- 1 large Large egg, room temperature
- 2 tbsp Unsalted butter, melted (for brushing)
How to Make Fluffy Gluten-Free Dinner Rolls (Yeasted Tear-and-Share)
Step 1: Bloom the yeast
Warm the milk to 105–115°F (40–46°C) and stir in the sugar and yeast. Let sit for 5–10 minutes until foamy and aromatic to confirm the yeast is active before continuing.For this step
- 1 cupWhole milk, warmed to 105–115°F (40–46°C)
- 2 1/4 tspInstant yeast (or active dry)
- 2 tbspGranulated sugar
Step 2: Combine dry ingredients
In a large bowl whisk together the gluten-free flour blend, xanthan gum (if using), and salt until evenly distributed. If your blend already contains xanthan, omit that ingredient and still whisk to aerate the flour.For this step
- 2 1/2 cupsGluten-free all-purpose flour blend (1:1, preferably with xanthan included)
- 1 tspXanthan gum (omit if your blend already contains it)
- 1 tspFine sea salt
Step 3: Mix dough
Whisk the melted butter and egg into the foamy milk mixture, then pour the wet ingredients into the dry and mix with a wooden spoon or paddle attachment on low speed until a sticky, cohesive dough forms. The dough should be moist and tacky; add up to 1–2 tbsp warm milk if it seems too dry, or a little extra flour if too loose.For this step
- 4 tbspUnsalted butter, melted (for dough)
- 1 largeLarge egg, room temperature
Step 4: First rise
Lightly oil a bowl and transfer the dough, smoothing the top, then cover with plastic wrap or a damp towel. Place in a warm draft-free spot and let rise about 60 minutes, until noticeably puffed and roughly doubled in volume.Step 5: Shape and second rise
Turn the dough out onto a lightly oiled surface, divide into 6 equal portions (weigh if you like), and shape each into a smooth ball. Arrange the balls tightly in a greased 9-inch round or similar pan for tear-and-share, cover, and let rise 25–35 minutes until puffy.Step 6: Bake and finish
While the rolls finish their second rise, preheat the oven to 375°F (190°C). Bake 20–25 minutes until golden brown and the tops spring back; immediately brush the hot rolls with the reserved melted butter for a glossy, tender finish and let cool slightly before serving.For this step
- 2 tbspUnsalted butter, melted (for brushing)


- Warm the milk to 105–115°F (40–46°C) and stir in the sugar and yeast. Let sit for 5–10 minutes until foamy and aromatic to confirm the yeast is active before continuing.
- In a large bowl whisk together the gluten-free flour blend, xanthan gum (if using), and salt until evenly distributed. If your blend already contains xanthan, omit that ingredient and still whisk to aerate the flour.
- Whisk the melted butter and egg into the foamy milk mixture, then pour the wet ingredients into the dry and mix with a wooden spoon or paddle attachment on low speed until a sticky, cohesive dough forms. The dough should be moist and tacky; add up to 1–2 tbsp warm milk if it seems too dry, or a little extra flour if too loose.
- Lightly oil a bowl and transfer the dough, smoothing the top, then cover with plastic wrap or a damp towel. Place in a warm draft-free spot and let rise about 60 minutes, until noticeably puffed and roughly doubled in volume.
- Turn the dough out onto a lightly oiled surface, divide into 6 equal portions (weigh if you like), and shape each into a smooth ball. Arrange the balls tightly in a greased 9-inch round or similar pan for tear-and-share, cover, and let rise 25–35 minutes until puffy.
- While the rolls finish their second rise, preheat the oven to 375°F (190°C). Bake 20–25 minutes until golden brown and the tops spring back; immediately brush the hot rolls with the reserved melted butter for a glossy, tender finish and let cool slightly before serving.
Fluffy Gluten-Free Dinner Rolls (Yeasted Tear-and-Share) Tips
Proof the yeast first
Even if you use instant yeast, proofing in warm milk with sugar for 5–10 minutes confirms activity and avoids a failed rise; milk should feel warm, not hot (105–115°F / 40–46°C).
Aim for tacky dough
The dough should be moist and slightly sticky — not dry like wheat dough; add up to 1–2 tablespoons warm milk if it feels stiff, or a touch more flour if it’s overly loose. Keep adjustments minimal to maintain rise and tenderness.
Oil, don’t flour
When shaping gluten-free dough, oil your hands and the work surface instead of flouring; flour just sits on the surface and prevents smooth shaping of sticky dough. Oil also helps create a slick exterior so balls join cleanly in the pan.
Watch proofing, not the clock
Gluten-free dough can under- or over-proof quickly; look for a noticeably puffed, slightly domed appearance rather than relying solely on time. If the rolls collapse when poked, they’ve likely over-proofed and should go into a slightly cooler oven.
Brush immediately with butter
Brushing the hot tops as soon as they come out of the oven adds shine and softens the crust, preventing an unpleasant dry skin that gluten-free rolls can develop once cooled.
Fluffy Gluten-Free Dinner Rolls (Yeasted Tear-and-Share) Variations and Substitutions
Dairy-free swap
Use unsweetened oat or soy milk warmed to the same temperature and replace the butter with melted vegan butter; add a tablespoon of neutral oil if your vegan butter is very low in fat for better tenderness.
Herb and garlic rolls
Fold 1–2 teaspoons minced garlic and 2 tablespoons finely chopped fresh herbs (rosemary, thyme, or parsley) into the dough or brush with garlic-herb butter after baking for savory pull-apart rolls.
Mini slider version
Divide the dough into 12 smaller portions and bake in a 9×13 pan for 12–15 minutes, checking earlier for color; reduced size requires a shorter bake time and makes handy sandwich rolls.
Egg-free binder option
Replace the egg with 1 tablespoon ground flax mixed with 3 tablespoons warm water (let sit 5 minutes) or use 2 tablespoons neutral oil and a teaspoon additional xanthan to help with structure.
How to Store and Make Fluffy Gluten-Free Dinner Rolls (Yeasted Tear-and-Share) Ahead
Store cooled rolls in an airtight container or a resealable bag at room temperature for up to 48 hours; avoid refrigeration, which accelerates staling. For longer storage, freeze baked rolls in a double layer of plastic wrap or a freezer bag for up to 3 months; reheat from frozen wrapped in foil at 325°F (160°C) for 12–18 minutes or defrost then warm to restore tenderness. You can also freeze shaped balls (flash-freeze on a sheet then transfer to a bag) and bake from frozen, adding proofing time as they thaw.
What to Serve With Fluffy Gluten-Free Dinner Rolls (Yeasted Tear-and-Share)
Serve warm with a generous swipe of compound butter (softened butter mixed with honey, lemon zest or chopped herbs) for holiday tables. These rolls are excellent alongside roast chicken or turkey with gravy, creamy soups like potato–leek or butternut squash, and pair well with a full-bodied white wine, hard cider, or a lightly oaked Chardonnay.
Fluffy Gluten-Free Dinner Rolls (Yeasted Tear-and-Share) FAQs
Can I use active dry yeast instead of instant?
Yes — use the same weight (about 2.25 teaspoons); dissolve and proof active dry yeast in the warm milk and sugar for 5–10 minutes until foamy before mixing, while instant can be sprinkled directly but still benefits from proofing to confirm activity.
Why didn’t my rolls rise properly?
Common causes are milk that was too hot or cold, expired yeast, salt touching the yeast directly, or under-proofing in a cool environment; repeat the proof step with fresh yeast and ensure the dough is kept in a warm, draft-free spot for the stated rise times.
My rolls were dry or crumbly — how can I fix that?
Dryness usually means insufficient fat or hydration or overbaking; next time increase the melted butter by a tablespoon or add a tablespoon more milk, and remove rolls as soon as the tops are golden and spring back to the touch.
Can I make these ahead or freeze them?
Yes — bake and cool completely, then freeze in airtight bags for up to 3 months; to reheat, thaw at room temperature and warm in a 325°F oven wrapped in foil for 10–15 minutes, or microwave briefly then crisp in the oven.
Is xanthan gum necessary if my blend already contains it?
No — omit the extra xanthan if your blend lists it; whisk the dry blend well to aerate but avoid doubling the binder which can make the crumb gummy.
Can I scale the recipe to more rolls or a different pan?
Yes — the dough scales easily; if you change pan size or increase the number of rolls, watch baking time closely because a deeper pan or larger mass may need additional minutes and you can check doneness by color and a slight spring back or an internal temperature of about 190°F (88°C).
About the author
Jake WoodsHello, I'm Jake. I started this recipe site with the idea that I hated recipe websites that overwhelm you with long stories and ads just to see plain content that's not helpful. My goal is to provide you with quality recipes, simple ideas and a fun cooking experience. There's lots of fun things to cook, and I think as you browse the site you'll find that TopShelf.Recipes is the place for quality recipes on the web.
See all recipes by Jake Woods →Ratings & Reviews
Did you make this recipe?
Be the first to share your experience.
Nutrition Facts
Per serving: 1 serving
Nutrition values are estimated from USDA ingredient data and may vary based on preparation, brands, and portion sizes. Values are provided for informational purposes only.
Keep Reading
Guides & articles for this recipe
Tips & Techniques
Baking Soda and Tenderized Beef
Learn how baking soda can tenderize, boost browning, and improve moisture for ground beef and other meats. This practical guide covers the science, step-by-step techniques, common mistakes, and recipes to try.

Healthy Eating
Gluten-Free Weeknight Grilling Plan
A 7-day gluten-free weeknight grilling plan with quick, family-friendly recipes, prep-ahead timelines, and a printable shopping list that spotlights late-summer produce and pantry staples. Includes clear cross-contamination safety tips and simple swaps to keep dinners fast and crowd-pleasing.

Healthy Eating
Low-Fat Grill Swaps for Big Flavor
A practical guide to trimming fat from grilled meals without losing juiciness or char. Learn yogurt- and citrus-based marinades, lean protein picks, searing and indirect-heat tricks, plus 5 quick low-fat marinades and a simple weeknight plan.
More from Baking
View all Baking recipes →
Cloud Bread Sandwiches

Honey Mustard Chicken Nuggets

Cheddar Jalapeño Corn Muffins

Basque Burnt Cheesecake

30-Minute Sticky Baked Honey Garlic Chicken Thighs with Crisp Edges

Lemon Butter Salmon

Spritz Cookies

Brown Butter Vanilla Syrup

Honey Glazed Easter Ham
Ask me anything about this recipe — substitutions, scaling, techniques, timing.
Powered by AI · 6 questions per 5 minutes, 30 per day