Gluten-Free Sourdough Bread Starter and Loaf (Step-by-Step Guide)
A step-by-step workflow to build a reliable gluten-free sourdough starter and turn it into a sturdy, flavorful loaf. This guide covers starter creation, maintenance, dough mixing with psyllium for structure, fermentation, and baking techniques adapted for gluten-free flours.
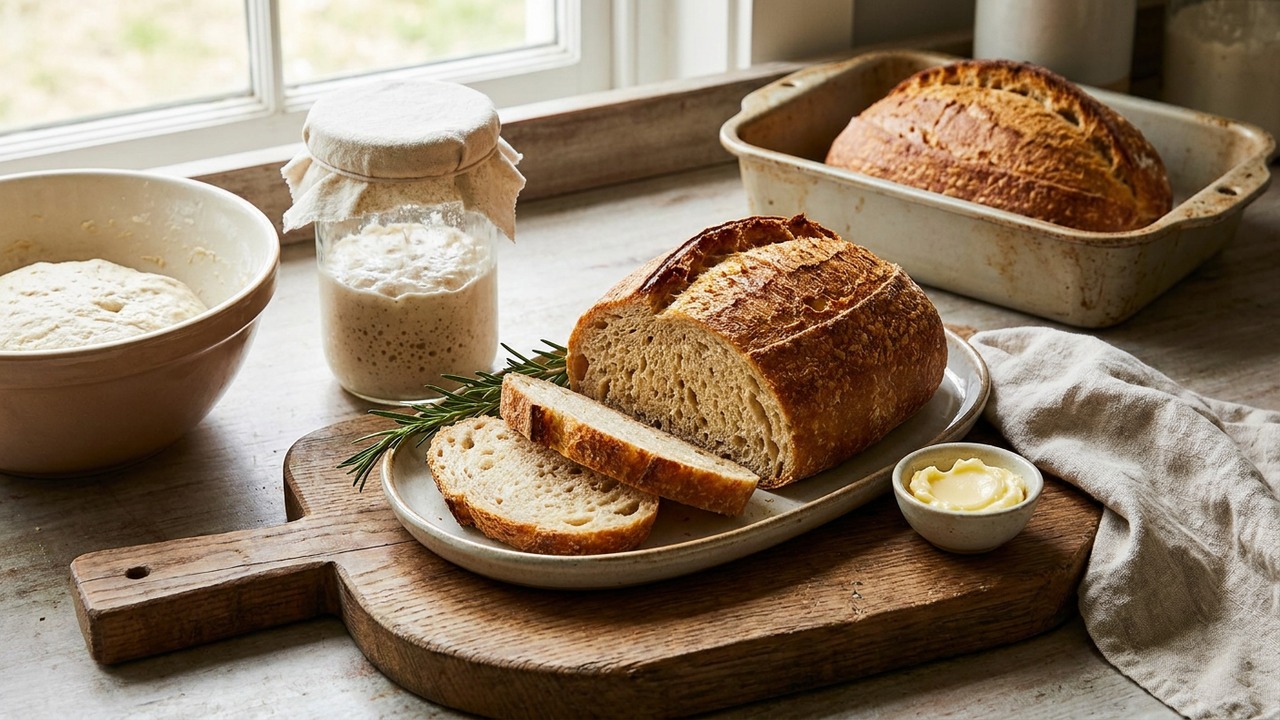
About This Recipe
Sourdough has a devoted fan base for a reason: the slow fermentation builds complex, tangy flavor and a resilient crumb. This gluten-free version leans on brown rice flour for a steady, predictable starter and tapioca starch plus psyllium husk for the stretch and chew that gluten normally provides. The result is a loaf with a crisp, deeply browned crust, a tender but structured interior, and the slightly sweet, toasty notes that develop during long fermentation. Because the starter is rice-based, it tends to be gentler and more forgiving than wheat starters, but it still rewards patience and regular feedings.
This recipe is made for people who want a real sourdough experience without wheat: home bakers who keep dairy-free or grain-sensitive kitchens, folks who like baking from scratch, and sourdough junkies curious about how psyllium can mimic gluten’s supportive role. Key moments are the 20–30 minute rest after mixing (critical for psyllium hydration), a careful bulk ferment where you look for visible aeration rather than dough elasticity, and a full rest after baking so the crumb can set. Follow those checkpoints and you’ll consistently turn a bubbly starter into a loaf that slices cleanly and toasts beautifully.
Ingredients for Gluten-Free Sourdough Bread Starter and Loaf (Step-by-Step Guide)
- 1/2 cup Brown rice flour
- 3 cups Gluten-free all-purpose flour blend (preferably with rice/tapioca/starch base)
- 1/2 cup Filtered water (room temperature)
- 1 cup Tapioca starch
- 2 tbsp Psyllium husk powder
- 2 tsp Fine sea salt
- 2 tbsp Neutral oil (sunflower, canola or light olive oil)
- 1 cup Active gluten-free sourdough starter (100% hydration)
How to Make Gluten-Free Sourdough Bread Starter and Loaf (Step-by-Step Guide)
Step 1: Create the initial starter (Day 0)
Combine brown rice flour and filtered water in a clean jar and stir until homogeneous; cover loosely to allow air exchange. Place the jar in a warm spot (70–75°F / 21–24°C) and mark the level so you can track rising; this is the base that you'll feed daily to cultivate natural wild yeasts.For this step
- 1/2 cupBrown rice flour
- 1/2 cupFiltered water (room temperature)
Step 2: Feed and mature the starter (Days 1–7)
Discard roughly half the starter each morning, then feed with equal weights/volumes of brown rice flour and water (about 1/2 cup and 1/2 cup) and mix well; repeat daily. Within 5–7 days you should see a reliably bubbly culture that doubles in volume within 4–8 hours of feeding and has a pleasant, tangy aroma — that indicates readiness for baking.Step 3: Mix the dough
In a large bowl, whisk together the gluten-free all-purpose blend, tapioca starch, psyllium husk powder, and salt until even. Separately combine the active starter, water (about 1 cup extra warm water if needed), and oil, then pour into the dry mix and stir until a thick, sticky dough forms; let rest 20–30 minutes to allow the psyllium to hydrate and the dough to bind.For this step
- 3 cupsGluten-free all-purpose flour blend (preferably with rice/tapioca/starch base)
- 1 cupTapioca starch
- 2 tbspPsyllium husk powder
- 2 tspFine sea salt
- 2 tbspNeutral oil (sunflower, canola or light olive oil)
- 1 cupActive gluten-free sourdough starter (100% hydration)
Step 4: Bulk fermentation
Cover the bowl and let dough ferment at room temperature (70–75°F / 21–24°C) for about 4–6 hours, performing one gentle fold midway to redistribute gas if desired. You should see the dough expand and become aerated; gluten-free doughs will not show the same stretch as wheat doughs but should feel lighter and visibly bubbly.Step 5: Shape and final proof; preheat oven
Turn the dough onto parchment, shape into a round or loaf pan with wet hands (a high-sided pan works well to support the loaf), and cover for a final proof of 1–2 hours until reasonably puffy. Meanwhile preheat the oven to 450°F (230°C) with a Dutch oven or baking stone inside; preheating ensures good oven spring and a crisp crust.Step 6: Bake and cool
Bake covered for 25 minutes, then uncover and reduce heat to 425°F (220°C) and bake another 25–30 minutes until the crust is deep golden and the internal temperature reaches about 205–210°F (96–99°C). Remove from the oven and cool fully on a rack (at least 1 hour) before slicing to let the crumb set and avoid gummy texture.


- Combine brown rice flour and filtered water in a clean jar and stir until homogeneous; cover loosely to allow air exchange. Place the jar in a warm spot (70–75°F / 21–24°C) and mark the level so you can track rising; this is the base that you'll feed daily to cultivate natural wild yeasts.
- Discard roughly half the starter each morning, then feed with equal weights/volumes of brown rice flour and water (about 1/2 cup and 1/2 cup) and mix well; repeat daily. Within 5–7 days you should see a reliably bubbly culture that doubles in volume within 4–8 hours of feeding and has a pleasant, tangy aroma — that indicates readiness for baking.
- In a large bowl, whisk together the gluten-free all-purpose blend, tapioca starch, psyllium husk powder, and salt until even. Separately combine the active starter, water (about 1 cup extra warm water if needed), and oil, then pour into the dry mix and stir until a thick, sticky dough forms; let rest 20–30 minutes to allow the psyllium to hydrate and the dough to bind.
- Cover the bowl and let dough ferment at room temperature (70–75°F / 21–24°C) for about 4–6 hours, performing one gentle fold midway to redistribute gas if desired. You should see the dough expand and become aerated; gluten-free doughs will not show the same stretch as wheat doughs but should feel lighter and visibly bubbly.
- Turn the dough onto parchment, shape into a round or loaf pan with wet hands (a high-sided pan works well to support the loaf), and cover for a final proof of 1–2 hours until reasonably puffy. Meanwhile preheat the oven to 450°F (230°C) with a Dutch oven or baking stone inside; preheating ensures good oven spring and a crisp crust.
- Bake covered for 25 minutes, then uncover and reduce heat to 425°F (220°C) and bake another 25–30 minutes until the crust is deep golden and the internal temperature reaches about 205–210°F (96–99°C). Remove from the oven and cool fully on a rack (at least 1 hour) before slicing to let the crumb set and avoid gummy texture.
Gluten-Free Sourdough Bread Starter and Loaf (Step-by-Step Guide) Tips
Feed at Consistent Times
Feeding your rice starter at the same times each day (morning and evening is ideal) helps it develop a predictable rise pattern and reliable leavening power.
Hydrate Psyllium Fully
After mixing, let the dough rest 20–30 minutes so the psyllium swells completely; underhydrated psyllium will give a crumb that crumbles or feels gummy.
Use a Warm Spot
Keep both starter and dough at 70–75°F (21–24°C) for reliable fermentation; if your kitchen is cool, use the oven with the light on or a proofing box.
Weigh Starter If Possible
A cup of starter can vary in hydration; if you can, weigh 100–240g and adjust the dough water to achieve a thick, tacky batter-like consistency rather than a stiff dough.
Check Internal Temp
Bake until the crumb reaches 205–210°F (96–99°C); that avoids an underbaked, gummy center which is a common issue with gluten-free loaves.
Gluten-Free Sourdough Bread Starter and Loaf (Step-by-Step Guide) Variations and Substitutions
Whole-Grain Boost
Swap up to 1 cup of the gluten-free blend for sorghum or buckwheat flour for a nuttier flavor; you may need an extra tablespoon of water to maintain the same dough hydration.
Seeded Loaf
Fold 1/2 cup mixed seeds (sunflower, pumpkin, flax) into the dough after the first fold for crunch and flavor, and press extra seeds onto the top before baking.
Lower-Carb Option
Replace 1 cup of the all-purpose blend with 3/4 cup almond flour and reduce the water by 2–3 tablespoons to account for almond flour’s lower absorbency.
Flavor Infusion
Stir in 1–2 tablespoons of miso paste or a teaspoon of smoked paprika into the wet mix for an umami or smoky twist that pairs wonderfully with savory toppings.
How to Store and Make Gluten-Free Sourdough Bread Starter and Loaf (Step-by-Step Guide) Ahead
Cool the loaf completely before storing to prevent condensation and a gummy crumb. Keep sliced bread in a loosely sealed bag at room temperature for up to 3 days, or freeze individual slices in a zipper bag for up to 3 months; toast from frozen for best texture. Reheat wrapped in foil at 325°F (160°C) for 10–12 minutes to refresh a whole loaf without drying it out.
What to Serve With Gluten-Free Sourdough Bread Starter and Loaf (Step-by-Step Guide)
This bread’s crisp crust and tender crumb make it excellent for open-faced sandwiches—try smoked salmon with dill crème fraîche or mashed avocado with lemon and chili flakes. It also shines alongside eggs and sautéed mushrooms for a savory brunch, or toasted with nut butter and honey for a simpler, sweet option. Pair with a lightly acidic white wine or a bright, citrus-forward beer if serving at a casual gathering.
Gluten-Free Sourdough Bread Starter and Loaf (Step-by-Step Guide) FAQs
How can I tell when my gluten-free starter is ready to use?
A mature rice-based starter will reliably double in volume within 4–8 hours after a feed, smell pleasantly tangy (not putrid), and show lots of small bubbles across the surface and through the jar.
My loaf is gummy in the middle—what went wrong?
Gumminess usually means underbaking or insufficient cooling; confirm you reached 205–210°F (96–99°C) in the center and allow the loaf to cool fully for at least an hour so the crumb sets.
Can I use a different flour for the starter?
Yes—brown rice is predictable, but sorghum or buckwheat work too; just expect different fermentation aromas and slightly altered activity, and stick to a single flour once you start building a culture.
Do I need psyllium husk powder, or can I omit it?
Psyllium is crucial here for structure and moisture retention; omitting it will produce a crumb that crumbles and won’t hold slices well, especially in loaves intended for sandwiches.
How often should I refresh the starter if I’m not baking daily?
Refrigerate the starter and feed it once a week if you bake occasionally; refresh it with daily feeds for 2–3 days at room temperature before baking to restore peak activity.
About the author
Jake WoodsHello, I'm Jake. I started this recipe site with the idea that I hated recipe websites that overwhelm you with long stories and ads just to see plain content that's not helpful. My goal is to provide you with quality recipes, simple ideas and a fun cooking experience. There's lots of fun things to cook, and I think as you browse the site you'll find that TopShelf.Recipes is the place for quality recipes on the web.
See all recipes by Jake Woods →Ratings & Reviews
Did you make this recipe?
Be the first to share your experience.
Nutrition Facts
Per serving: 1 serving
Nutrition values are estimated from USDA ingredient data and may vary based on preparation, brands, and portion sizes. Values are provided for informational purposes only.
Keep Reading
Guides & articles for this recipe
Guides
Labour Day Smoking Playbook
Seven ready-to-run smoke-first menus with exact start/hold/serve timelines so you can plan an overnight pit and a stress-free Labour Day spread. Includes make-ahead side pairings, cooler-transport tips, fuel and wood picks for late-summer weather, and safety + hold strategies so hosts can relax and enjoy the holiday.
Guides
Preserve the Season: Batch, Freeze, and Grill — Turn Seasonal Recipes into Make‑Ahead, Freezer‑Friendly Meals
Learn practical strategies to scale seasonal favorites for batch cooking, freeze them without losing flavor or texture, and finish on the grill or campfire to revive fresh‑off‑the-market character. Includes packaging methods, storage timelines, safe reheating, and finishing techniques so your summer harvest feeds you all season long.
Guides
Grilled & Campfire Seasonal Sweets: 12 Crowd‑Favorite Desserts and How to Make Them Year‑Round
A season-by-season guide to 12 grill- and campfire-friendly desserts with flame-safe techniques, make-ahead strategies, vegetarian and gluten-free swaps, plus serving and storage tips so your outdoor sweets shine any time of year.
More from Baking
View all Baking recipes →
Cloud Bread Sandwiches

Honey Mustard Chicken Nuggets

Cheddar Jalapeño Corn Muffins

Basque Burnt Cheesecake

30-Minute Sticky Baked Honey Garlic Chicken Thighs with Crisp Edges

Lemon Butter Salmon

Spritz Cookies

Brown Butter Vanilla Syrup

Honey Glazed Easter Ham
Ask me anything about this recipe — substitutions, scaling, techniques, timing.
Powered by AI · 6 questions per 5 minutes, 30 per day