Homemade Blue Corn Tortillas and Quick Toasting Method
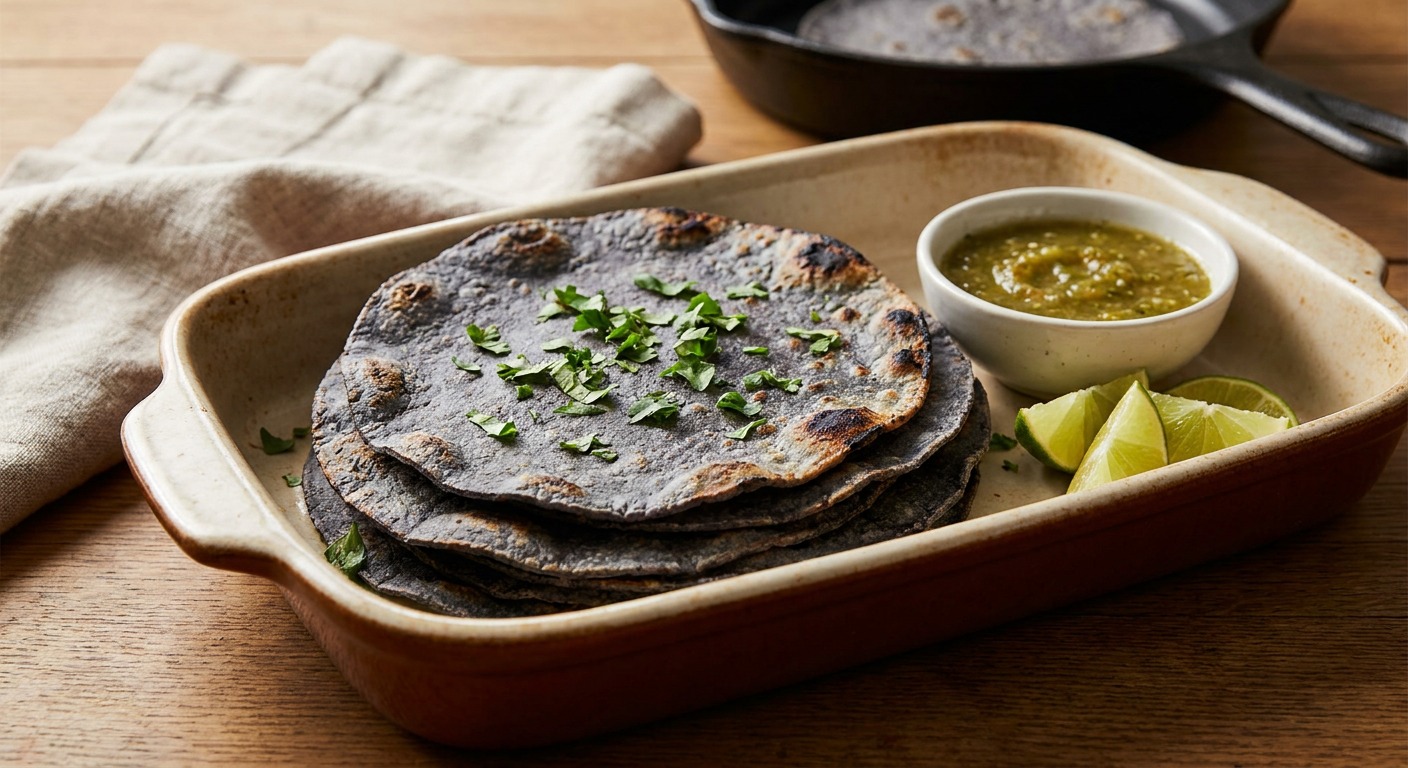
A straightforward recipe for tender blue corn tortillas with a quick toasting finish that gives you blistered, slightly crisp edges — perfect as an elevated base for tacos. These are easy to make at home with pantry-stable blue masa harina and a fast skillet method for restaurant-style texture.
Ingredient Spotlight
Blue corn masa harina
Blue corn masa harina is masa harina (nixtamalized corn flour) made from blue corn kernels, used to make tortillas, arepas, tamales and other Mesoamerican/Southwestern dishes. It has a slightly sweet, nutty, earthy corn flavor with a subtle mineral note from the nixtamalization process and gives a distinctive blue‑purple color. Find it at Latin groceries, specialty or natural‑foods stores, and online; substitute regular masa harina (yellow or white) for the same texture and technique — you’ll lose the blue color and some flavor — or mix regular masa with blue cornmeal if you can find it.
Jake Woods's note
"I love these blue corn tortillas for their nutty color and the way a quick toast transforms them into taco-ready canvases. They shine at weeknight taco nights and when you want to impress without fuss."
About This Recipe
Blue corn masa has a lower starch profile and a subtle nutty sweetness that reads like the soul of a good taco — this recipe lets that flavor shine while giving you a restaurant-style finish at home. The dough’s brief knead and a short 10–15 minute rest let the masa fully hydrate so the tortillas press smooth and stay tender; the quick skillet boil-and-flip cooks them through, and the final high-heat toast creates those irresistible blistered spots and slightly crisped edges without making the rounds brittle. Using warm water and a touch of neutral oil gives a pliable, springy dough that puffs nicely in the pan and won’t crack when folded around fillings.
This technique is for cooks who want elevated tacos without a long kitchen marathon: it uses pantry-stable blue masa harina and one pan, but yields a tortilla with complex color, firm structure, and a toasted finish that plays well with grilled meats, roasted vegetables, and bright salsas. The blistered edges add texture and visual contrast—great when you want tacos that look as good as they taste—while the blue hue adds an elegant, earthy backdrop for vibrant garnishes like cotija, pickled onion, or citrus crema.
Ingredients for Homemade Blue Corn Tortillas and Quick Toasting Method
- 2 cups Blue corn masa harina
- 1 1/2 cups Warm water (about 110°F / 43°C)
- 1 tsp Fine sea salt
- 1 tbsp Vegetable oil (neutral) — for dough
- 1 tbsp Unsalted butter, melted (optional, for toasting)
- 1 tsp Extra vegetable oil (for skillet, if needed)
How to Make Homemade Blue Corn Tortillas and Quick Toasting Method
Step 1: Mix the masa into a soft dough
In a bowl, whisk the blue corn masa harina and salt together, then stir in the warm water and the tablespoon of vegetable oil. Use your hands to bring the dough together — it should feel soft and springy, not sticky; add a teaspoon more water or a tablespoon more masa if needed. I always knead it briefly (30–45 seconds) to develop a smooth texture that presses nicely.For this step
- 2 cupsBlue corn masa harina
- 1 1/2 cupsWarm water (about 110°F / 43°C)
- 1 tspFine sea salt
- 1 tbspVegetable oil (neutral) — for dough
Step 2: Rest the dough
Cover the bowl with plastic wrap or a damp cloth and let the dough rest for 10–15 minutes so the masa fully hydrates. This step makes the tortillas more tender and easier to press, and it’s a little secret that pays off in texture. While it rests, preheat your cast-iron skillet or comal over medium-high heat.Step 3: Portion and press
Divide the dough into 10–12 golf-ball-sized pieces and roll each into a smooth ball. Press each ball between two pieces of parchment or plastic in a tortilla press, or roll out with a rolling pin to about 5–6 inches across; keep a thin, even thickness for best results. Keep the pressed tortillas covered with a damp towel while you work so they don’t dry out.Step 4: First cook on a hot skillet
Place a tortilla on your preheated skillet and cook until the edges start to dry and small bubbles form, about 40–50 seconds, then flip and cook the second side for 30–40 seconds. Press gently with a spatula during cooking to encourage even contact and puffing; you want a cooked, pliable tortilla that holds together. Transfer cooked tortillas to a towel-lined basket and keep covered while you finish the rest.Step 5: Quick toasting for blistered, crisp edges
For the elevated finish, brush one side of each cooked tortilla lightly with the melted butter (or a little more vegetable oil) and return to the hot skillet for 10–25 seconds per side until you see blistered, golden spots and slightly crisp edges. Work quickly — the goal is a short, high-heat toast that adds texture without making them brittle. If you prefer, you can broil stacked tortillas brushed with butter for 1–2 minutes total, flipping once, but I like the skillet for more control and deeper color.For this step
- 1 tbspUnsalted butter, melted (optional, for toasting)
- 1 tspExtra vegetable oil (for skillet, if needed)
Step 6: Keep warm and serve
Stack the finished tortillas and wrap them in a clean kitchen towel or place in a tortilla warmer to stay pliable while you assemble tacos. Serve immediately for best texture — these are happiest hot and slightly blistered, ready to cradle your fillings.


- In a bowl, whisk the blue corn masa harina and salt together, then stir in the warm water and the tablespoon of vegetable oil. Use your hands to bring the dough together — it should feel soft and springy, not sticky; add a teaspoon more water or a tablespoon more masa if needed. I always knead it briefly (30–45 seconds) to develop a smooth texture that presses nicely.
- Cover the bowl with plastic wrap or a damp cloth and let the dough rest for 10–15 minutes so the masa fully hydrates. This step makes the tortillas more tender and easier to press, and it’s a little secret that pays off in texture. While it rests, preheat your cast-iron skillet or comal over medium-high heat.
- Divide the dough into 10–12 golf-ball-sized pieces and roll each into a smooth ball. Press each ball between two pieces of parchment or plastic in a tortilla press, or roll out with a rolling pin to about 5–6 inches across; keep a thin, even thickness for best results. Keep the pressed tortillas covered with a damp towel while you work so they don’t dry out.
- Place a tortilla on your preheated skillet and cook until the edges start to dry and small bubbles form, about 40–50 seconds, then flip and cook the second side for 30–40 seconds. Press gently with a spatula during cooking to encourage even contact and puffing; you want a cooked, pliable tortilla that holds together. Transfer cooked tortillas to a towel-lined basket and keep covered while you finish the rest.
- For the elevated finish, brush one side of each cooked tortilla lightly with the melted butter (or a little more vegetable oil) and return to the hot skillet for 10–25 seconds per side until you see blistered, golden spots and slightly crisp edges. Work quickly — the goal is a short, high-heat toast that adds texture without making them brittle. If you prefer, you can broil stacked tortillas brushed with butter for 1–2 minutes total, flipping once, but I like the skillet for more control and deeper color.
- Stack the finished tortillas and wrap them in a clean kitchen towel or place in a tortilla warmer to stay pliable while you assemble tacos. Serve immediately for best texture — these are happiest hot and slightly blistered, ready to cradle your fillings.
Homemade Blue Corn Tortillas and Quick Toasting Method Tips
Hydration is everything
Warm the water to about 110°F (43°C) to help the masa absorb quickly; the dough should feel soft and springy, not tacky — adjust by teaspoonfuls of water or masa.
Use parchment for pressing
Press between parchment or plastic to prevent sticking and get a very even thickness; if you don’t have a press, roll from center outward so edges don’t end up paper-thin.
Preheat, then test heat
A properly hot cast-iron or comal is crucial — test with a small scrap of dough: it should sizzle and bubble quickly but not brown instantly, indicating a medium-high surface.
Encourage even puffing
Press gently with a spatula during the first side to keep full contact and coax steam pockets that produce the classic blister and slight puff.
Toast briefly for texture
Brush the tortilla very lightly with melted butter or oil and flash-toast for 10–25 seconds per side to add color and crisp edges without drying the center.
Keep them covered
Stack cooked tortillas in a towel-lined basket or tortilla warmer to trap steam and keep them pliable while you finish the batch.
Homemade Blue Corn Tortillas and Quick Toasting Method Variations and Substitutions
Vegan butter swap
Use a neutral oil or vegan margarine for the toasting step to keep these tortillas dairy-free while still getting golden, flavorful edges.
Blue-and-yellow blend
Mix equal parts blue masa and yellow masa harina for a milder blue color and a slightly softer, more familiar corn flavor that’s excellent with smoky fillings.
Chile-lime twist
Stir 1 tsp ancho chile powder and the zest of one lime into the dough for bright, savory heat that pairs especially well with grilled seafood.
Tortilla chips
Brush pressed tortillas with oil, cut into wedges, and bake at 400°F (200°C) until crisp (8–12 minutes) or fry briefly for crunchy chips that keep the blue color intact.
How to Store and Make Homemade Blue Corn Tortillas and Quick Toasting Method Ahead
Cooked tortillas are best the same day, but you can refrigerate a sealed stack for up to 3 days; warm them briefly in a hot skillet or wrap in a damp towel and microwave for 20–30 seconds. For longer storage, freeze flat between parchment sheets in a zip-top bag for up to 2 months, and reheat straight from frozen in a skillet over medium heat until pliable.
What to Serve With Homemade Blue Corn Tortillas and Quick Toasting Method
Serve hot and blistered as the base for simply seasoned fillings like grilled fish with cabbage slaw, carne asada with charred onions, or roasted poblano and cotija for a vegetarian option. Offer pickled red onions, a bright salsa verde, and wedges of lime on the side, and pair with a mineral-forward margarita, light Mexican lager, or a citrusy agua fresca to cut the masa’s earthiness.
Homemade Blue Corn Tortillas and Quick Toasting Method FAQs
Can I use regular (white/yellow) masa harina instead of blue?
Yes—regular masa harina works the same way for texture and technique, but you’ll lose the blue corn’s distinctive nutty flavor and color; consider blending if you want a subtler effect.
My dough is cracking when I press tortillas — what went wrong?
Cracking usually means the dough is too dry or the tortillas are rolled/pressed too thin at the edges; add a teaspoon of water, knead briefly, and keep pressed rounds covered while you work.
Why don’t my tortillas puff up?
Puffing is caused by rapid steam formation and an even, hot surface; press evenly, make sure the skillet is hot, and don’t over-thin the center — also avoid flattening them with the spatula after the first minute.
Can I make the dough ahead of time?
Yes — refrigerated, tightly wrapped dough keeps up to 24 hours and often develops better flavor and a smoother texture; bring it to room temperature for 15–20 minutes before shaping.
Is the quick toasting step necessary?
It’s optional but recommended: the brief, high-heat toast adds color, caramelized flavor, and crisped edges that contrast nicely with a soft center, elevating the tortilla beyond just a plain cooked round.
About the author
Jake WoodsHello, I'm Jake. I started this recipe site with the idea that I hated recipe websites that overwhelm you with long stories and ads just to see plain content that's not helpful. My goal is to provide you with quality recipes, simple ideas and a fun cooking experience. There's lots of fun things to cook, and I think as you browse the site you'll find that TopShelf.Recipes is the place for quality recipes on the web.
See all recipes by Jake Woods →Ratings & Reviews
Did you make this recipe?
Be the first to share your experience.
Nutrition Facts
Per serving: 1 serving
Nutrition values are estimated from USDA ingredient data and may vary based on preparation, brands, and portion sizes. Values are provided for informational purposes only.
Keep Reading
Guides & articles for this recipe
Tips & Techniques
Baking Soda and Tenderized Beef
Learn how baking soda can tenderize, boost browning, and improve moisture for ground beef and other meats. This practical guide covers the science, step-by-step techniques, common mistakes, and recipes to try.

Healthy Eating
Gluten-Free Weeknight Grilling Plan
A 7-day gluten-free weeknight grilling plan with quick, family-friendly recipes, prep-ahead timelines, and a printable shopping list that spotlights late-summer produce and pantry staples. Includes clear cross-contamination safety tips and simple swaps to keep dinners fast and crowd-pleasing.

Healthy Eating
Low-Fat Grill Swaps for Big Flavor
A practical guide to trimming fat from grilled meals without losing juiciness or char. Learn yogurt- and citrus-based marinades, lean protein picks, searing and indirect-heat tricks, plus 5 quick low-fat marinades and a simple weeknight plan.
More from Baking
View all Baking recipes →
Cloud Bread Sandwiches

Honey Mustard Chicken Nuggets

Cheddar Jalapeño Corn Muffins

Basque Burnt Cheesecake

30-Minute Sticky Baked Honey Garlic Chicken Thighs with Crisp Edges

Lemon Butter Salmon

Spritz Cookies

Brown Butter Vanilla Syrup

Honey Glazed Easter Ham
Ask me anything about this recipe — substitutions, scaling, techniques, timing.
Powered by AI · 6 questions per 5 minutes, 30 per day