Red Velvet Molten Lava Cakes with Raspberry Blood Sauce
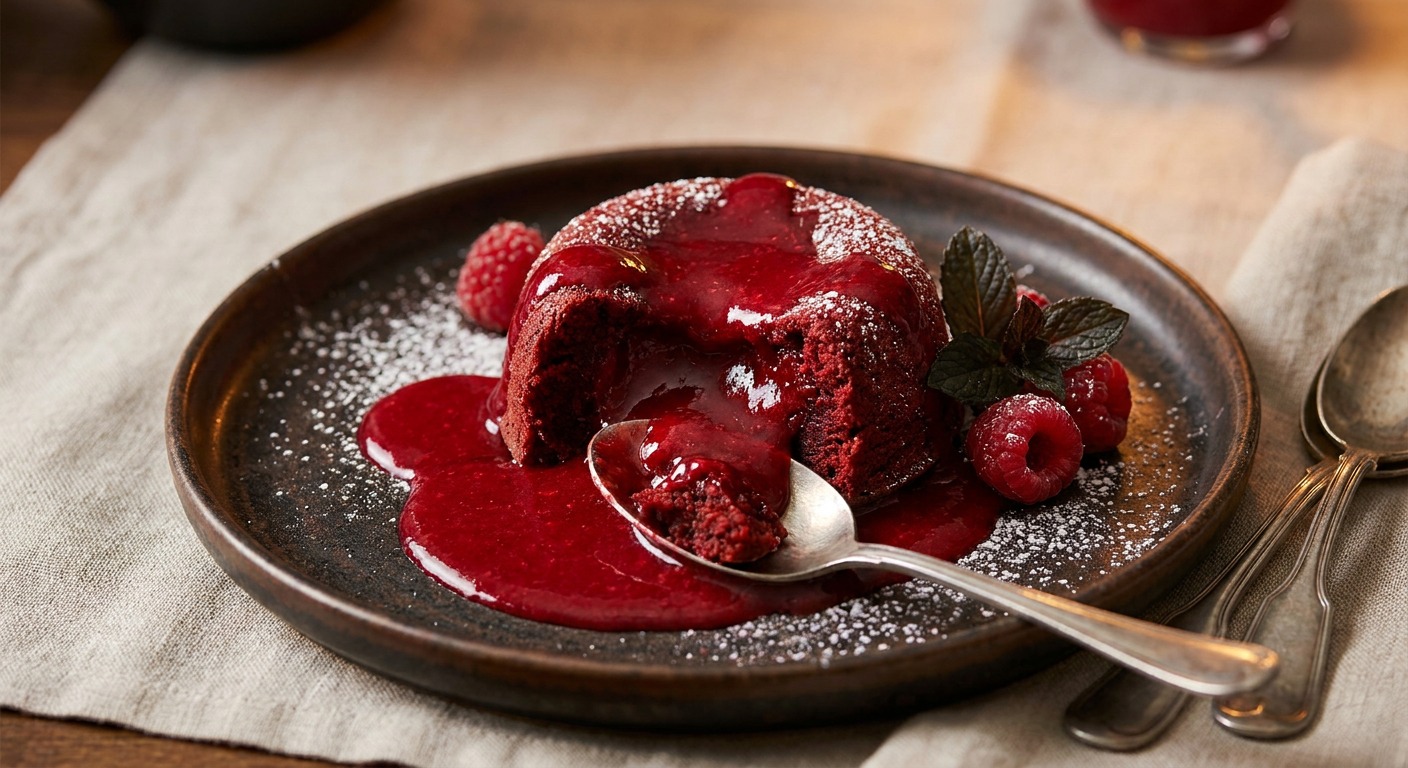
Show-stopping single-serve red velvet molten lava cakes with a gooey interior and a vibrant raspberry “blood” sauce. Perfect for Halloween or any dramatic dessert course — crisp edges, tender red crumb, and a glossy crimson drizzle.
Jake Woods's note
"These individual cakes are a crowd-pleasing, theatrical finale for themed parties — they’re fast to make but look like a confectionary spectacle. Expect fudgy centers and a bright, room-staining raspberry sauce that delivers the perfect ‘blood’ effect."
About This Recipe
These red velvet molten lava cakes are theatrical without being fussy: a tender, cocoa-kissed crumb that gives way to a gooey, bittersweet center, finished with a glossy, tart raspberry “blood” sauce that cuts through the richness. The recipe leans on finely chopped 60–70% bittersweet chocolate (not cocoa alone) to deliver real chocolate depth while the small amount of flour and extra egg and sugar keep the interior fluid rather than cakey. Dusting ramekins with unsweetened cocoa — not flour — gives the edges that crisp, almost cookie-like barrier that makes unmolding satisfying and keeps the interior molten.
They’re ideal for a Halloween dinner or any time you want dramatic plating for six: the crimson sauce is both a flavor counterpoint and a visual flourish. The method emphasizes temperature control — gently cooling melted chocolate before folding it into aerated eggs keeps the batter glossy and stable, while a short, high-heat bake sets the edges fast and leaves the heart molten. Small changes (quality chocolate, fresh or thawed raspberries, and a good gel color) have an outsized impact, so this version balances showmanship with reliably reproducible technique.
Ingredients for Red Velvet Molten Lava Cakes with Raspberry Blood Sauce
- 6 tbsp Unsalted butter
- 6 oz Bittersweet chocolate, finely chopped (60–70% cacao)
- 6 count Large eggs
- 3/4 cup Granulated sugar (reserve 3 tbsp for sauce)
- 1 tsp Vanilla extract
- 1 tsp Red gel food coloring
- 3/4 cup All-purpose flour
- 3 tbsp Unsweetened cocoa powder (for batter + dusting)
- 1 cup Fresh or frozen raspberries
How to Make Red Velvet Molten Lava Cakes with Raspberry Blood Sauce
Step 1: Preheat and prepare ramekins
Preheat the oven to 425°F (220°C). Generously butter six 6-oz ramekins and dust the insides with unsweetened cocoa powder, tapping out any excess; this both flavors and helps release the cakes after baking.For this step
- 3 tbspUnsweetened cocoa powder (for batter + dusting)
Step 2: Make the red velvet batter
Melt the chopped bittersweet chocolate with 4 tablespoons of the butter in a double boiler or microwave in 20-second bursts, stirring until smooth; set aside to cool slightly. In a large bowl, whisk the eggs with the granulated sugar until pale and slightly thickened, then whisk in the remaining 2 tablespoons butter, vanilla, and red gel food coloring until evenly colored. Fold the cooled chocolate into the egg mixture, then gently fold in the flour and 1 tablespoon of cocoa powder until just combined — avoid overmixing to keep the center molten.For this step
- 6 ozBittersweet chocolate, finely chopped (60–70% cacao)
- 6 countLarge eggs
- 3/4 cupGranulated sugar (reserve 3 tbsp for sauce)
- 1 tspVanilla extract
- 1 tspRed gel food coloring
- 3/4 cupAll-purpose flour
Step 3: Portion and bake
Divide the batter evenly among the prepared ramekins (they should be about 3/4 full). Place ramekins on a baking sheet and bake 10–12 minutes, until the edges are set and the centers still jiggle slightly when shaken — timing will vary by oven. Let rest 1–2 minutes after removing from oven to set the exterior.Step 4: Make the raspberry 'blood' sauce
While the cakes bake, combine the raspberries and the reserved 3 tablespoons of granulated sugar in a small saucepan over medium heat. Cook, stirring and mashing occasionally, until the berries break down and the mixture thickens (about 6–8 minutes); if you prefer a silky sauce, strain through a fine mesh sieve to remove seeds, then return to the pan to reduce briefly to a pourable but viscous consistency.For this step
- 1 cupFresh or frozen raspberries
Step 5: Unmold and serve with sauce
Run a small knife around the edge of each ramekin and invert each cake onto a plate; tap lightly if needed. Spoon the warm raspberry sauce around and over each cake for a dramatic blood-like effect, and garnish with a few whole raspberries or a light dusting of cocoa powder if desired. Serve immediately while centers are molten.


- Preheat the oven to 425°F (220°C). Generously butter six 6-oz ramekins and dust the insides with unsweetened cocoa powder, tapping out any excess; this both flavors and helps release the cakes after baking.
- Melt the chopped bittersweet chocolate with 4 tablespoons of the butter in a double boiler or microwave in 20-second bursts, stirring until smooth; set aside to cool slightly. In a large bowl, whisk the eggs with the granulated sugar until pale and slightly thickened, then whisk in the remaining 2 tablespoons butter, vanilla, and red gel food coloring until evenly colored. Fold the cooled chocolate into the egg mixture, then gently fold in the flour and 1 tablespoon of cocoa powder until just combined — avoid overmixing to keep the center molten.
- Divide the batter evenly among the prepared ramekins (they should be about 3/4 full). Place ramekins on a baking sheet and bake 10–12 minutes, until the edges are set and the centers still jiggle slightly when shaken — timing will vary by oven. Let rest 1–2 minutes after removing from oven to set the exterior.
- While the cakes bake, combine the raspberries and the reserved 3 tablespoons of granulated sugar in a small saucepan over medium heat. Cook, stirring and mashing occasionally, until the berries break down and the mixture thickens (about 6–8 minutes); if you prefer a silky sauce, strain through a fine mesh sieve to remove seeds, then return to the pan to reduce briefly to a pourable but viscous consistency.
- Run a small knife around the edge of each ramekin and invert each cake onto a plate; tap lightly if needed. Spoon the warm raspberry sauce around and over each cake for a dramatic blood-like effect, and garnish with a few whole raspberries or a light dusting of cocoa powder if desired. Serve immediately while centers are molten.
Red Velvet Molten Lava Cakes with Raspberry Blood Sauce Tips
Butter and cocoa coating
Generously butter the ramekins then cocoa-dust them (tap out excess) to ensure release and add a thin chocolate edge that crisps during baking.
Melt chocolate gently
Use a double boiler or short microwave bursts and stop while a little streaky—residual heat will finish it; letting it cool slightly prevents scrambling the eggs.
Whisk eggs till pale
Beat the eggs and sugar until noticeably thickened and lighter in color to incorporate air that gives lift without turning the center cakey.
Fold, don’t overmix
Combine the wet and dry ingredients with gentle folds until just homogenous; overworking develops gluten and risks a firm center.
Watch the jiggle
Bake until the edges are set but the center jigs with a slight wobble—carryover heat will finish the exterior in the ramekin during the brief rest.
Seedless sauce option
Pass the raspberry mix through a fine sieve for a silky ‘blood’ sauce, then reduce it a minute or two to reach a pourable syrup consistency.
Red Velvet Molten Lava Cakes with Raspberry Blood Sauce Variations and Substitutions
White chocolate twist
Use high-quality white chocolate in place of bittersweet and skip added gel color for a pale pink interior; reduce batter sugar by 2 tablespoons if your white chocolate is very sweet.
Espresso‑infused
Dissolve 1 teaspoon instant espresso or finely ground espresso into the melted chocolate to deepen the cocoa notes and make the tart raspberry contrast pop.
Gluten‑free swap
Replace the all-purpose flour with a 1:1 gluten-free baking flour blend and handle gently; the texture will be nearly identical if the blend contains xanthan gum.
Orange‑raspberry pairing
Add 1 teaspoon finely grated orange zest to the batter and a splash of orange liqueur to the raspberry sauce for a bright citrus lift.
Dairy‑free option
Use refined coconut oil in place of butter and a dairy-free dark chocolate (60–70% cacao) to keep the molten texture while making the cakes vegan-friendly with caution around egg substitution.
How to Store and Make Red Velvet Molten Lava Cakes with Raspberry Blood Sauce Ahead
These cakes are at their best fresh; however, you can refrigerate baked cakes uncovered for up to 24 hours, then cover for longer storage. Reheat from chilled in a 350°F (175°C) oven for about 8–10 minutes to restore a molten center, or microwave for 20–30 seconds for a quicker option—watch closely to avoid overcooking. The raspberry sauce keeps separately in the fridge for up to 3 days and can be gently warmed before serving.
What to Serve With Red Velvet Molten Lava Cakes with Raspberry Blood Sauce
Serve each warm cake with a quenelle of vanilla ice cream or a spoonful of lightly sweetened whipped cream to marry hot and cold textures and tame richness. Garnish with fresh raspberries and a few chopped toasted pistachios for color and crunch, and pair the dessert with a glass of chilled Prosecco, tawny port, or a bold espresso depending on whether you want fizz, sweetness, or a palate-cleansing finish.
Red Velvet Molten Lava Cakes with Raspberry Blood Sauce FAQs
How can I tell when the cakes are done?
Look for set, slightly pulled-away edges and a center that still jiggles gently when you nudge the ramekin; if the center is completely liquid the outside won’t have set enough, and if it’s firm the lava is gone.
Why did my center come out cakey instead of molten?
Overbaking, overmixing, or using too much flour will produce a cakier center—shorten the bake time, fold gently to avoid gluten development, and measure flour accurately by spooning into the cup and leveling.
Can I make these ahead for a dinner party?
You can prepare the batter and fill buttered, cocoa-dusted ramekins up to 24 hours ahead, keeping them covered in the fridge; bake straight from chilled and add a minute or two to the timing if needed.
Why did my cakes stick to the ramekins?
Insufficient buttering or too much cocoa dust left in clumps can cause sticking; ensure a smooth butter layer and tap out excess cocoa so there’s a thin, even coating.
Is it okay to use frozen raspberries for the sauce?
Yes—use them straight from frozen into the saucepan; they’ll break down well and often release more juice, but you may need to reduce the sauce slightly longer to reach the right thickness.
Can I freeze baked molten cakes?
You can freeze fully cooled, wrapped cakes for up to a month, but reheating from frozen risks overcooking the center; for best results freeze unbaked filled ramekins and bake from frozen, adding a few extra minutes to the oven time.
About the author
Jake WoodsHello, I'm Jake. I started this recipe site with the idea that I hated recipe websites that overwhelm you with long stories and ads just to see plain content that's not helpful. My goal is to provide you with quality recipes, simple ideas and a fun cooking experience. There's lots of fun things to cook, and I think as you browse the site you'll find that TopShelf.Recipes is the place for quality recipes on the web.
See all recipes by Jake Woods →Ratings & Reviews
Did you make this recipe?
Be the first to share your experience.
Nutrition Facts
Per serving: 2 eggs
Nutrition values are estimated from USDA ingredient data and may vary based on preparation, brands, and portion sizes. Values are provided for informational purposes only.
Keep Reading
Guides & articles for this recipe
Guides
Grilled & Campfire Seasonal Sweets: 12 Crowd‑Favorite Desserts and How to Make Them Year‑Round
A season-by-season guide to 12 grill- and campfire-friendly desserts with flame-safe techniques, make-ahead strategies, vegetarian and gluten-free swaps, plus serving and storage tips so your outdoor sweets shine any time of year.
Guides
Summer Weeknight Grilling Playbook: 4-Week Rotating Meal Plan with Quick Seasonal Recipes, Make‑Ahead Sides & Grill‑First Desserts
A practical, four-week summer grilling playbook built for busy weeknights: 12 fast mains, 8 make‑ahead sides, 4 grill-forward desserts, weekly shopping lists, prep timelines, and smart tips for backyard, tailgate, or campsite cooking. Get the rhythm of easy, seasonal grilling that keeps dinner fresh and fast.

Healthy Eating
Gluten-Free Weeknight Grilling Plan
A 7-day gluten-free weeknight grilling plan with quick, family-friendly recipes, prep-ahead timelines, and a printable shopping list that spotlights late-summer produce and pantry staples. Includes clear cross-contamination safety tips and simple swaps to keep dinners fast and crowd-pleasing.
More from Desserts
View all Desserts recipes →
Easy Peanut Butter Bars

Chocolate Peanut Butter Chex Mix

No-Churn Fresh Berry Ice Cream (No Machine, 5 Ingredients)

Molten Lemon Cake

Boozy Red White Blue Popsicles (Vodka Ice Pops for Adults)

Salted Caramel Stuffed Brownies with Crispy Edges and Sea Salt

Poached Pears with Pistachio

Affogato with Caramel

Canning Peaches Light Syrup
Ask me anything about this recipe — substitutions, scaling, techniques, timing.
Powered by AI · 6 questions per 5 minutes, 30 per day