Vegan Lemon Bars
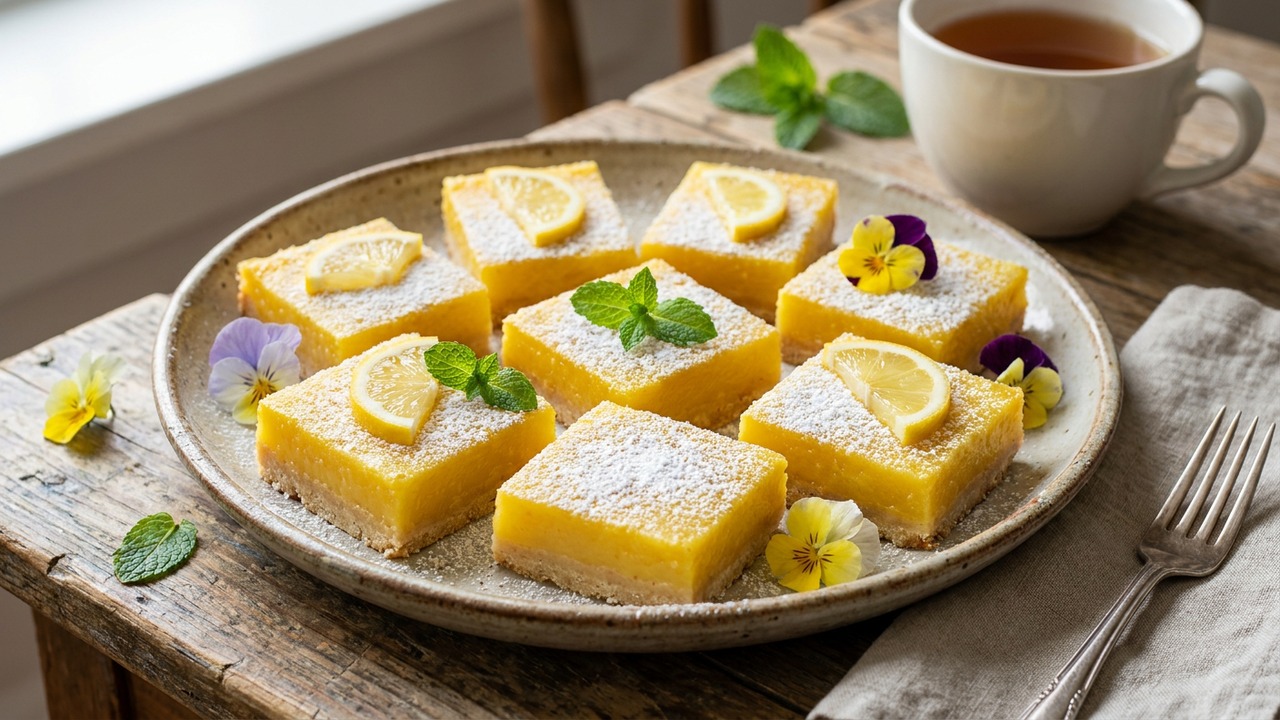
Bright, tangy vegan lemon bars with a tender shortbread crust and a silky, dairy-free lemon curd topping. These plant-based bars are easy to make and perfect for potlucks, afternoon tea, or any time you crave a citrusy dessert.
Jake Woods's note
"This recipe turns a classic lemon bar into a reliable vegan favorite with a simple cornstarch-thickened curd that sets beautifully. It shines at spring gatherings and is an approachable treat for home bakers who want bright flavor without dairy."
About This Recipe
Bright, tart lemon bars meet the kind of tender, shortbread-style crust that keeps a buttery snap even without dairy — this is a lemon bar that proves plant-based can be both simple and seriously satisfying. The crust bakes up with a faintly crisp edge and a sandy, melt-in-your-mouth interior thanks to cold vegan butter and minimal handling, while the filling relies on cornstarch and a little soy milk to become glossy and spoonable without eggs. The result is a bright, clean lemon flavor that’s more about pure citrus than heavy sweetness, so the bars feel refreshingly light even at the end of a meal.
This version is designed to be forgiving: blind-baking the base prevents sogginess, pouring hot curd onto a warm crust helps the layers set together, and an hour in the fridge firms everything for tidy slices. It’s a great recipe for potlucks, spring gatherings, or an elegant weeknight dessert; vegans, dairy‑sensitive guests, and curious non-vegans alike will appreciate the familiar texture and unapologetic lemon punch. If you like even more depth, a mix of lemon and a whisper of orange zest plays nicely without stealing the spotlight.
Ingredients for Vegan Lemon Bars
- 1 1/4 cups All-purpose flour
- 1 cup Granulated sugar (total)
- 2/3 cup Vegan butter, cold
- 1/4 tsp Fine sea salt
- 1/4 cup Cornstarch
- 1/2 cup Fresh lemon juice
- 2 tbsp Lemon zest
- 1/3 cup Unsweetened soy milk (or other unsweetened plant milk)
- 1/4 cup Confectioners' (powdered) sugar, for dusting
How to Make Vegan Lemon Bars
Step 1: Preheat and prepare pan
Preheat the oven to 350°F (175°C). Line an 8x8-inch (20x20 cm) baking pan with parchment paper, leaving an overhang on two sides for easy removal, and lightly grease the paper.Step 2: Make and blind-bake the crust
In a bowl, combine the all-purpose flour, 1/3 cup of the granulated sugar (reserve the rest for the filling), and salt. Cut in the cold vegan butter with a pastry cutter or fork until the mixture resembles coarse crumbs, then press evenly into the prepared pan. Bake for 15–18 minutes, or until the edges are lightly golden; remove from the oven and set aside while you make the filling.For this step
- 1 1/4 cupsAll-purpose flour
- 1 cupGranulated sugar (total)
- 2/3 cupVegan butter, cold
- 1/4 tspFine sea salt
Step 3: Prepare the lemon filling
Whisk the cornstarch with the reserved granulated sugar and the unsweetened soy milk in a medium saucepan until smooth. Cook over medium heat, stirring constantly, until the mixture thickens and begins to bubble. Remove from heat and whisk in the fresh lemon juice and lemon zest until completely combined and glossy; if the mixture cools and tightens, briefly return to low heat while stirring.For this step
- 1/4 cupCornstarch
- 1/2 cupFresh lemon juice
- 2 tbspLemon zest
- 1/3 cupUnsweetened soy milk (or other unsweetened plant milk)
Step 4: Assemble and bake
Pour the hot lemon filling over the warm baked crust and smooth the top. Return the pan to the oven and bake for 18–22 minutes, or until the filling is set around the edges and only slightly jiggly in the center. Remove from the oven and let cool to room temperature, then refrigerate at least 1 hour (longer improves slicing).Step 5: Slice and finish
Use the parchment overhang to lift the chilled slab from the pan and place on a cutting board. Dust the top with confectioners' sugar, then slice into 8 bars using a sharp knife wiped between cuts for clean edges. Serve chilled or at cool room temperature.For this step
- 1/4 cupConfectioners' (powdered) sugar, for dusting


- Preheat the oven to 350°F (175°C). Line an 8x8-inch (20x20 cm) baking pan with parchment paper, leaving an overhang on two sides for easy removal, and lightly grease the paper.
- In a bowl, combine the all-purpose flour, 1/3 cup of the granulated sugar (reserve the rest for the filling), and salt. Cut in the cold vegan butter with a pastry cutter or fork until the mixture resembles coarse crumbs, then press evenly into the prepared pan. Bake for 15–18 minutes, or until the edges are lightly golden; remove from the oven and set aside while you make the filling.
- Whisk the cornstarch with the reserved granulated sugar and the unsweetened soy milk in a medium saucepan until smooth. Cook over medium heat, stirring constantly, until the mixture thickens and begins to bubble. Remove from heat and whisk in the fresh lemon juice and lemon zest until completely combined and glossy; if the mixture cools and tightens, briefly return to low heat while stirring.
- Pour the hot lemon filling over the warm baked crust and smooth the top. Return the pan to the oven and bake for 18–22 minutes, or until the filling is set around the edges and only slightly jiggly in the center. Remove from the oven and let cool to room temperature, then refrigerate at least 1 hour (longer improves slicing).
- Use the parchment overhang to lift the chilled slab from the pan and place on a cutting board. Dust the top with confectioners' sugar, then slice into 8 bars using a sharp knife wiped between cuts for clean edges. Serve chilled or at cool room temperature.
Vegan Lemon Bars Tips
Keep butter very cold
Cut the vegan butter into small cubes and work quickly so the dough stays cold; this gives the crust its flaky, sandy texture rather than becoming greasy.
Press crust evenly
Use the bottom of a flat measuring cup to press the crust into the pan for a uniform thickness, which ensures even baking and clean slices.
Temper the filling
Whisk the cornstarch with the sugar and soy milk until completely smooth before heating to prevent lumps and to achieve a silky curd.
Pour while hot
Pour the lemon filling over the warm (not piping hot) crust right away; the heat helps the layers bond and gives a glossy finish to the top.
Chill thoroughly before cutting
Refrigerate for at least an hour, preferably longer, so the bars firm up and slice without tearing; wipe the knife between cuts for sharp edges.
Vegan Lemon Bars Variations and Substitutions
Lime or Citrus Mix
Substitute lime juice for lemon or use a 50/50 combo of lemon and orange for a sweeter, more floral curd; adjust sugar slightly if using sweeter citrus.
Gluten-Free Crust
Replace the all-purpose flour with a 1:1 gluten-free baking blend that contains xanthan gum; press and blind-bake the crust a couple minutes longer if it seems fragile.
Coconut Almond Crust
For a nuttier base, replace 1/4 cup of the flour with finely ground almonds and use coconut oil instead of vegan butter, pressing firmly to compensate for crumbliness.
Less Sweet Option
Reduce total granulated sugar by 2–3 tablespoons if you prefer more tartness; taste the hot filling and add a touch of maple syrup if it needs rounding out.
How to Store and Make Vegan Lemon Bars Ahead
Store leftover bars chilled in an airtight container for up to 4 days; place parchment between layers to prevent sticking. For longer storage, freeze individual slices wrapped tightly in plastic and foil for up to 2 months, then thaw in the refrigerator overnight. If dusted with powdered sugar, wait to add it until just before serving to avoid bleeding or moisture spots.
What to Serve With Vegan Lemon Bars
Serve chilled or at cool room temperature with a dollop of lightly sweetened whipped coconut cream or a few macerated berries to balance the tartness. Pair with Earl Grey or a floral white tea for afternoon tea, or offer a sparkling rosé or Prosecco for a celebratory dessert course. Present on a simple white plate and garnish with a thin strip of lemon zest for a clean, elegant look.
Vegan Lemon Bars FAQs
Can I use a different plant milk?
Yes — almond, oat, or cashew milk will work, but fuller-fat options (like oat or cashew) give a slightly creamier mouthfeel while very thin milks may require a tiny extra minute of cooking to thicken.
Why did my filling become grainy or lumpy?
Lumps usually come from undissolved cornstarch or sudden high heat; always whisk the cornstarch with the sugar and milk until smooth, and cook over medium heat while stirring constantly to reach a glossy, lump-free texture.
The filling wept—what happened?
Weeping can occur if the curd wasn’t cooked long enough to fully gelatinize the cornstarch or if the bars were left too warm before refrigerating; return the pan to low heat while stirring to reincorporate any separated liquid, then chill thoroughly.
Can I make these ahead for an event?
Absolutely — make them a day or two in advance and keep chilled; they slice cleaner after refrigerating and taste just as bright the next day. Add powdered sugar right before serving to keep the top pristine.
How do I get perfectly clean slices?
Use a long, sharp knife warmed under hot water and wiped dry between cuts, or refrigerate until firm and use a plastic knife for thin, precise slices to avoid dragging the filling.
About the author
Jake WoodsHello, I'm Jake. I started this recipe site with the idea that I hated recipe websites that overwhelm you with long stories and ads just to see plain content that's not helpful. My goal is to provide you with quality recipes, simple ideas and a fun cooking experience. There's lots of fun things to cook, and I think as you browse the site you'll find that TopShelf.Recipes is the place for quality recipes on the web.
See all recipes by Jake Woods →Ratings & Reviews
Did you make this recipe?
Be the first to share your experience.
Nutrition Facts
Per serving: 1 bar (95g)
Nutrition values are estimated from USDA ingredient data and may vary based on preparation, brands, and portion sizes. Values are provided for informational purposes only.
Keep Reading
Guides & articles for this recipe
Guides
Grilled & Campfire Seasonal Sweets: 12 Crowd‑Favorite Desserts and How to Make Them Year‑Round
A season-by-season guide to 12 grill- and campfire-friendly desserts with flame-safe techniques, make-ahead strategies, vegetarian and gluten-free swaps, plus serving and storage tips so your outdoor sweets shine any time of year.

Guides
Summer Weeknight Grilling Playbook: 4-Week Rotating Meal Plan with Quick Seasonal Recipes, Make‑Ahead Sides & Grill‑First Desserts
A practical, four-week summer grilling playbook built for busy weeknights: 12 fast mains, 8 make‑ahead sides, 4 grill-forward desserts, weekly shopping lists, prep timelines, and smart tips for backyard, tailgate, or campsite cooking. Get the rhythm of easy, seasonal grilling that keeps dinner fresh and fast.

Healthy Eating
Gluten-Free Weeknight Grilling Plan
A 7-day gluten-free weeknight grilling plan with quick, family-friendly recipes, prep-ahead timelines, and a printable shopping list that spotlights late-summer produce and pantry staples. Includes clear cross-contamination safety tips and simple swaps to keep dinners fast and crowd-pleasing.
More from Desserts
View all Desserts recipes →
Easy Peanut Butter Bars

Chocolate Peanut Butter Chex Mix

Molten Lemon Cake

Boozy Red White Blue Popsicles (Vodka Ice Pops for Adults)

Salted Caramel Stuffed Brownies with Crispy Edges and Sea Salt

Poached Pears with Pistachio

Affogato with Caramel

Canning Peaches Light Syrup

Cottage Cheese Cookie Dough (High Protein)
Ask me anything about this recipe — substitutions, scaling, techniques, timing.
Powered by AI · 6 questions per 5 minutes, 30 per day