White Chocolate Cherry Skulls
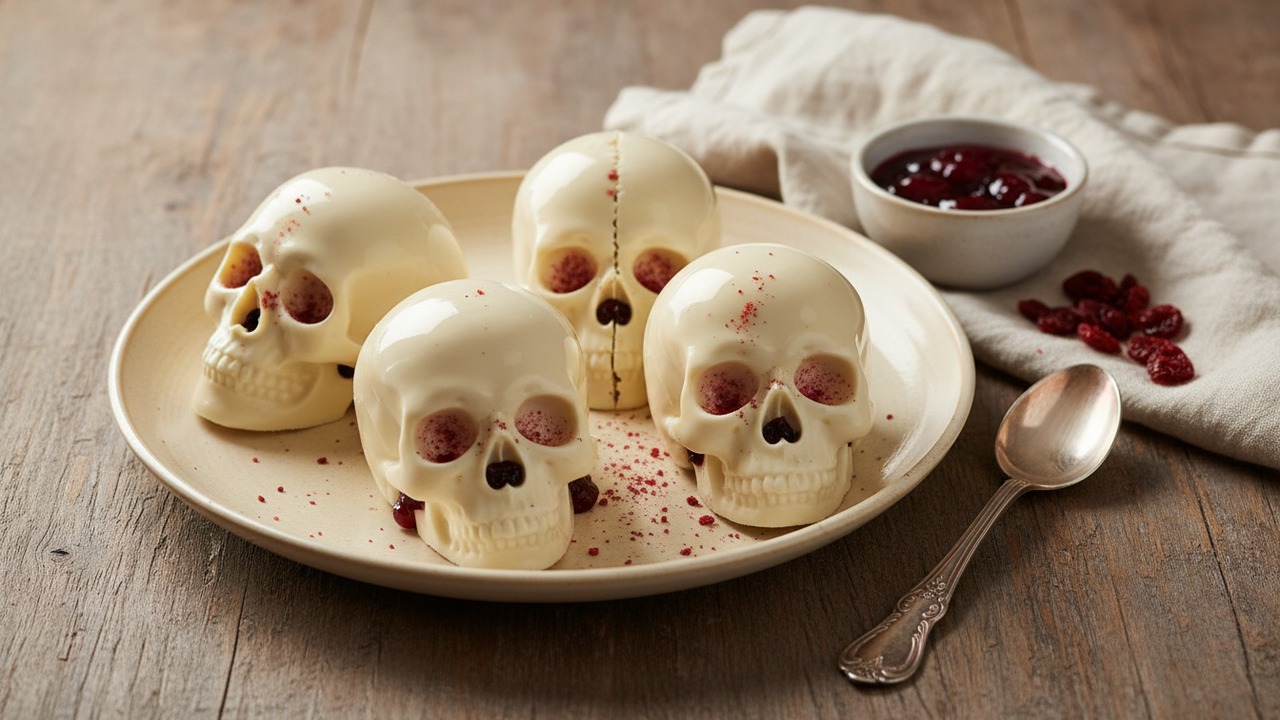
Molded white chocolate candies filled with tart dried cherries and a hit of cherry jam, finished with a whisper of freeze-dried cherry dust and flaky sea salt. No baking required — these spooky skulls are perfect for Halloween, parties, or an elegant homemade treat.
Ingredient Spotlight
white chocolate (chips or couverture)
White chocolate is made from cocoa butter, sugar and milk solids rather than cocoa solids, so it has a sweet, creamy vanilla-forward flavor rather than a chocolatey one; “couverture” refers to higher-cocoa-butter chocolate intended for tempering and glossy coatings. It’s used widely in baking and confectionery but behaves differently from dark/milk chocolate when melting and setting. Find it at supermarkets, specialty baking shops, or online; if you don’t have it, use milk chocolate (flavor and color will change) or candy melts as a last resort.
Ingredient Spotlight
dried tart cherries, chopped
Dried tart cherries (often from Montmorency/ sour cherry varieties) are dehydrated cherries with a pronounced tangy-acidic flavor and chewy texture that’s brighter and less sweet than typical sweet dried cherries. They’re common in New England and baking recipes but may be less familiar in some regions; look for them in grocery stores, natural-food aisles or online. Substitute with dried cranberries for similar tartness, or use regular dried cherries plus a splash of lemon juice to boost acidity.
Ingredient Spotlight
freeze-dried cherries, crushed to powder
Freeze-dried cherries are fruit that’s been frozen and dehydrated under vacuum, yielding an intensely flavored, very dry fruit that can be blitzed to a vibrant, shelf-stable powder used for color and concentrated tart cherry flavor. They’re popular in pastry, decorating and powdered flavorings and are sold by specialty baking suppliers, health-food stores and online; if unavailable, you can pulse whole freeze-dried cherries into powder yourself or substitute with tart cherry juice concentrate reduced to a thicker syrup (flavor and texture will differ) or powdered freeze-dried raspberries/strawberries for a similar tart-fruity note.
Jake Woods's note
"These white chocolate skulls are an easy make-ahead treat that look impressively seasonal but are simple to assemble. Home cooks will love that they need no tempering skill — just gentle melting, a mold, and a little chill time."
About This Recipe
These White Chocolate Cherry Skulls land right at the fun-but-elegant intersection: glossy, buttery white chocolate shells give a first sweet, melt-in-the-mouth impression that’s instantly cut by a bright, chewy core of tart dried cherries and a spoonful of cherry preserves. The freeze-dried cherry dust adds a whispered, natural rosiness to the eye sockets while concentrating cherry flavor without adding moisture, and a flake of sea salt on each skull amplifies the fruit and quiets the white chocolate’s sweetness. Using a silicone skull mold keeps the making simple while delivering an impressive, hand-finished look.
What makes this version work is restraint—thin shells for a delicate snap, a fairly dry but sticky cherry filling so the centers don’t ooze, and a light touch of coconut oil so the chocolate flows and sets with a satiny sheen. It’s a no-bake recipe that suits hosts who want homemade favors, people who don’t want to temper chocolate, or anyone looking for a seasonal confection that reads spooky but tastes polished and balanced.
Ingredients for White Chocolate Cherry Skulls
- 12 oz white chocolate (chips or couverture)
- 1 tbsp coconut oil (solid or liquid)
- 1 tsp vanilla extract
- 3/4 cup dried tart cherries, chopped
- 1/4 cup cherry preserves (seedless)
- 2 tbsp freeze-dried cherries, crushed to powder
- 1/4 tsp flaky sea salt
Kitchen Equipment
1 tool
Large Skull Silicone Mold
Required
Amazon links are paid links. As an Amazon Associate we earn from qualifying purchases.
How to Make White Chocolate Cherry Skulls
Step 1: Melt and flavor the white chocolate
Active 8 min
Chop or weigh the white chocolate, place it in a heatproof bowl with the coconut oil. Melt gently in 20–30 second bursts in the microwave, stirring between bursts until smooth (or use a double boiler). Stir in the vanilla. You will use part of this melted chocolate for the shells (about 1/3, roughly 4 oz / 110 g) and reserve the remainder for sealing later.For this step
- 1 tbspcoconut oil (solid or liquid)
- 1 tspvanilla extract
Step 2: Form thin chocolate skull shells
Active 10 min · Passive 5 min
Working quickly, spoon about 1/3 of the melted white chocolate (about 4 oz / 110 g) into a clean silicone skull mold. Tilt and tap the mold so chocolate coats all cavity walls; scrape away excess to leave a thin shell. Place the mold on a tray and chill in the refrigerator for 5 minutes to set the shells.Step 3: Prepare and add the cherry filling
Active 6 min · Passive 10 min
While shells chill, chop the dried tart cherries to small pieces and stir with the cherry preserves so you have a spoonable, slightly sticky filling. Remove the chilled shells from the fridge and drop about 1/2 teaspoon of the chopped cherry mixture into the center of each shell cavity (leave a small border so shells can be sealed). After filling, return the mold to the fridge and chill 10 minutes so the filling firms slightly.For this step
- 3/4 cupdried tart cherries, chopped
- 1/4 cupcherry preserves (seedless)
Step 4: Seal the skulls with remaining chocolate
Active 3 min · Passive 20 min
Rewarm the remaining melted white chocolate briefly if needed and spoon it over each filled cavity to seal (use the remaining ~8 oz / 230 g of melted chocolate). Smooth the backs with a spatula so each cavity is fully closed. Refrigerate the mold for 20 minutes, until the candies are completely firm — this recipe makes about 20 skulls depending on mold size.Step 5: Unmold and finish
Active 3 min
Gently pop the skulls from the silicone mold onto a tray. Dust each skull lightly with the crushed freeze-dried cherry powder to give rosy eye sockets or accents, and finish with a tiny pinch of flaky sea salt on each for contrast.For this step
- 2 tbspfreeze-dried cherries, crushed to powder
- 1/4 tspflaky sea salt
Step 6: Store and serve
Active 2 min
Store the skulls in an airtight container in the fridge for up to 2 weeks or at cool room temperature for 2–3 days. Serve chilled or at cool room temperature as a festive treat or party favor.


- Chop or weigh the white chocolate, place it in a heatproof bowl with the coconut oil. Melt gently in 20–30 second bursts in the microwave, stirring between bursts until smooth (or use a double boiler). Stir in the vanilla. You will use part of this melted chocolate for the shells (about 1/3, roughly 4 oz / 110 g) and reserve the remainder for sealing later.
- Working quickly, spoon about 1/3 of the melted white chocolate (about 4 oz / 110 g) into a clean silicone skull mold. Tilt and tap the mold so chocolate coats all cavity walls; scrape away excess to leave a thin shell. Place the mold on a tray and chill in the refrigerator for 5 minutes to set the shells.
- While shells chill, chop the dried tart cherries to small pieces and stir with the cherry preserves so you have a spoonable, slightly sticky filling. Remove the chilled shells from the fridge and drop about 1/2 teaspoon of the chopped cherry mixture into the center of each shell cavity (leave a small border so shells can be sealed). After filling, return the mold to the fridge and chill 10 minutes so the filling firms slightly.
- Rewarm the remaining melted white chocolate briefly if needed and spoon it over each filled cavity to seal (use the remaining ~8 oz / 230 g of melted chocolate). Smooth the backs with a spatula so each cavity is fully closed. Refrigerate the mold for 20 minutes, until the candies are completely firm — this recipe makes about 20 skulls depending on mold size.
- Gently pop the skulls from the silicone mold onto a tray. Dust each skull lightly with the crushed freeze-dried cherry powder to give rosy eye sockets or accents, and finish with a tiny pinch of flaky sea salt on each for contrast.
- Store the skulls in an airtight container in the fridge for up to 2 weeks or at cool room temperature for 2–3 days. Serve chilled or at cool room temperature as a festive treat or party favor.
White Chocolate Cherry Skulls Tips
Choose quality chocolate
Use good white chocolate or couverture rather than cheap chips for a cleaner melt and better snap; look for cocoa butter in the ingredients list.
Add coconut oil sparingly
One tablespoon improves flow and shine, but more will soften the set; stick to the recipe amount to keep the shells firm.
Make uniformly thin shells
Spoon, tilt, and scrape excess quickly then chill for just a few minutes so the shell sets before adding filling—this prevents gaps and weak spots.
Control filling moisture
Mix chopped dried cherries with preserves until spoonable but not runny, and return the filled molds to the fridge so the centers firm slightly before sealing.
Rewarm chocolate gently
Heat the reserved chocolate in very short microwave bursts or over simmering water; overheating causes graininess and can burn the chocolate.
White Chocolate Cherry Skulls Variations and Substitutions
Dark Chocolate Skulls
Swap the white chocolate for good-quality dark or semisweet chocolate for a more classic, less sweet contrast with the cherries; reduce or omit the coconut oil for a firmer set.
Almond-Cherry Filling
Stir 1/4 teaspoon almond extract and a tablespoon of toasted, finely chopped almonds into the cherry preserves for a nutty, marzipan-like note that pairs beautifully with white chocolate.
Vegan/Dairy-Free Option
Use a certified dairy-free white chocolate and plant-based coconut oil; check that your preserves contain no gelatin and your freeze-dried cherries are unsweetened.
Boozy Cherry Centers
Soak the dried cherries in a tablespoon of kirsch, brandy, or cherry liqueur for 30 minutes, then drain and mix with preserves for an adult twist; reduce the preserves slightly if the mixture seems too loose.
How to Store and Make White Chocolate Cherry Skulls Ahead
Store the skulls in a single layer in an airtight container lined with parchment, keeping them chilled to maintain shape and shine. They will keep in the refrigerator for up to two weeks or at a cool room temperature for 2–3 days; do not store near strong odors. If you need to freeze them, wrap individually and freeze up to one month, then thaw in the fridge before bringing to cool room temperature to avoid condensation.
What to Serve With White Chocolate Cherry Skulls
Present the skulls on a matte black slate or a mirrored tray for dramatic contrast, using a sprinkle of extra freeze-dried cherry dust around the plate. Pair with a slightly acidic drink—dry sparkling wine, a tart cherry cocktail, or a strong espresso—to cut the white chocolate’s sweetness and highlight the tart cherry center.
White Chocolate Cherry Skulls FAQs
Can I use white chocolate chips instead of couverture?
Yes, but couverture with higher cocoa butter will melt more smoothly and set with a better sheen; if using chips, add the specified coconut oil to improve texture and flow.
Why do you add coconut oil to the chocolate?
A small amount thins the melted white chocolate so it coats mold cavities evenly and gives a glossier finish; too much will make the shells soft and prone to melting at room temperature.
My skulls have air gaps or thin spots—how can I prevent that?
Work quickly when coating the cavities, tapping and rotating the mold to let chocolate settle into details, scraping excess, then chilling briefly before adding filling so the shell holds its shape.
Will the cherry preserves make the chocolates soggy over time?
Using mostly chopped dried cherries with only a spoonful of preserves keeps the centers fairly dry; still, store chilled and consume within two weeks to avoid moisture softening the shells.
Can I temper the white chocolate for a longer shelf life?
You can temper white chocolate, but it’s more challenging than dark; this recipe avoids full tempering by using coconut oil and refrigeration—tempering will improve snap and bloom-resistance if you’re experienced.
How do I unmold the skulls without damaging them?
Pop the silicone mold off the skulls rather than pushing the chocolates through, and let the mold sit at room temperature for a minute if it’s been very cold to prevent a sticky, soft exterior.
About the author
Jake WoodsHello, I'm Jake. I started this recipe site with the idea that I hated recipe websites that overwhelm you with long stories and ads just to see plain content that's not helpful. My goal is to provide you with quality recipes, simple ideas and a fun cooking experience. There's lots of fun things to cook, and I think as you browse the site you'll find that TopShelf.Recipes is the place for quality recipes on the web.
See all recipes by Jake Woods →Ratings & Reviews
Did you make this recipe?
Be the first to share your experience.
Nutrition Facts
Per serving: 1 serving
Nutrition values are estimated from USDA ingredient data and may vary based on preparation, brands, and portion sizes. Values are provided for informational purposes only.
Keep Reading
Guides & articles for this recipe

Recipes
Top 10 Halloween Recipes
Ten easy, showy Halloween recipes to feed a crowd or level up trick-or-treat night. From spooky appetizers to eerie desserts and a punch that stains the rim, these picks balance dramatic presentation with home-kitchen simplicity.

Healthy Eating
Gluten-Free Weeknight Grilling Plan
A 7-day gluten-free weeknight grilling plan with quick, family-friendly recipes, prep-ahead timelines, and a printable shopping list that spotlights late-summer produce and pantry staples. Includes clear cross-contamination safety tips and simple swaps to keep dinners fast and crowd-pleasing.

Healthy Eating
Low-Fat Grill Swaps for Big Flavor
A practical guide to trimming fat from grilled meals without losing juiciness or char. Learn yogurt- and citrus-based marinades, lean protein picks, searing and indirect-heat tricks, plus 5 quick low-fat marinades and a simple weeknight plan.
More from General
View all General recipes →
Ghost Meringues

Mummy Jalapeño Poppers

Deep Fried Mini Apple Fritters

Easy Peanut Butter Bars

Lemon Butter Salmon

Carbonara Garlic Cream Sauce

Honey Garlic Glazed Salmon

One-pot Portuguese Chicken and Rice

Huli Huli Chicken
Ask me anything about this recipe — substitutions, scaling, techniques, timing.
Powered by AI · 6 questions per 5 minutes, 30 per day