Witch Finger Cookies
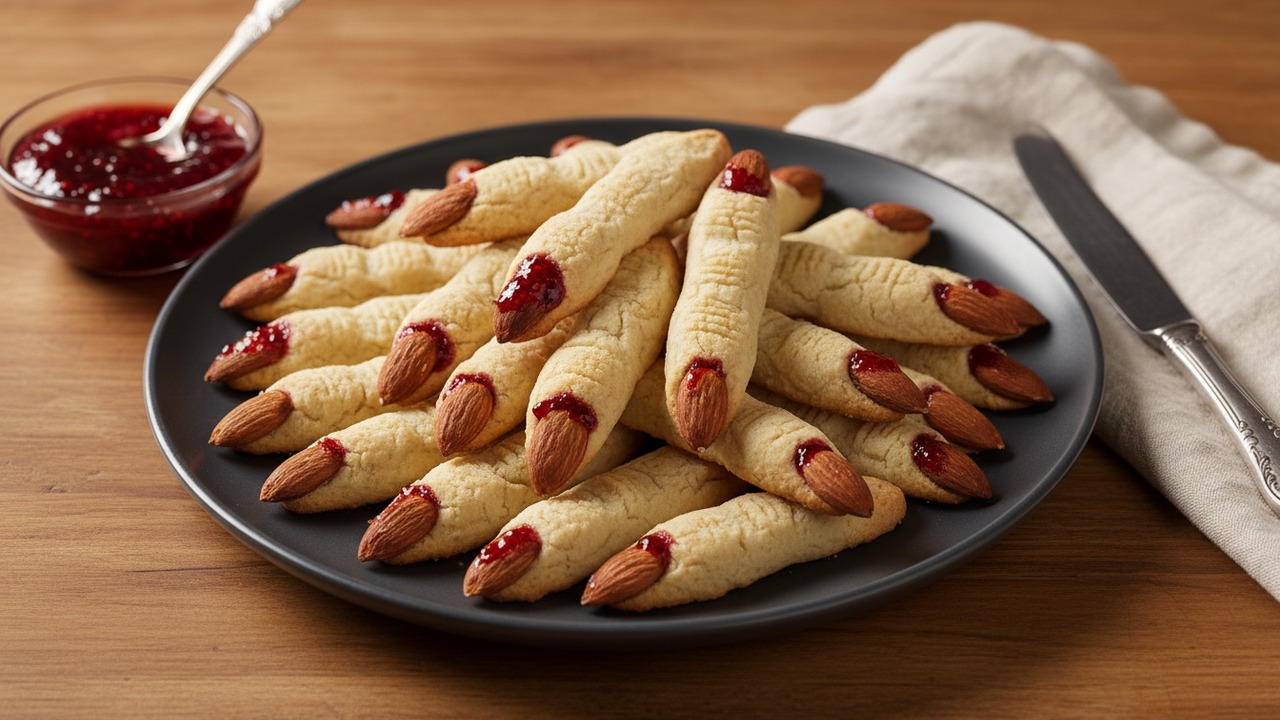
Crunchy-but-tender sugar cookies shaped like spooky witch fingers — perfect for Halloween bake-alongs, classroom treats, or a kid-friendly party activity. Almond “nails” and knuckle details make these delightfully creepy yet easy-to-make cookies.
Jake Woods's note
"These Witch Finger Cookies are an iconic Halloween bake — simple enough for kids to shape and decorate, but cute and creepy enough to be a hit at parties and school events. Expect gentle rolling and a short chill to make shaping easy."
About This Recipe
Witch Finger Cookies are the kind of seasonal showpiece that reads spooky but bakes like a dream: crunchy edges give way to a tender, slightly shortbread-y center, while the blanched almond “nail” and knuckle indentations sell the look without any complicated piping or tempering. They’re sweet without being cloying, with a buttery base that takes raspberry jam or red gel well if you want a little theatrical ‘bleeding’ detail. Because these are shaped by hand and baked relatively quickly, they’re perfect for a Halloween bake-along with friends, a classroom treat (with supervision for the almond nails), or a last-minute party platter that looks far more elaborate than it actually is.
What makes this version work is the balance between structure and tenderness: creaming the butter and sugar introduces just enough air for a light bite, while a short chill firms the dough so you can roll precise “fingers” without them flattening in the oven. Pressing the almond in before baking helps it adhere as the cookie sets, and baking until only pale golden keeps the interior soft rather than dry and crumbly. Minimal ingredients, straightforward steps, and room for creative decoration mean you can riff on the theme—add spice, swap the nail for a candy, or freeze shaped dough for a future fright-night rush.
Ingredients for Witch Finger Cookies
- 1 cup Unsalted butter, softened
- 3/4 cup Granulated sugar
- 1 large Large egg
- 1 tsp Pure vanilla extract
- 2 1/4 cups All-purpose flour
- 1 tsp Baking powder
- 1/2 tsp Salt
- 24 whole almonds Whole blanched almonds (for "fingernails")
- 3 tbsp Raspberry jam or red decorating gel (optional, for "blood")
How to Make Witch Finger Cookies
Step 1: Prep and cream wet ingredients
Preheat the oven to 350°F (175°C) and line two baking sheets with parchment. In a large bowl, cream the softened butter and granulated sugar with a hand or stand mixer until light and fluffy (about 2–3 minutes). Beat in the egg and vanilla until fully incorporated.For this step
- 1 cupUnsalted butter, softened
- 3/4 cupGranulated sugar
- 1 largeLarge egg
- 1 tspPure vanilla extract
Step 2: Add dry ingredients and form dough
Whisk together the all-purpose flour, baking powder, and salt in a separate bowl. Gradually add the dry mixture to the butter mixture and mix until a soft, slightly crumbly dough forms. Gather the dough into a disc, wrap in plastic, and chill in the refrigerator for 20–30 minutes to make shaping easier.For this step
- 2 1/4 cupsAll-purpose flour
- 1 tspBaking powder
- 1/2 tspSalt
Step 3: Shape into fingers and add almond nails
Divide the chilled dough into 24 equal pieces and roll each into a 2½–3 inch (6–8 cm) finger-shaped log, slightly tapering one end. Press a whole almond into the tapered end of each log to create the fingernail. Use the back of a butter knife to make three shallow knuckle indentations on each finger. (This recipe makes 24 cookies.)For this step
- 24 whole almondsWhole blanched almonds (for "fingernails")
Step 4: Bake until pale golden
Place the shaped cookies on the prepared baking sheets about 1½ inches apart. Bake in the preheated oven for 12–14 minutes, until the edges are just turning golden and the bottoms are set. Let cool on the baking sheet for 5 minutes, then transfer to a wire rack to cool completely.Step 5: Add "blood" and serve
If desired, dot a small amount of raspberry jam or red decorating gel at the base of the almond to simulate blood and wipe gently for a realistic effect. Arrange on a platter and enjoy — each cookie is one spooky treat (1 cookie per serving).For this step
- 3 tbspRaspberry jam or red decorating gel (optional, for "blood")


- Preheat the oven to 350°F (175°C) and line two baking sheets with parchment. In a large bowl, cream the softened butter and granulated sugar with a hand or stand mixer until light and fluffy (about 2–3 minutes). Beat in the egg and vanilla until fully incorporated.
- Whisk together the all-purpose flour, baking powder, and salt in a separate bowl. Gradually add the dry mixture to the butter mixture and mix until a soft, slightly crumbly dough forms. Gather the dough into a disc, wrap in plastic, and chill in the refrigerator for 20–30 minutes to make shaping easier.
- Divide the chilled dough into 24 equal pieces and roll each into a 2½–3 inch (6–8 cm) finger-shaped log, slightly tapering one end. Press a whole almond into the tapered end of each log to create the fingernail. Use the back of a butter knife to make three shallow knuckle indentations on each finger. (This recipe makes 24 cookies.)
- Place the shaped cookies on the prepared baking sheets about 1½ inches apart. Bake in the preheated oven for 12–14 minutes, until the edges are just turning golden and the bottoms are set. Let cool on the baking sheet for 5 minutes, then transfer to a wire rack to cool completely.
- If desired, dot a small amount of raspberry jam or red decorating gel at the base of the almond to simulate blood and wipe gently for a realistic effect. Arrange on a platter and enjoy — each cookie is one spooky treat (1 cookie per serving).
Witch Finger Cookies Tips
Chill the dough
A 20–30 minute chill firms the butter so the logs hold their shape when you roll and make the knuckle impressions without smudging.
Press almonds firmly
Push the blanched almond into the tapered end until it sits flush with the dough so it won’t pop out while baking.
Keep fingers uniform
Weigh or eyeball each piece to be the same size (about 24 pieces) for even baking and consistent cook time.
Watch the color closely
Bake until edges are just turning golden—overbaking dries them out; pull a minute early if you prefer a softer center.
Use a silicone mat
Baking on parchment or a silicone mat prevents sticking and helps the bottoms brown evenly without needing extra flour.
Witch Finger Cookies Variations and Substitutions
Nut-free 'nails'
Substitute the almonds with slivered chocolate pieces, candy corn, or a small dab of tinted royal icing to accommodate nut-free classrooms.
Chocolate witch fingers
Replace 1/3 cup of the flour with Dutch-processed cocoa for a chocolate version; you may need an extra tablespoon of flour if the dough gets very sticky.
Spiced autumn version
Add 1 tsp cinnamon and 1/4 tsp ground ginger to the dry mix for warm fall spice that pairs beautifully with raspberry “blood.”
Vegan or gluten-free swaps
Use vegan butter and a flax egg (1 tbsp flax + 3 tbsp water) for a vegan option, or swap in a 1:1 gluten-free flour blend with xanthan gum for gluten-free cookies.
How to Store and Make Witch Finger Cookies Ahead
Store cooled cookies in an airtight container at room temperature for up to 4 days, layering parchment between rows to protect the almonds and any jam details. If you add jam, refrigerate for longer storage and bring to room temperature before serving for best texture. Shaped unbaked dough can be frozen on a tray, then transferred to a bag for up to 2 months; bake straight from frozen, adding a minute or two to the time.
What to Serve With Witch Finger Cookies
Present on a simple platter lined with parchment and scatter a few faux spider webs or edible glitter for effect; a shallow bowl of extra raspberry jam or chocolate sauce makes a fun dipping option. Pair these with warm mulled apple cider, rich hot chocolate, or a bold coffee for guests old and young; for kids, a tall glass of cold milk is classic and balances the buttery sweetness.
Witch Finger Cookies FAQs
My almonds fell off—how can I prevent that?
Make sure the almond is pressed into chilled dough so it seats firmly; if you’re worried, press the almond in after 3–4 minutes of baking when the surface has begun to set, or glue it on after baking with a little jam or melted chocolate.
The dough is too sticky to shape—what do I do?
Return the dough to the fridge for 10–15 minutes; if it’s still tacky, knead in a tablespoon of flour at a time until it’s workable but not dry.
How can I make the fingers softer instead of crunchy?
Reduce oven time by 1–2 minutes and remove when edges are set but not browned; alternatively, increase the butter by 1–2 tablespoons for a slightly more tender crumb.
Can I make these ahead for a party?
Yes—shape and freeze the unbaked fingers on a tray, then store in a freezer bag for up to 2 months; bake from frozen, adding a couple of minutes to the time. Baked cookies also freeze well for finished make-ahead treats.
What's the best way to add realistic 'blood'?
Raspberry jam thinned with a teaspoon of water and a quick microwave stir makes a glossy, spreadable 'blood' that won’t overwhelm the cookie; use a toothpick to dab a small amount around the almond and wipe for a natural look.
About the author
Jake WoodsHello, I'm Jake. I started this recipe site with the idea that I hated recipe websites that overwhelm you with long stories and ads just to see plain content that's not helpful. My goal is to provide you with quality recipes, simple ideas and a fun cooking experience. There's lots of fun things to cook, and I think as you browse the site you'll find that TopShelf.Recipes is the place for quality recipes on the web.
See all recipes by Jake Woods →Ratings & Reviews
Did you make this recipe?
Be the first to share your experience.
Nutrition Facts
Per serving: 2 cookies (70g)
Nutrition values are estimated from USDA ingredient data and may vary based on preparation, brands, and portion sizes. Values are provided for informational purposes only.
Keep Reading
Guides & articles for this recipe
Tips & Techniques
Baking Soda and Tenderized Beef
Learn how baking soda can tenderize, boost browning, and improve moisture for ground beef and other meats. This practical guide covers the science, step-by-step techniques, common mistakes, and recipes to try.

Healthy Eating
Gluten-Free Weeknight Grilling Plan
A 7-day gluten-free weeknight grilling plan with quick, family-friendly recipes, prep-ahead timelines, and a printable shopping list that spotlights late-summer produce and pantry staples. Includes clear cross-contamination safety tips and simple swaps to keep dinners fast and crowd-pleasing.

Healthy Eating
Low-Fat Grill Swaps for Big Flavor
A practical guide to trimming fat from grilled meals without losing juiciness or char. Learn yogurt- and citrus-based marinades, lean protein picks, searing and indirect-heat tricks, plus 5 quick low-fat marinades and a simple weeknight plan.
More from Baking
View all Baking recipes →
Sheet-Pan Breakfast Hash

Juicy Oven-Baked Chicken Breasts (No-Dryness Method)

Gluten-Free Soft Pretzels

Sticky Gochujang Spare Ribs (Oven-Baked Korean-Inspired)

Apple Cider Muffins

Baked Buffalo Chicken Wings with Blue Cheese Dip (Crispy Oven Method)

Gluten-Free Honey Garlic Chicken Thighs with Tamari and Toasted Sesame

Sheet Pan Baked Honey Garlic Chicken Breasts with Roasted Vegetables

Cloud Bread Sandwiches
Ask me anything about this recipe — substitutions, scaling, techniques, timing.
Powered by AI · 6 questions per 5 minutes, 30 per day