Dry-Brined Turkey
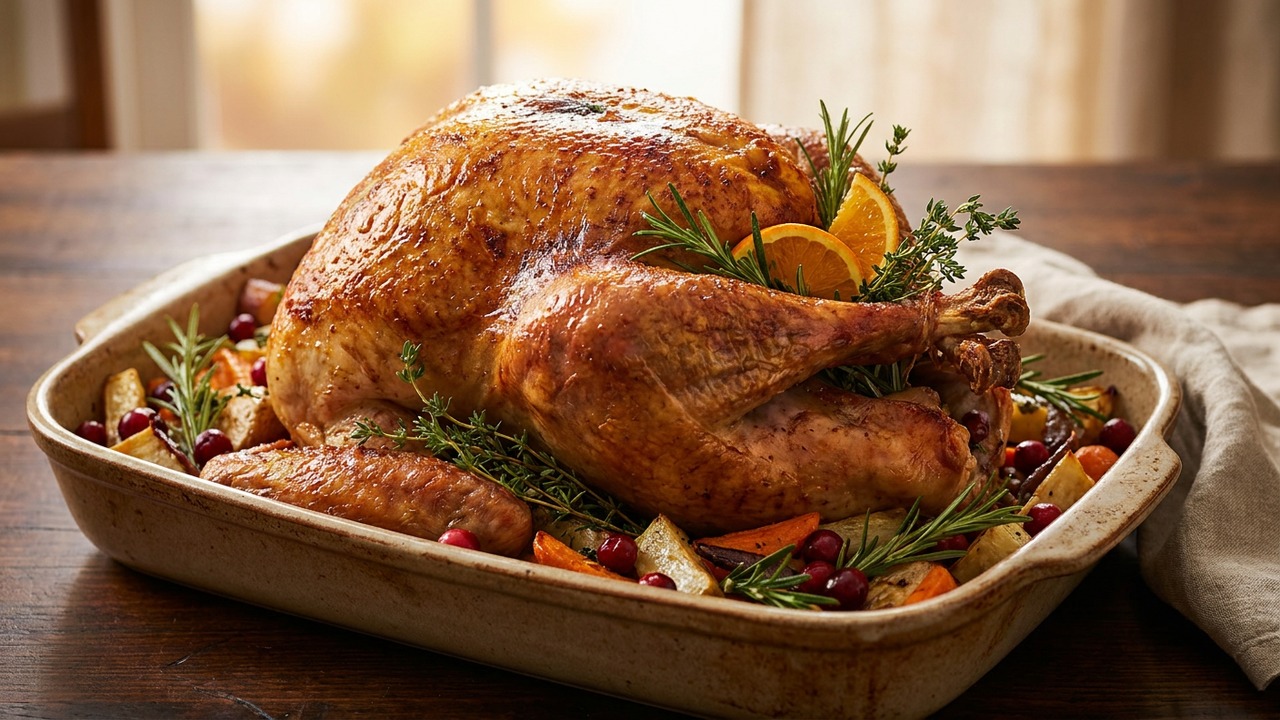
A reliable whole-bird dry-brine method that yields juicy, well-seasoned meat and extra-crisp skin. The technique is simple, requires minimal hands-on time, and shines as the centerpiece for Thanksgiving or any special roast dinner.
Jake Woods's note
"This recipe leans on a long, simple dry brine to concentrate flavor and preserve juiciness while producing beautifully crisp skin. Home cooks will love how little active work is required for reliably impressive results."
About This Recipe
This dry-brined turkey focuses on two simple promises: deeply seasoned meat and skin that actually crisps. By rubbing kosher salt and herbs under the skin and leaving the bird uncovered in the refrigerator, you concentrate flavor in the flesh while drying the outer surface so it browns evenly in the oven. The butter tucked under the skin adds fat for glossy color and silky breast meat, while a light sprinkle of black pepper and aromatics in the cavity keep the profile classic and crowd-pleasing.
The method is forgiving and low-fuss—no basting marathon or complicated injections—so it’s ideal if you want a dramatic centerpiece without constant stove-side babysitting. For a 12-pound bird the recipe’s 24-hour rhythm hits the sweet spot: enough time for seasoning to penetrate, not so long that the texture changes. Use Diamond Crystal kosher salt if you can, or reduce the quantity slightly for denser salts; small adjustments here will keep the balance between savory and briny. Whether you’re hosting a holiday dinner or simply roasting for a special Sunday supper, this approach reliably delivers juicy meat and an impressive, crackling skin.
Ingredients for Dry-Brined Turkey
- 12 lb Whole turkey (neck and giblets removed)
- 3 tbsp Kosher salt (Diamond Crystal preferred)
- 1 tbsp Granulated sugar (optional)
- 2 tbsp Fresh thyme leaves, chopped (or substitute rosemary)
- 6 tbsp Unsalted butter, softened
- 2 tbsp Olive oil
- 1 tsp Black pepper, freshly ground
- 1 batch Aromatics: 1 onion (quartered), 1 lemon (halved), 4 garlic cloves (crushed)
How to Make Dry-Brined Turkey
Step 1: Mix and apply the dry brine
Combine the kosher salt, granulated sugar, and chopped thyme in a small bowl. Pat the turkey very dry with paper towels, then loosen the skin over the breast by sliding your fingers between skin and meat. Sprinkle and rub roughly two-thirds of the salt mixture under the skin over the breasts and the remainder all over the exterior and inside the cavity, working to coat evenly. Place the turkey on a rack set in a sheet pan or roasting pan to catch any drips.For this step
- 12 lbWhole turkey (neck and giblets removed)
- 3 tbspKosher salt (Diamond Crystal preferred)
- 1 tbspGranulated sugar (optional)
- 2 tbspFresh thyme leaves, chopped (or substitute rosemary)
Step 2: Refrigerate uncovered to brine and dry the skin
Transfer the uncovered turkey on its rack to the refrigerator and leave it to dry-brine for 24 to 48 hours; 24 hours is recommended for a 12-pound bird. Leaving the skin exposed to the cold air concentrates flavor and helps the skin dry, which is essential for crisp roasting. Do not rinse the turkey after brining; pat it dry again with paper towels before roasting. If space is tight, place the bird in a shallow pan to catch condensation but keep it uncovered.Step 3: Preheat oven and finish prepping the bird
About 1 hour before roasting, remove the turkey from the fridge and let it sit at room temperature for 30 minutes while you preheat the oven to 325°F (163°C). Tuck the wing tips behind the shoulders and tie the legs together with kitchen twine if desired. Rub the skin all over with olive oil and season lightly with freshly ground black pepper; work the softened butter under the breast skin and over the thighs for added richness. Stuff the cavity with the prepared aromatics and position the turkey breast-side up on the rack in the roasting pan.For this step
- 6 tbspUnsalted butter, softened
- 2 tbspOlive oil
- 1 tspBlack pepper, freshly ground
- 1 batchAromatics: 1 onion (quartered), 1 lemon (halved), 4 garlic cloves (crushed)
Step 4: Roast until the proper internal temperature
Place the turkey in the preheated oven and roast at 325°F (163°C). Estimate about 13–15 minutes per pound; a 12-pound turkey will take roughly 2.5–3 hours, but start checking internal temperature after about 2 hours. Roast until the thickest part of the breast reaches 165°F (74°C) and the thickest part of the thigh reaches 175°F (79°C); use an instant-read thermometer for accuracy. If the skin is browning too quickly, tent the breast loosely with foil for the last portion of cooking.Step 5: Rest, carve, and serve
Remove the turkey from the oven and transfer it to a cutting board, tenting loosely with foil; let it rest undisturbed for 20–30 minutes so the juices redistribute. While it rests, pour the pan drippings into a fat separator or a saucepan to make gravy if desired. Carve the bird and serve warm, or reserve sliced meat for make-ahead platters; the dry-brine keeps the meat flavorful even if served slightly later.


- Combine the kosher salt, granulated sugar, and chopped thyme in a small bowl. Pat the turkey very dry with paper towels, then loosen the skin over the breast by sliding your fingers between skin and meat. Sprinkle and rub roughly two-thirds of the salt mixture under the skin over the breasts and the remainder all over the exterior and inside the cavity, working to coat evenly. Place the turkey on a rack set in a sheet pan or roasting pan to catch any drips.
- Transfer the uncovered turkey on its rack to the refrigerator and leave it to dry-brine for 24 to 48 hours; 24 hours is recommended for a 12-pound bird. Leaving the skin exposed to the cold air concentrates flavor and helps the skin dry, which is essential for crisp roasting. Do not rinse the turkey after brining; pat it dry again with paper towels before roasting. If space is tight, place the bird in a shallow pan to catch condensation but keep it uncovered.
- About 1 hour before roasting, remove the turkey from the fridge and let it sit at room temperature for 30 minutes while you preheat the oven to 325°F (163°C). Tuck the wing tips behind the shoulders and tie the legs together with kitchen twine if desired. Rub the skin all over with olive oil and season lightly with freshly ground black pepper; work the softened butter under the breast skin and over the thighs for added richness. Stuff the cavity with the prepared aromatics and position the turkey breast-side up on the rack in the roasting pan.
- Place the turkey in the preheated oven and roast at 325°F (163°C). Estimate about 13–15 minutes per pound; a 12-pound turkey will take roughly 2.5–3 hours, but start checking internal temperature after about 2 hours. Roast until the thickest part of the breast reaches 165°F (74°C) and the thickest part of the thigh reaches 175°F (79°C); use an instant-read thermometer for accuracy. If the skin is browning too quickly, tent the breast loosely with foil for the last portion of cooking.
- Remove the turkey from the oven and transfer it to a cutting board, tenting loosely with foil; let it rest undisturbed for 20–30 minutes so the juices redistribute. While it rests, pour the pan drippings into a fat separator or a saucepan to make gravy if desired. Carve the bird and serve warm, or reserve sliced meat for make-ahead platters; the dry-brine keeps the meat flavorful even if served slightly later.
Dry-Brined Turkey Tips
Adjust for salt brand
Diamond Crystal is lighter and flakier than Morton, so use the recipe amount as written for Diamond Crystal; if using Morton, cut the salt by about 25% to avoid over-salting.
Dry the skin thoroughly
Pat the turkey completely dry before brining and again right before roasting; any surface moisture prevents the skin from crisping properly.
Distribute butter evenly
Work softened butter gently under the breast skin and smear over the thighs so fat renders into the meat and promotes even browning without making the skin greasy.
Thermometer placement matters
Insert an instant-read thermometer into the thickest part of the breast and thigh without touching bone; begin checking temperature early to avoid overshooting.
Give it time to rest
Let the bird rest 20–30 minutes tented loosely with foil; this lets juices redistribute and makes carving cleaner and less messy.
Dry-Brined Turkey Variations and Substitutions
Herb swap — sage and rosemary
Replace thyme with chopped sage and rosemary for a woodsy, autumnal profile; these herbs pair particularly well with butter and citrus aromatics.
Citrus-forward brine
Add 1 tablespoon each of lemon and orange zest to the salt mixture and into the cavity for a brighter, slightly sweeter note that lifts the bird.
Spatchcock for speed
Butterfly the turkey (remove backbone and flatten) after brining to cut roasting time and give even browning across breast and thighs; roast at 425°F for roughly 6–8 minutes per pound.
Salt-conscious option
If you need a lower-sodium bird, halve the salt and brine for 12–18 hours, then rub with a flavorful butter compound of garlic, herbs and lemon to compensate for reduced salinity.
How to Store and Make Dry-Brined Turkey Ahead
Store carved turkey in shallow airtight containers or wrapped tightly in foil in the refrigerator for up to 3–4 days. For longer storage, freeze slices in single-layer portions on a baking sheet, then transfer to freezer bags for up to 3 months. Reheat gently in a low oven (300°F) covered with foil and a splash of stock to keep the meat from drying; for gravy or casseroles, freeze and reheat directly from frozen.
What to Serve With Dry-Brined Turkey
Serve this turkey with gravy made from the pan drippings, buttery mashed potatoes, and roasted root vegetables for a classic spread, and add a bright element like cranberry chutney or a lemon-herb vinaigrette–dressed salad to cut richness. For wine, pick a medium-bodied Chardonnay or a juicy Pinot Noir; for non-alcoholic options, sparkling apple cider complements the savory-sweet contrasts. Slice breast meat thinly and fan on a warmed platter with the dark meat arranged alongside for attractive presentation.
Dry-Brined Turkey FAQs
Can I brine for less than 24 hours?
Yes — a minimum of 12 hours will season the surface and improve texture, but 24 hours gives a noticeably deeper seasoning especially for a 12-pound bird.
Do I need to rinse the turkey after dry-brining?
No — rinsing will remove the flavor you’ve worked to build and will reintroduce moisture to the skin; simply pat the bird dry before roasting.
How do I know the turkey is done without overcooking?
Use an instant-read thermometer in the thickest part of the breast (165°F) and thigh (175°F); start checking early and pull the bird when these temps are reached because residual heat will continue to cook it during resting.
My skin browned too quickly — what should I do?
If the skin is darkening before the interior reaches temperature, tent the breast loosely with foil to slow browning while the meat finishes cooking.
Can I brine a stuffed turkey?
It’s safer and more reliable to brine the turkey and roast stuffing separately; cooking stuffing inside the bird can extend cook time and create food-safety challenges.
About the author
Jake WoodsHello, I'm Jake. I started this recipe site with the idea that I hated recipe websites that overwhelm you with long stories and ads just to see plain content that's not helpful. My goal is to provide you with quality recipes, simple ideas and a fun cooking experience. There's lots of fun things to cook, and I think as you browse the site you'll find that TopShelf.Recipes is the place for quality recipes on the web.
See all recipes by Jake Woods →Ratings & Reviews
Did you make this recipe?
Be the first to share your experience.
Nutrition Facts
Per serving: 1 serving
Nutrition values are estimated from USDA ingredient data and may vary based on preparation, brands, and portion sizes. Values are provided for informational purposes only.
Keep Reading
Guides & articles for this recipe
Tips & Techniques
Baking Soda and Tenderized Beef
Learn how baking soda can tenderize, boost browning, and improve moisture for ground beef and other meats. This practical guide covers the science, step-by-step techniques, common mistakes, and recipes to try.

Healthy Eating
Gluten-Free Weeknight Grilling Plan
A 7-day gluten-free weeknight grilling plan with quick, family-friendly recipes, prep-ahead timelines, and a printable shopping list that spotlights late-summer produce and pantry staples. Includes clear cross-contamination safety tips and simple swaps to keep dinners fast and crowd-pleasing.

Healthy Eating
Low-Fat Grill Swaps for Big Flavor
A practical guide to trimming fat from grilled meals without losing juiciness or char. Learn yogurt- and citrus-based marinades, lean protein picks, searing and indirect-heat tricks, plus 5 quick low-fat marinades and a simple weeknight plan.
More from Baking
View all Baking recipes →
Cloud Bread Sandwiches

Honey Mustard Chicken Nuggets

Cheddar Jalapeño Corn Muffins

Basque Burnt Cheesecake

30-Minute Sticky Baked Honey Garlic Chicken Thighs with Crisp Edges

Lemon Butter Salmon

Spritz Cookies

Brown Butter Vanilla Syrup

Honey Glazed Easter Ham
Ask me anything about this recipe — substitutions, scaling, techniques, timing.
Powered by AI · 6 questions per 5 minutes, 30 per day